Best way to re-align the P bracket ??

PetiteFleur

Well-Known Member
Joined
29 Feb 2008
Messages
5,245
Location
Suffolk
Visit site
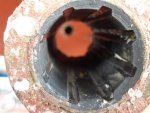
On my Moody 33, I know that the P bracket is not aligned to the prop shaft. I've removed the prop, Stripper and anodes and there is about 3mm vertical movement in the cutlass bearing and just looking at the wear pattern, the P bracket is not aligned correctly with the shaft. I did notice this several years ago when I re-engined when it was it obvious it had been like it from new. So am thinking about re-aligning the P bracket. My first thought would be to pack out the P bracket with washers between the bracket base and hull. Once aligned correctly, with a new cutlass bearing, I would tighten up with suitable mastic, say Sikaflex 291 which should stop any potential leaks. As the bracket has 4 bolts holding it down, I should be able to just put washers on the fore or aft ones to level up the shaft. Perhaps a packing strip of plastic would be better than washers, maybe the sort builders use?
Is there a better/easier way or should I just accept renewing the cutlass bearing every few years? This will be the 3rd time I will have renewed it in 13 years.
 
I've never tried this but we use it to confirm the P bracket is aligned. Get the new bearing made as a clearance fit in the bearing carrier/P bracket chock shaft centrally in bearing carrier at the front with wedges. When the carrier is aligned you will be able to slide the new bearing in by hand and rotate it. Normally we work on a clearance of between 0.05 and 0.15mm bearing OD to carrier ID. Tricky job on a small shaft set up though.
 
When I replaced my P-bracket I found it surprisingly easy to align it with the shaft by feel. With an Aquadrive it didn't need to be perfect but I am fairly confident it was. With a new cutless bearing I think you will do it easily. You are fortunate to have some means of removing it easily. Mine was glassed in without any form of bolting other than the internal angle irons, which were themselves glassed in. The complete story is on the website.
 
not sure if your "P" bracket is bonded into the hull or secured with through hull bolts.
Lifted my motorboat boat a season or two ago and one of the "P" brackets was bent at least an inch or two,causing the shaft to be very tight to turn in the cutlass bearing .
Boat is on drying blocks and its low water.
The "temporary" fix was as follows.
Undo six bolts holding "P" bracket to hull to ends of thread,this allows about 4" between bottom of bracket and surface of hull and an inch or two horizontal movement.
Remove any old sealant and clean with thinners.
Dash off to local factors and buy fast cure chopped strand glassfibre repair kit.
Mix up a decent a amount and fill gap twist bracket and hull.
Gently and quickly tighten/ loosen/adjust bolts until shaft turns nicely and freely by hand..
Clean off any surplus glassfibre squeezed out of joint.
Wait for it all to cure.
Remove all bolts and pack with sealer of your choice, then rebolt bracket to the hull via your newly formed pad.
Did actually get round to unbending the "P" bracket a year or two later.
Infill pad fell off after a good thump with wooden wedge and a hammer.
 
Last edited:
Are you sure it isn't aligned properly? it is supposed to be angled slightly to one side so the propshaft can slide out past the skeg, but you probably already know that and it sound as though you suspect yours is in the "up and down" direction. If it was me (and I'm not saying this is correct) I'd use big washers as you plan, to get the alignment, then add glass to the hull so the whole mating area was even as oldwill suggests to provide good contact with the "P" bracket. I also tend to agree with Vyv that it should be fairly easy to feel that it's aligned with a new bearing in place.

Could it be that the old engine had dropped slightly on its mounts (the top hat three bolt ones that are no longer available) causing the shaft to be no longer in alignment in that plane? And the new engine has gone in with the same misalignment? How can it be aligned with the shaft seal and out of alignment with the "P" bracket? If a shaft is supported in three places (cutlass, sterngland and engine) and one is out of alignment surely it causes the other two to appear misaligned too? do you not get lots of movement at the sterngland?

Sorry if you already know some of the above, just trying to help. I've a M33 too. Agree with you that it'd be great to get it sorted rather than changing cutlass bearings every three or four years!

Andrew
 
Your proposed approach is arse about to be vulgar. Unless your boat has been damaged and the P bracket replaced wrongly, it wont be in the wrong position. Your engine is. What you do is align the engine to the P bracket - thats why the engine has adjustable mounts.

So: fit a new bearing. Then install the shaft but dont bolt up the flange to the gearbox. Tip - you can often use the old shaft bearing to centralise the shaft in the stern tube at the engine end, otherwise it will sag. Loosen off the engine mounts so they can slide. Move the engine about until the flange lines up with the gearbox. Bolt up. Ideally you need the flange to meet the gearbox flange to within 0.001 inch at 0, 90, 180, 270 degrees.

Sounds easy and it is, albeit usually takes time.
 
Are you sure it isn't aligned properly? it is supposed to be angled slightly to one side so the propshaft can slide out past the skeg, but you probably already know that and it sound as though you suspect yours is in the "up and down" direction. If it was me (and I'm not saying this is correct) I'd use big washers as you plan, to get the alignment, then add glass to the hull so the whole mating area was even as oldwill suggests to provide good contact with the "P" bracket. I also tend to agree with Vyv that it should be fairly easy to feel that it's aligned with a new bearing in place.

Could it be that the old engine had dropped slightly on its mounts (the top hat three bolt ones that are no longer available) causing the shaft to be no longer in alignment in that plane? And the new engine has gone in with the same misalignment? How can it be aligned with the shaft seal and out of alignment with the "P" bracket? If a shaft is supported in three places (cutlass, sterngland and engine) and one is out of alignment surely it causes the other two to appear misaligned too? do you not get lots of movement at the sterngland?

Sorry if you already know some of the above, just trying to help. I've a M33 too. Agree with you that it'd be great to get it sorted rather than changing cutlass bearings every three or four years!

Andrew
Hi, thanks for your reply. I re-engined 12yrs ago, a year after purchase, with a new prop and shaft. I also fitted a new Volvo shaft seal to replace the original packing gland. To fit the new gland I made a housing to fit the existing two bolts which held it on to the boat. This part was identical apart from the diameter and length to suit the Volvo gland. I also fitted a new cutlass bearing in the P bracket at the same time. When aligning the engine I fitted the shaft and centralised the shaft in this new housing with temporary matchsticks. There was only about 2-3mm clearance around the shaft which is why I used matchsticks which were just the right thickness. I then aligned the engine to the shaft, removed the matchsticks, checked the alignment again and then slid the Volvo seal down and secured. I did not notice the misalignment on the P bracket at the time and it was only a few years later that I noticed. I'm going down tomorrow with a friend to get the old cutlass bearing out and look at the feasibility of re-aligning the P bracket. Thanks for all the suggestions - I'll update my progress later. (I've also asked on the MOA website)
 
I would have been very surprised that when built, your boat had the P bracket out of alignment. Before undertaking any changes I would check it is definitely out of alignment, rather than the engine.

When the engine was aligned, was this out of the water? If so, did you check it again when in the water. Your hull will be a different shape in the water?

Also after 12 years in place, have you checked the engine feet are not in need of replacement? And have you checked the engine alignment?

As you have already done so much removal of parts, I suggest you remove the shaft and use either a laser or taught cord to check the alignment of the P bracket. You might be able to do this just by eye, provided you can sight down from the back of the engine coupling.
 
Hi, thanks for your reply. I re-engined 12yrs ago, a year after purchase, with a new prop and shaft. I also fitted a new Volvo shaft seal to replace the original packing gland. To fit the new gland I made a housing to fit the existing two bolts which held it on to the boat. This part was identical apart from the diameter and length to suit the Volvo gland. I also fitted a new cutlass bearing in the P bracket at the same time. When aligning the engine I fitted the shaft and centralised the shaft in this new housing with temporary matchsticks. There was only about 2-3mm clearance around the shaft which is why I used matchsticks which were just the right thickness. I then aligned the engine to the shaft, removed the matchsticks, checked the alignment again and then slid the Volvo seal down and secured. I did not notice the misalignment on the P bracket at the time and it was only a few years later that I noticed. I'm going down tomorrow with a friend to get the old cutlass bearing out and look at the feasibility of re-aligning the P bracket. Thanks for all the suggestions - I'll update my progress later. (I've also asked on the MOA website)

this is the correct way of doing it. The position of the engine is largely irrelevant as it is the alignment of the P bracket with the stern tube that is critical and if you have the shaft central in the tube (if it were not then it would be touching the side) and getting off centre wear of the cutless then the P bracket is out of line.

So the basic idea is to centralise the shaft in the tube and adjust the P bracket if necessary so the gap around the shaft is equal and the cutless will slide in easily. Probably best done with the engine disconnected, then line the engine up in the normal way.
 
There is a thread on the MOA site about wear on cutless bearings which the OP will no doubt find. Ours was wearing unevenly, despite everything being in line - shaft and coupling checked in lathe, shaft slides in perfectly through P bracket and second cutless bearing in stern tube and couplings line up perfectly steel to steel. Shaft also checked with dial gauge. In the end, it appeared the Vetus cutless bearings were oversize I.D. and some owners changed to Countrose bearings which I think solved their problem. ASAP sent me another make (can't remember which though) which had smaller I.D. than the Vetus and that solved our problem. Photo shows the uneven wear we were getting which suggested wrongly that the P bracket was off to one side.
 

Attachments

  • 2015a.jpg
    2015a.jpg
    102.8 KB · Views: 9
sorry to differ but i had the problem of uneven cutless bearing wear which was cured by realigning the engine. And if you think about it a small change at the engine end is magnified as it goes along the shaft and therefore will be less at the stern tube than at the P bracket. A tiny tiny change at the coupling makes a difference 3 or 4 feet later down the shaft. not sure what stuffing box/seal you have but mine is close to the coupling and the packing material is bungey enough to take up a very small movement.
 
sorry to differ but i had the problem of uneven cutless bearing wear which was cured by realigning the engine. And if you think about it a small change at the engine end is magnified as it goes along the shaft and therefore will be less at the stern tube than at the P bracket. A tiny tiny change at the coupling makes a difference 3 or 4 feet later down the shaft. not sure what stuffing box/seal you have but mine is close to the coupling and the packing material is bungey enough to take up a very small movement.

If you disagree with my post about my boat, suggest you read it again. I have two cutless bearings, one in the P bracket and the other in the forward end of the stern tube. To connect the shaft to the gearbox (metal to metal couplings to check for alignment) with an out of line engine, would entail either bending the 1.25" shaft or distorting the engine mounts, both of which would be pretty obvious.
 
If you disagree with my post about my boat, suggest you read it again. I have two cutless bearings, one in the P bracket and the other in the forward end of the stern tube. To connect the shaft to the gearbox (metal to metal couplings to check for alignment) with an out of line engine, would entail either bending the 1.25" shaft or distorting the engine mounts, both of which would be pretty obvious.

I also believe that the problem is the engine end and that first the engine should be disconnected at its coupling and the see if the prop enters the cutless correctly then with the shaft correctly set up between the shaft seal end bearing and cutless realign the engine. I suspect the problem goes back to the e engining.
 
Thanks for all the replies, I've decided with my friend that I will do as has been suggested. Fit the new cutlass bearing, split the coupling and realign the engine. There is no bearing at the inboard end, just the rubber shaft seal. I'll move the seal, a Radice type, up the shaft, check it's central in the housing and realign the engine. I'll update when it's done later this week, weather permitting of course
 
I suspect there is a bearing in the shaft tube however if not the I suspect you will find the shaft is off centre and striking the opposite side to where you are finding cutless wear. You may find things are quieter in the cock pit after realigning the engine and this is certainly the right way to go. Please let us know how things are going and if you hit any snags.
 
Thanks for all the replies, I've decided with my friend that I will do as has been suggested. Fit the new cutlass bearing, split the coupling and realign the engine. There is no bearing at the inboard end, just the rubber shaft seal. I'll move the seal, a Radice type, up the shaft, check it's central in the housing and realign the engine. I'll update when it's done later this week, weather permitting of course
UPDATE - So went to the boat today and removed the P bracket, which was remarkably easy. {I had previously fitted the new cutlass bearing) I removed the rubber sealant around the edge, then undid the 4 nuts inside, 7/16" Whit socket required. All nuts undone easily then gently knocked the 4 countersunk screws through. Then the P bracket just came away with a screwdriver and a gentle pull. And what did I find - the bracket had a packing piece at the rear, which had obviously been fitted when built. I cleaned it up and fitted it dry with 2 stainless washers at the two rear holes, which greatly improved the fit of shaft to cutlass bearing. I can now easily rotate the shaft with my hand which was impossible before the packing washers. The shaft still needs lifting a trifle which I will do when I re-align the engine. I found one of the rear rubber engine mounts had sheared so I've to wait until the new mounts arrive. I'll also check the other mounts to make sure they are OK. I ordered two just in case. It was not at all obvious the mount had sheared and only obvious once removed. It was impossible to remove the mount as the thread had rusted badly so unbolted the bracket from the engine. Bracket is cleaned up and painted, I'm thinking of making a conical cover over this mount to prevent further rusting which happens when changing the engine anode as inevitably some water escapes.
Just to recap, there is no bearing at the inner end of the prop tube, only a Radice shaft seal then into the flexible coupling shaft clamp.

Do you have a photo of the P-bracket mounting that I could use on the website please? I have not come across one that would simply unbolt. would be a useful addition.
 
Do you have a photo of the P-bracket mounting that I could use on the website please? I have not come across one that would simply unbolt. would be a useful addition.

That is quite common in the MOBO world, and the Moody 33 was built by Marine Projects (Princess).
 

Other threads that may be of interest

Top