Yamaha 2hp outboard no spark

a.j.pearse12

New Member
Joined
10 Feb 2022
Messages
9
Visit site
I recently purchased a 2A 646 2hp Yamaha 2 stroke. Bought cheap as unknown condition. Its the old type with points. Quickly found there is no spark.

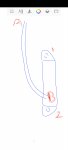
I have continuity through the coil and continuity through the HT lead from the spark plug end to the coil joint but can't get continuity from the end of the HT lead through the coil. The lead doesn't simply slot into the coil it is a solder joint which looks fine then the tab disappears into the coil. Given that the lead and coil have continuity individually what would be the best next step and likely issue? I'm assuming sourcing replacement parts would be tricky..
 
Possibly showing my lack of experience but simply that I get a beep from my multimeter when applied to either end of the coil (metal bits or screws) thought this was a very basic way of testing the windings on the coil. No beep if I test from HT lead to either end of the ignition coil
 
Thanks. I've been reading that forum. Lots of similarities but their ultimate faults seem to be HT lead and the stop switch. I'm hoping someone can let me know if the lack of continuity on the coil on mine could be the ultimate fault or it I'm mistaken
 
Are you using a digital volt meter? If so the continuity setting that beeps often has a lower resistance range, one of my meters will only beep and show a value if the resistance is below 500 ohm, all meters vary in this. To check the coil, depending on your meter you may have a manual range, if so switch the meter to its highest resistance range, if it only has auto ranging then maybe you can switch off the beeper, then see if you get a reading.
Typical resistance values of these sort of coils could be between 2000 and 30000 ohms.
If you measure on a high resistance range and still get an open circuit reading then the coil will need to be replaced.
 
Thanks for reply. That's interesting. The multimeter is certainly a cheap one so there may be something to this.

To clarify I've attached a little scribbled diagram. When I apply the leads to A and B I get continuity as well as 1 and 2. What I cant get is a reading between A and 1 or A and 2. I'll see if I can get a reading on the other settings as you say.
 

Attachments

  • Screenshot_20220211-090037.jpg
    Screenshot_20220211-090037.jpg
    168.9 KB · Views: 14
Okay new question.. I've taken apart the plastic sparkplug boot as I think the wire filament may have shrunk back from the contact point.

The boot has a metal insert that looks like a fuse that meets the base of the sparkplug (inside the plastic housing). It looks like however it's seated in the plastic cover there will be a small gap between the HT lead and the next part connecting to the sparkplug end. It looks deliberate. Is this a function of the design or is something strange going on?
 
Thanks for reply. That's interesting. The multimeter is certainly a cheap one so there may be something to this.

To clarify I've attached a little scribbled diagram. When I apply the leads to A and B I get continuity as well as 1 and 2. What I cant get is a reading between A and 1 or A and 2. I'll see if I can get a reading on the other settings as you say.
Measure the resistance of the primary and secondary windings separately using the resistance ranges of your multimeter ( LT connection to ground and HT connection to ground respectively)

I don't have values for a model as old as yours but I d expect the primary to have a resistance of around 200 ohms and the secondary to be around 3000 ohms

Good readings do don't necessarily mean the col is OK because you'll not detect a small number of shorted turns but if either winding is open circuit the coil is defunct.
 
Thanks guys, very helpful tips. Managed to get a spark and got it to start up (briefly). Now to figure out how to fix the clamp bracket that I broke trying to get it unseized! So annoyed.
 
Here it is. Tore the tab of metal/handle through the aluminium. Now the thread is still seized and it's missing a handle.. Need some heat and then a bodged new handle? Any tips? Will be shorter than the other side now too
 

Attachments

  • Screenshot_20220214-215935.jpg
    Screenshot_20220214-215935.jpg
    517.3 KB · Views: 22
Last edited:
Once you have the handle off you could cut off the domed end and replace the bolt with a countersunk one using 2 nuts locked together with possibly a washer underneath to spread the load on the domed bit.

Edited to include a (bad) sketch.20220215_082017.jpg
 
One problem after another! I've put the broken clamp on hold for the minute while I replace the impeller. Two questions!

I have the gearbox cover off. It looks like the old gasket/seal that fits under the gearbox cover is perished but I can't find a replacement anywhere even though new impeller kits are common and easy to find. Any ideas? Presumably the gearbox front seal NEEDS a gasket/ seal to stop water entering the box and mixing with the oil?

Secondly, I have removed the retaining circlip from the driveshaft and the bolts off from the lower leg but the whole unit won't budge. Any tips?
 
Top