Wooden Solo Dinghy Control Lines

Jed_L

New Member
Joined
12 Apr 2020
Messages
3
Visit site
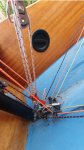
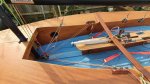
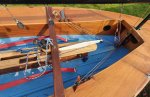
Hi all, for the last 5 years I have stored a wooden Solo Dinghy at home with the dream of having the time to prep and sail. In the current unfortunate situation we all find ourselves in, I have had time to take the covers off and I found all the parts - I think. With my fairly basic and limited knowledge, on checking over what is what and what goes where, it is fairly obvious I don't understand where to connect the control lines. I am used to lines going directly to cleats or jammers but I am presented with lines that loop from one side to the other and require connecting at the region at the bottom of the mast. I have guessed at some of it but the arrangement on the kicker is alluding me. I have been unsuccessful in finding any Solo related guides so far so any direction on what to do would really be appreciated. Stay safe, many thanks, Jed.
 

Attachments

  • Solo Control Lines - Smaller.jpg
    Solo Control Lines - Smaller.jpg
    168.3 KB · Views: 81
I am going to hazard a guess...

I reckon the centre block with a yellow line running each side should be suspended as a "cascade", with the pink/white line doing another purchase up to the boom and then down again...to the aforementioned block
 
I am going to hazard a guess...

I reckon the centre block with a yellow line running each side should be suspended as a "cascade", with the pink/white line doing another purchase up to the boom and then down again...to the aforementioned block
Yes.
I suspect the kicker as rigged is basically upside down?
Should be something like a 2:1 adjustable from either side, acting on a 3:1 or something.
Both my boats have 4:1 x 2:1 x 2:1
 
Hi Jed,
If you could take a picture a bit further out I can probably help with the layout.
If not these people will definitely be able to help.
http://www.cvrda.org

Hi Jasper, thank you for the response and offer of help. I have connected the Cunningham to the block closest to the mast and the outhaul to the middle block. My confusion is with the kicker. The only point to connect it to the mast is at the bottom and then any connection to the last block seems too close and so the control lines don't pull at all on the kicker. So I am definitely doing something wrong - if not all of it! Thanks again. Regards, Jed,
 

Attachments

  • Solo Control Lines - Smaller 002.jpg
    Solo Control Lines - Smaller 002.jpg
    557.6 KB · Views: 71
  • Solo Control Lines - Smaller 003.jpg
    Solo Control Lines - Smaller 003.jpg
    518.7 KB · Views: 72
  • Solo Control Lines - Smaller 004.jpg
    Solo Control Lines - Smaller 004.jpg
    483.1 KB · Views: 60
Looks about right, I sail a wooden solo, and my arrangement is pretty much identical.

Dont forget, with the sail on and the boom further up, that kicker will be a lot tighter. Just connect the tail of the kicker to the last "green" pulley at a positin that allows the right range of adjustement and you are done. I suspect with the sail on, you will find the end of the kicker tail is just the tight length to tie a bowline on that last pulley.


Untie all those hanks on the control line loose ends .. you need 1 to 2 m of loose line on each side. During the race, as you tack and gybe you will find you end up easing on one side then taking in on the opposite side on various legs and you need a fair bit of spare cord or you run out of adjustment during the race. before each race make sure the spare line is roughly centred again.
 
It looks like the kicker is quite forwards on the boom. Moving it back might help, but you don't want it to rub on the side decks.
If you rig it as 2x2x2x2:1 that won't be badly wrong.
I see you have a snap shackle to disconnect it to get the sail up, that helps avoid running out of movement.
You'll need to put the sail up to get the lengths right.
To avoid running out of string on one side, I splice my controls into continuous loops.
 
None of this helps with the problem that the horizontal distance between the turning block at the bottom of the kicker and the two side turning blocks is far too small to allow reasonable kicker travel.

Clearly block at the end of the kicker cascade needs to move a considerable distance; this could be vertically (as per the cunningham and outhall) or it could go aft and round a turning block at the front of the centreboard case. The former would mean missing out the last turning block at the base of the kicker, the latter would require an additional block.
 
Should look like this when fully extended:
P&B Harken 16:1 Spliced Kicker System (Type 2) (PBK2H16:1) | P&B

The last pulley then has the control line off to the turning blocks on the hog then the cleats either side.

My boat looks more like this, the empty block is a double, so it's rigged as 4:1 acting on a 2:1 acting on a 2:1, which again gives 16:1 with a bit more range.
P&B Solo Harken 16:1 Spliced Kicker System (SOLKH) | P&B

The Op has a snap shackle so the kicker can be freed to get the sail up, so less adjustment range is needed.
 
How old is the boat?
Solos are not complicated, you have traveller, kicker, cunningham, outhaul.
Plus probably a centreboard up/down?
The controls are each a separate system, no complex interconnections.
So longas each works adequately, no need to make ir fit someone else's diagram.
The class has been going over 50 years, so there is quite a variety of different fit-outs.
I would suggest checking out the class website and facebook pages.
Look to get it functioning with minimum changes , go sailing, then decide what you'd like different.
 
Ha. Got taken in by one of these resurected threads. I think threads should be locked after a few months. That way if you wanted to continue a conversation you would start a new thread and get a discussion going amongst those who currently have an interest.
 
Last edited:
Top