Princess Electric Sliding Windows

J12345T

Well-Known Member
Joined
9 Dec 2009
Messages
140
Location
New Zealand
Visit site
Hi All,

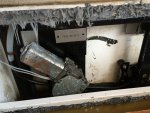
After finally sorting out the leaks in my port side electric sliding window (c2008 Princess 50 mark 3) I now have another problem with it. Recently, I've noticed a 'juddering' sound as the window nears (within 15mm) of the top of its travel. Initially I thought to just monitor the situation however, on closer inspection I've found that the window does not fully close. It stops ~10-15mm from the top.

I'm pretty familiar with getting access to the unit but have never attempted to remove/ fault find the mechanism. From memory it would seem to be a nightmare of a job. I've emailed Peter Harwood at Princess but have not received a reply as yet; maybe a lock down related issue?

Anyway, I know this is a common problem with these windows and just wondering if/ how anyone else has dealt with it and what advice you may have?

Cheers,

James.
 
From memory they have a thermal trip and when the window reaches the top it cuts out because the top of the frame will not let it travel any further, this causes the current to rise rapidly and the trip overheats and cuts out the motor, so basically it could be excess load causing the window to trip.

Look at the seals and ensure they are fitted correctly and they have no obstructions, if they bulge out this will be visible, try closing it while pushing the window up and see if it fully closes, if it does then it is being overloaded which could be several things. It could be the motor itself becoming weak, it could be the gearbox becoming worn or dry. basically the grease dries out and causes large loadings, it could be the guides which are loose and moving, it could be the mechanism itself, if it has cables then these could be worn, if it has rods then these could have their plastic connections worn out.
 
I have replaced the motors and mechanisms on severall Princess’s and yes its a pig of a job on some models. Before delving in try lubing the slides that the glass sits in with silicone spray. If the glass isn’t binding then you will have to examine the mechanism.
 
I've been lubricating mine to keep it going.
To get access to it if it goes is going to be a real ?astard.
It is just forward and behind the seating in the dinette right at the point where you can't reach.
Consequently, we only open it a small way (max of 9") in hope that it won't get stuck.
I did get some photos of the mechanism from Princess that were taken as it was built.
 
Thanks All,

Yes I've extensive experience in behind that dinette seat attending to the leaking drain box. I know where the mechanism is but the thought of accessing it to fix a mechanical issue fills me with dread. I'll try lubricating the slides but I don't unfortunately think that is the problem. I was just hoping there were some schematics of how the mechanism functions floating about so I could work out what may be happening.

I'll try again with Princess.

Many thanks.

James.
 
I thought if cutting a hatch in mine but the window box is surrounded by supports for the internal woodwork.

The following photos are specifically for the P67 but might be of help to you.
More importantly, I've attached two PDF files from Trend who make these window assemblies.
I hope they help - they did for me.


P67 window 3.resized.JPG


P67 window 4.resized.JPG

P67 window 5.resized.JPG

P67 window from above.resized.jpg

P67 window showing drain.resized.jpg
 

Attachments

Brilliant, thanks Hurricane, that's exactly the same unit as on our Pearl, in fact one of the photos is a Pearl. Especially useful as our port side window is a bit creaky and the glass comes out of the holding channel if it goes too far down. I'm also thinking of cutting a hatch in the unit to give me access from inside. Those PDFs are really useful.

Do you think any elements of the mechanism are serviceable or is it if there's a problem bin it and get a new one from Trend ?
 
Last edited:
Thanks All,

This is what I'm dealing with. Photo is from when we were sorting out the leaking drain box but I think you can see the access issues (actually not as bad as I remember).

Does anyone know how the mechanism actually works; ie. I assume there is a small gear box inside the housing which drives a cable system around a pulley? This is just a guess of course and I'd appreciate any first hand insight..

I just wonder what could be causing the 'juddering' and lack of motion as it nears the top? If doesn't sound like gears jumping or grinding, more like a kind of clutch slipping? Could the cable be slipping on the (theoretical) drum??

Cheers,

James.
 

Attachments

  • P50 III Port Window.jpg
    P50 III Port Window.jpg
    91.1 KB · Views: 47
Hi, has anyone done any work on any of these units ? My port side one is getting increasingly arthritic. I've been told it is just a "replace it" job but am keen to see if there's anything that can be done to service them.

I bet the cabling/gears/runners etc can benefit from a good clean and re-grease.

Haven't asked Trend yet how much for a replacement but will speak to them later today.
 
Just had a great chat with a very helpful person at Trend. They can supply a replacement motor if needed but also said from my description of it that it probably just needs a check over, service and re grease everything.
They said that if the motor's still working then it'll likely be the worm gear/slider mechanism, if theres issues with the motors then they tend to burn out and just stop working.
So next visit it's out with the dinette,
dremel an access hatch in the cassette and see how it all looks.
If I were you, I would mahe the access hole as big as you can.
Even if it means making an oversized cover to fit over you hole later.

Mine wouldn't be that easy to get to.
It is half way between the dinette and the port bathroom.
If I worked at it, I could probably make an access though.
In the meantime, I am lubricating it by squirting lubricant into the end of the flex drive.
I get access to the top of the cassette by removing the trim next to the window.
Then peer down from the top
It then looks a bit like this (but this pic was taken in the factory.

index.php
 
Thanks, I think ours might just be accessible if I remove the dinette seating and adjoining woodwork,. Yes thanks for the nod, I’ll make any access panel in the cassette as large as possible with my Dremel, can always epoxy the removed section back into place when I’ve finished.

Might get a chance this weekend but will report back with pics and results whenever I get into it.
 
Last edited:
So ours has finally given up...I thought it might be worth seeing if it was recoverable but having accessed the unit yesterday it is clearly beyond repair.

We took out most of that section of the upper dinette and multi tooled a large access hole , there is a bit more removed forward of the main cassette as the motor is the optional fwd mounted one, it's not in the confines of the main window area, and we needed space to get the motor out on the riser channel.

So Trend are sending a new unit this week and hopefully it'll be the correct fitment and I'll get it in and working this weekend,. I think I might paint as much as possible in black Hammerite and also really load up the mechanism and cable in waterproof grease before fitting.
Port window Motor Oct 2019 4mb.jpg
 
Interesting
You will make the panel removable, I assume.
Will the piece that you took out be the piece that goes back?

When princess created an access panel for me in the crews quarters, thats what they did.
Rather than fitting something over it, they screwed battens behind (on the inside) and screwed through from the front.
They used adhesive/sealant as well.
It looks like yours is behind the seats so anything would do - maybe a larger piece of epoxy treated ply???
 
Yes , def removeable. My current thinking is to silicon on a clear sheet (don't know quite why I'm thinking clear but it seems like a good enough idea!) that's about 25mm bigger on each edge. I was originally thinking of just epoxying the removed section back in but as you've said it might as well be a removeable panel. I like the idea of the battens behind , might well pinch that !

I guess it it shouldn't need to be waterproof as the cassette shouldn't fill up unless the drain tube gets blocked, it hasn't yet.

It will never be seen unless the whole lot comes out again to do the same job.

All ideas/ comments/improvements welcome at this stage...
 
How about some of this?
Clear Acrylic PLEXIGLAS Perspex Sheet XT Cut To Size Panels Plastic Material | eBay
They supply several sizes
For example a piece of A3 - 5mm thick is less than a tenner
I think it would be a better job than my other idea of a piece of epoxyed ply.
And clear so that you can see if anything is wrong inside without removing it.
Probably just screwed on - over the opening that you have made.

Also maybe blow the drain through whilst you can - IMO, compressed air would be best but maybe just a water hose for a few seconds.
If it like ours, it will run into a hopper and then go out with other drains.
 
Perfect ,thanks, that's exactly what I was thinking of, only got the old window mech out yesterday afternoon so haven't had a chance to look at sourcing material yet , but I'll get some from them, looks good.

Trend reckon I'll get the new bits later this week which would be nice as I can get it all back in this coming weekend ready for re launch the following week.

Thanks.
 
Well , am pleased to say it's all fixed. Trend delivered the new mechanism last Friday which worked out well as I went down to the boat Friday evening. The old motor was already out so I compared the new one to it just to check, everything looked the same.
Then cut the perspex and after fitting the mechanism ( which did have a few sweary moments as it's a bit of a struggle getting the bolts and nuts fitted), fixed the clear sheet in place checked everything worked ok again and pieced the interior back together. All told am quite pleased with the job although it was a fair bit of work removing and refitting the seating and trims etc. but we do have a nice working window again now.
New Window fitted 2mb.jpgNew Window Motor 3  2mp.jpgWindow completed 2mb.jpg
 
Check the drain tube going aft has a fall and that water drains away, it should go to a collector box in the engine room. We had several boats which had water in the cassette because there wasn’t a constant fall in the drain hose. The hose actually dipped then went up over the engine room bulkhead before falling to the collector box, this resulted in water sitting in the cassette and corroding the mechanism.
 
Thanks,not trying to be a know-it-all but did check water drained out the cassette, also as I cleaned the inside of it and ran some water in to see if it drained. A bit of an odd design as the drain tube exited the cassette horizontally on the side face not vertically out the base, albeit it’s fitted as low as possible but still means there will always be some water left in the base. It would have been best with a fall into a low point and drain from that.
 
Top