Old, old Autohelm tiller pilot ball bearing ran away from home

kronosmen

New Member
Joined
25 Apr 2020
Messages
10
Visit site
I have an Autohelm 2000 tiller pilot which I've had for over 40 years. It has been sitting for 30 years in a heated garage.

It is the one with the tiller ram and a separate control box. Not the one with the compass and not Raymarine.

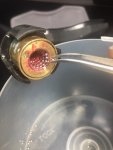
Anyway, the electronics and the motor all seem to work but the ram was seized.
I opened it up the tube and a zillion tiny ball bearing ran out.

The threads on the brass bushing are worn out/stripped out.
That I think I can repair using a brass helicoil.

However, where did all this tiny ball bearing call home?

I assume inside the gear drive assembly?

It appears that a snap ring holds that unit together? Is that correct?
The threaded rod that drives the ram rotates okay on the gear assembly but not too smoothly.

Any idea how involved it becomes if I remove that snap ring?
Also, any clue where I can find replacements for the tiny ball bearings?
And lastly, how difficult is it to return those ball bearings to their home?

Thanks
marty
 
I have rebuilt my ram twice.

The ball bearings are an essential part of the mechanism. You need to place each one in the outer female threaded helical section then carefully introduce the inner male threaded part. In effect you screw that bit in. When it's done, as the motor turns the inner bit will move up or down the outer, extending or retracting the pushrod.

I used grease to stick the balls in. If you knock one out you have to start again.

Good luck.

It's quite easy really.

Thanks for replying so quickly !

That explains why I thought that female thread was stripped or worn out!!
Because the ball bearings take up the space between the male thread of the rod and the female thread of the bass. Who would have thought?

I really appreciate your helping me

What I could not figure out was how this Autohelm worked perfectly up to the last day I used it and yet the threaded rod was so much smaller than the female thread in the brass bushing. No way it could work

Do you happen to remember the number of ball bearings?
I count that I have 35 of them.

If I am short, do you know of any source for them?

Thanks again
marty
 
I don't know how many ball bearings there should be but it should be worthwhile attempting a rebuild with the ones you have.

As I said, I bedded them into grease. Tweezers helped!
 
James

Will do., however looking at the tiny size of the ball bearings and task of getting them all into the female grooves while threading in the ram screw....there maybe a lot of cursing and throwing of tools.

Plus I read on a previous post from an former Autohelm technician that claimed that for over 18 years they never had a customer successfully put the ball bearing back.

Sounds like you were the first?
I hope to be the second. LOL


Thanks.
 
Don't be downhearted!

Push the ball bearings well into the grooves. Use grease to stick them in place.

And if you dislodge one when introducing the male part, carefully withdraw, pop it back into place and have another go.

I did the job at the dining room table each time. It's not really hard to do.

I can't remember exactly how I orientated each part in the process... obviously the trick is to stop the balls falling out due to gravity. I think I may have held the male bit more or less vertically in one hand whilst rotating the female bit around it. But whatever works for you!

There's some kind of stop at each end of the female helical grooves, I think this directs the balls into some kind of recirculating arrangement, whatever, but if you put the first ball against the bottom stop as you have it oriented, and then the next one pressed against it etc until you run out of balls, then with a bit of care they'll hold together in position during the reassembly.
 
James

Can the brass bushing with the female threads inside be removed from the ram tube without damaging either?

It would be a lot easier to fill the threads with the ball bearings if that brass could be removed from the tube.
I cannot tell how it is fastened to the tube, pressed on or in some other manner? Or if it is just one piece bushing and tube.

I ordered and am waiting for some new 2 mm stainless steel ball bearings and a couple pairs of scientific forceps to handle the insertion of the bearings.

thanks for your help
marty
 
Marty, I don't know, I didn't need to. I can't remember ever doing any more than unscrewing pretty much everything that easily came apart.

Thus I unscrewed the tiller fitting at the end of the pushrod, unscrewed the bush at that end of the cylinder and slid the bush off the rod. There's a seal inside the bush which likes a bit of grease when you reassemble. I unscrewed the cylinder at its next junction. At this point you can remove the whole cylinder and all the ball bearings drop out.

I'd assumed you'd got that far...

(You don't need to for your repair, but if you ever need to replace the electric motor, this is accessed by unscrewing at the following junction, along with the pivot end bush.)

James
 
James

Okay thanks

Yes I have removed the motor and have the unit totally apart except I have no need to remove the snap ring on the drive unit and disassemble that as it seems to rotate on the threaded rod smoothly.

I guess I will just start inserting the ball bearings as soon as they arrive.
Will follow your suggestion and take pics in case they may help someone else repeat this task in the future.
As old as these units are that is probably unlikely.

marty
 
Well they go for good prices on Ebay!

Not that I can find one right now... asking around £200 as I recall.

The pushbutton control units are up to £200 as well.
 
Last edited:
I found it wasn't too difficult just a bit of a learning curve. I bought new ball bearings on ebay as I managed to loose some. A dowel of the right diameter helps to retain the balls as you replace them. The grease doesn't need to be sticky as the balls are very small. I seem to remember leaving a gap as it seems to work better if it's not completely full. Mines been going for at least 10 years since then.
 
I am missing something here.

Firstly, the balls do not fall out of their grooves in the brass bushing during normal operation since the threaded rod that drives the ram holds them in....

The reason the balls fall out on disassembly is that folks turn that threaded rod too far in towards the motor end of the unit. At that end of of the threaded rod, the threads end and the rod tapers to a smaller diameter just before it is pinned to the drive base.

When the rod is turned down that far the balls simply roll out of their grooves since the rod is not threaded at that extreme end and is of smaller diameter.

I find it hard to believe anyone can pack the bearings into the threads of the brass bushing while it is still attached to the ram tube and then turn the threaded rod into the bushing with the balls in it.

I can believe that if the threaded rod is detached from the drive assembly by pressing out the drift pin that attaches it and then somehow you can detach the brass bushing from the ram tube then the threaded rod can be screwed in from the bottom of the bushing (the ram tube end) as you insert the bearings from the top.

That is possible because that end of the threaded rod is smaller and will engage the brass bushing and allow the balls to inserted from the top.

So, I am convinced the brass bushing MUST be detached from the ram tube in order to insert the ball bearings.

I have NO clue how to separate the brass bushing from the ram tube without damaging either.

I realize that it has probably been decades since anyone has worked on these units and therefore memories are fuzzy of how exactly how much was disassembled in order to get the bearings back into the unit.

thanks
marty
 
James

You were correct. I was making this job more complicated that it needed.

I followed your instructions and using a pair of surgical forceps i got all the balls back into the threads of the brass female nut.
(I purchased a hundred of the same size 2 mm stainless steel balls and added quite of few of them to what had fallen out)

Then I simply screwed the threaded ACME rod into it.
Got a nice fit and the screw is tight in load with no slack and yet spins easily with just two fingers.

I attached a couple photos and video The website accepted the photo but not the video. But all it was of me spinning the screw in and out. Not much help there for anyone

Thanks for your help
marty
 

Attachments

  • Autohelm.JPG
    Autohelm.JPG
    38.8 KB · Views: 35
Upon further review

Sometimes you think you have something all figured out.
And then....you realize that you don't have a clue.

In my previous post I included a photo showing the ball bearings in the nut's female threads.
Looked good, huh?

Wrong. All the balls you can see simply turned out when the screw was rotated out.
Threading it in the balls went back into the nut.
Not good.

Here is the deal. Inside that nut there are two holes in the thread each about two threads in from either end of the nut.

Those holes are connected by a passageway through the body of the nut.

The balls MUST travel into one hole, through that passageway and out the other hole back into the threads of the nut. When the screw direction is reversed the balls go back the opposite direction up one hole through the passageway and out the other hole.

(I guess that is why is it called a recirculating ball system?......Duh)

Any balls that are inserted, by a novice re builder like me, into the threads from either end of the nut into the thread grooves before the grooves with the holes in them , just spin out of the nut on the shaft threads.

The nut threads are tapered just like any normal nut. There is nothing at either end of the nut to prevent the ball bearings from just spinning out on the screw shaft as it turns.

Only the balls that travel between the holes and through the passageway are captive in that nut.

This explains why I was able to put 60 ball bearings into the nut when only 35-46 originally came out.

The extras I added were on the first two grooves before the third groove with the hole in it on both ends of the nut. They just spun out when the shaft was rotated.

Anyway it now works

Marty
 
Top