matching interior wood? use of woodstain?

contessaman

Well-Known Member
Joined
29 Oct 2009
Messages
823
Visit site
Can anyone give me some advice on matching interior wood?

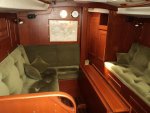
Please see attached photo. allegedly this is mahogany.

I'm doing some surgery around the chart table so I can flush mount my radar screen and also build a new shelf for my SSB transceiver and a printer below it. plus enlarging the shelf for my pilot books.

I have been to robbins timber and bought some good quality mahogany marine ply to do this. but wetting it to get an idea of how it will look when varnished does not give the orangy glow of the existing wood.

any ideas? all I can think of right now is buying a bunch of different wood stains and use some of my very expensive wood for a bit of trial and error. there must be a less wasteful approach?

ta muchly
 

Attachments

  • DSC02937.jpg
    DSC02937.jpg
    89.2 KB · Views: 0
Don't know of any quicker methods. I use Coloron woodstains and have amassed a goodly selection over the years. You can get an idea of the final colour from the spot on the tin, but actual result will depend on the colour of the veneer you are putting it on. The final coating you use will also affect the appearance and colour. So, no short cut to taking a piece of your new ply where you think you will have waste from your cutting and experimenting. Worth spending time on it as the final result is there forever. Not easy to get a uniform colour on sheets of ply - I have had more success with solid hardwood trim, but have only tried small ply bits in places where there is a break from existing panels. It might be worth finding a professional furniture restorer to do the colour matching.
 
I've had good results by mixing the stain with varnish ( first) and applying that. The deeper the colour you want the greater the number of coats of the stain varnish you apply.
 
..... It might be worth finding a professional furniture restorer to do the colour matching.

This would be my advice and is based on experience of having damaged shelfs repaired. The restorer matched the shade very well on the new bits of shelf. The time that they spend doing this may be far shorter than your time trying to get the right mix and thus more economical if you are freed up to do other work.
 
look for some rustins light teak interior/exterior (NOT THE WATER BASED STUFF OF THE EU DEVILS) it will be an exact colour match to the photo. Rustins don’t generally have a seal under the lid so you can take the lid off to look at the color . It will require bare wood at the point of repair and a polish/varnish over the top


http://www.rustins.eu/Details.asp?ProductID=817
 
Last edited:
Problem with stains is that it is much easier to darken the wood than to lighten it. In the past I have resorted to bleaching then varnishing with tinted varnishes but mainly on solid wood rather than ply. This is what our local boat builder usually does and his matching is amazing. The advantage of using a tinted or opaque varnish rather than stain is that it is not deeply absorbed so colours less per coat and can be removed if you get it wrong. It is still vital to experiment with off cuts first.
The 'take it to a professional' is probably the best response, here I would take it down to Jack and get him to mix me the various coats.
 
I've had good results by mixing the stain with varnish ( first) and applying that. The deeper the colour you want the greater the number of coats of the stain varnish you apply.
+1: get too much or the wrong colour on bare wood and you're stuck with it. A coat of clear varnish first and then coloured varnish is removable. Build up in 4-5 coats and then a final semi-matt coat on top.
 
Stain is very easyly removable with a ligh 180 grit sand but wont be necessary as rustins light teak on mahog type wood (possibly utile or sapele) will be an exact colour match
it will give that elusiv orange glow you are looking for edit the colour can becooled a bit by using 10% white spirit


image5031.gif
 
Last edited:
Stain is very easyly removable with a ligh 180 grit sand but wont be necessary as rustins light teak on mahog type wood (possibly utile or sapele) will be an exact colour match
it will give that elusiv orange glow you are looking for edit the colour can becooled a bit by using 10% white spirit


View attachment 52773

will try some of this on a sample patch - thank you :)

re:mixing stain with varnish, I intend to use international satin varnish. so is it a case of as long as I get the 'oil' based wood stain I can just mix this in?

cheers
 
will try some of this on a sample patch - thank you :)

re:mixing stain with varnish, I intend to use international satin varnish. so is it a case of as long as I get the 'oil' based wood stain I can just mix this in?

cheers

some oil based varnish will take a small amount of rustins stain for tinting maybe upto 5% even 10% but it can interfere with the drying properties of the varnish(if too much is added it can also turn the the varnish white, though after a vlight denibbing and overcoating with varnish with no stain added for tinting or shading, will get rid of the white) generally i would stain firston bare wood and allow a good overnight drying followed by varnish afterwards. Satin is about right (50% sheen)the original finish might have been as low as 35%sheen which you would have to get from a specialist supplier or mix matt and satin I wouldn't go to the time expense.. You wont get the same look with any water-based finishes. edit trial on scrap is def the way to go.Overcoating the original if not stripped is def a test area first...,join new and old finish on an edge to minimise any noticeable difference .... also test small amounts befor you mix stain and varnish
 
Last edited:
some oil based varnish will take a small amount of rustins stain for tinting maybe upto 5% even 10% but it can interfere with the drying properties of the varnish(if too much is added it can also turn the the varnish white, though after a vlight denibbing and overcoating with varnish with no stain added for tinting or shading, will get rid of the white) generally i would stain firston bare wood and allow a good overnight drying followed by varnish afterwards. Satin is about right (50% sheen)the original finish might have been as low as 35%sheen which you would have to get from a specialist supplier or mix matt and satin I wouldn't go to the time expense.. You wont get the same look with any water-based finishes. edit trial on scrap is def the way to go.Overcoating the original if not stripped is def a test area first...,join new and old finish on an edge to minimise any noticeable difference .... also test small amounts befor you mix stain and varnish

thanks for all this buddy. been looking at your website you certainly know what you're doing!!

dug out a picture of the chart table area and attached it here. To be honest if I can get a 90% match on the wood tone I'll be pleased as its such a bloomin' mess at the moment with bits of electronics and transmitters and computers everywhere its going to look a whole heap better once I have done a bit of wood work and tidied it all up. . that 'mahogany' ply, mouldings and batons I got from robbins is on the lighter end of the scale for mahogany so it should take the colour well...

there are removable draws in the side of the chart table I might take one out and experiment on the normally hidden part of the draw before letting myself loose elsewhere.....

thanks again. oh.... p.s. I don't suppose you have any tips for finger jointing with only DIY tools do you? separate project... but I want to build a plywood box to take my trusty old video hydrograph and a small 12 volt battery so I can use it in the dinghy for putting shot lines into reefs and wrecks. cheers
 

Attachments

  • DSC_0117.jpg
    DSC_0117.jpg
    88.3 KB · Views: 0
thanks for all this buddy. been looking at your website you certainly know what you're doing!!

dug out a picture of the chart table area and attached it here. To be honest if I can get a 90% match on the wood tone I'll be pleased as its such a bloomin' mess at the moment with bits of electronics and transmitters and computers everywhere its going to look a whole heap better once I have done a bit of wood work and tidied it all up. . that 'mahogany' ply, mouldings and batons I got from robbins is on the lighter end of the scale for mahogany so it should take the colour well...

there are removable draws in the side of the chart table I might take one out and experiment on the normally hidden part of the draw before letting myself loose elsewhere.....

thanks again. oh.... p.s. I don't suppose you have any tips for finger jointing with only DIY tools do you? separate project... but I want to build a plywood box to take my trusty old video hydrograph and a small 12 volt battery so I can use it in the dinghy for putting shot lines into reefs and wrecks. cheers

The only technique isnt really basic diy , uses a bench saw or bandsaw. I find it easier to cut dovetails by hand for a one off box
 
Last edited:
Stain is very easyly removable with a ligh 180 grit sand
But be careful you don't sand right through the veneer. I still prefer clear varnish as the first coat then stain in the later coats of varnish. If it's wrong you can undo without having to sand the veneer itself.
 
But be careful you don't sand right through the veneer. I still prefer clear varnish as the first coat then stain in the later coats of varnish. If it's wrong you can undo without having to sand the veneer itself.

it does work after a fashion,however bought coloured varnish will not look like the original it clouds the grain and after several coats starts to look like wood coloured paint.He will have great difficulty to get the correct colour even by mixing tins.. Adding stain to a varnish is good for small repairs , not so good , for large areas, .. Universal colourant which i wasn’t going to mention can get an exact match to the colour but mixing that is very skilled, and the base colours are hugely expensive and it produces cloudy grain.

large area sanding can go through the surface veneer so requires care specially taking varnish off most people are too much in a hurry and the bull breaks the china.
Unless you are using dark stains like dark oak ,dark teak ,walnut , the light one they can be got off with very light sanding , maybe a rub down with pure white spirit will help to take a lot of the colour out
 
thanks for all this buddy. been looking at your website you certainly know what you're doing!!

dug out a picture of the chart table area and attached it here. To be honest if I can get a 90% match on the wood tone I'll be pleased as its such a bloomin' mess at the moment with bits of electronics and transmitters and computers everywhere its going to look a whole heap better once I have done a bit of wood work and tidied it all up. . that 'mahogany' ply, mouldings and batons I got from robbins is on the lighter end of the scale for mahogany so it should take the colour well...

there are removable draws in the side of the chart table I might take one out and experiment on the normally hidden part of the draw before letting myself loose elsewhere.....

thanks again. oh.... p.s. I don't suppose you have any tips for finger jointing with only DIY tools do you? separate project... but I want to build a plywood box to take my trusty old video hydrograph and a small 12 volt battery so I can use it in the dinghy for putting shot lines into reefs and wrecks. cheers

if you are making new parts you will get a good colour match with light teak .The slight diff in colour with the chart table and the cabin side itself will require painstaking work to correct,A colour varnish top coat may get a closer colour match but it will need a very gentle hand to correct with a really good qual brush and a small colour change is difficult to achive in one coat . Too many coats and you will get a treacley look which you are unlikly to be happy with . Sanding back to bare wood to stain has risks in a large area, highlighted in JWilson's post but with a slow hand on a few wet an windy days it would be possible. On balance i would leave well alone and stick to getting the new added shelves right

edit rustins is the only people i know still making that colour of the peg. Colron used to make one but it was not as closer colour match. Colron have changed their product range in most suppliers to water based wood 'dye' so not to cross with ronseal wood stain an abismal garden product. The colours are pastel and the finish is poor and the eco waterbased varnishes (scuse me while i spit on the eu) wont do a good job for you long term
 
Last edited:
If you can't get it right - give up bothering! My boat interior has lots of different tints now after various repairs, modifications, and unequal exposure to UV. As long as the varnishing is uniform, it looks characterful and attractive.

If the varnishing is uneven, then even if the tint is exact, it looks a mess.
 
Guys, thanks for all the sound advice. I'm not going to touch what's already there at this stage I'm just going to concentrate on making my new timber match as best I can. I think I will apply the light teak stain directly to the wood. By doing a test patch on an offcut first I can guard against too much colour. Re: the existing wood I may consider sanding back in the future, but not now. There's also the huge mismatch anyway in the horizontal surfaces because for some reason hallberg rassy used wood look melamine for the chart table top and the galley work surfaces. It's hard wearing but is a totally different colour to the rest of the (beautiful) wood in the cabin. It was probably as trendy as the green corduroy seats back in the early 80's!! Cheers again guys. I will report back with my results but looking at work plot this could be some time...
 
Top