You are using an out of date browser. It may not display this or other websites correctly.
You should upgrade or use an alternative browser.
You should upgrade or use an alternative browser.
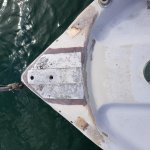
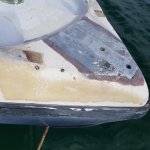
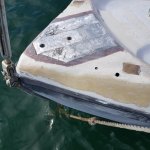
Just removed my bowsprit, to find THIS underneath. Steps for strong repair please?
- Thread starter yourmomm
- Start date
grumpy_o_g
Well-known member
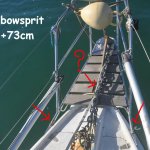
I can understand that the steel tubing is screwd port and starbord. But.. which part of the bowsprit is supposed to be screwd at the delaminated area? at the pic is showed one wood plank passing over that area which is missing its center part also...
View attachment 75002
That was my thought - I assume it's the arrow from the question mark that is the attachment to the damaged area. If it is then I wouldn't have expected that point to be fastened to the hull. The aftmost points of the arms attached to the hull or gunwhales should effectively be hinges that are handling the rearwards force mentioned above (created by the fact the bobstay and forestay aren't vertical but also pull backwards as well as up and down). The bobstay should hold the bowsprit down against the upwwards force exerted by the forestay. Any movement in the bowsprit caused by tension on the forestay changing (which it will as the sail draws) is going to have a an additional leverage as the attachment looks to be about half way back from the tip to the end of the arms.
I'm reluctant to be specific without seeing the actual installation but wouldn't some kind of floating arrangement be better? Worst case move the support point out to the edges so the the hull sides can add support because basically that bowsprit appears to be almost exactly what I would design if I wanted to break out that foredeck ply with a lever.
yourmomm
Member
That was my thought - I assume it's the arrow from the question mark that is the attachment to the damaged area. If it is then I wouldn't have expected that point to be fastened to the hull. The aftmost points of the arms attached to the hull or gunwhales should effectively be hinges that are handling the rearwards force mentioned above (created by the fact the bobstay and forestay aren't vertical but also pull backwards as well as up and down). The bobstay should hold the bowsprit down against the upwwards force exerted by the forestay. Any movement in the bowsprit caused by tension on the forestay changing (which it will as the sail draws) is going to have a an additional leverage as the attachment looks to be about half way back from the tip to the end of the arms.
I'm reluctant to be specific without seeing the actual installation but wouldn't some kind of floating arrangement be better? Worst case move the support point out to the edges so the the hull sides can add support because basically that bowsprit appears to be almost exactly what I would design if I wanted to break out that foredeck ply with a lever.
Yep these arrows and question mark are the hull fixing points. Sorry, I thought I'd made that clearer than I obviously did. Underneath that wooden plank by the question mark is a really thin stainless plate, and it is this which is bolted to the bow: i have no idea, but it was probably done as additional support, because those toe rail fixing points are so bloody inaccessible, so as to not be able to put decently sized backing plates, or fibreglass strengthening in there (only a washer!). I'm not sure I'd trust just the toe rail bolts, to hold everything in place...can you be more specific with your alternative/floating support idea? I'm keen to explore different (ie better!) ways of attaching the sprit.
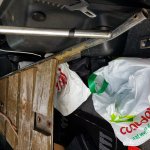
The bowsprit is relatively intact, following its damage: it's only the lower starboard tube which got bent, as well as the fitting on the starboard toe rail (which was a real PITA to remove, as it had bent downwards, over its bolts). The engineers are open after the christmas break on Jan 18th, and will be looking at cutting out the bent/damaged stainless, and welding in new, as well as strengthening the whole sprit itself...they are not marine engineers, mind you, so any ideas would be greatfully received. Also, it strikes me that it doesn't matter HOW strong the sprit is, if it simply isn't attached in a strong way to the hull...
As I say, I'm keen to hear any other ideas, here, preferably before I forge ahead trying to repair this damage!
yourmomm
Member
Sorry edit...here is an upload of the damaged bowsprit...showing that the bow bolts are on the second rear plank (the rearward one is missing in the picture), by the red question mark...you can also see the bend in the starboard tube, although it looks less bad than it is with this perspective.
You can also see how the thin stainless plate under this plank has buckled upwards, (I'd assumed from the mooring line damage).
You can also see how the thin stainless plate under this plank has buckled upwards, (I'd assumed from the mooring line damage).
Attachments
Last edited:
yourmomm
Member
Am seriously tempted to start again:
https://www.trademe.co.nz/motors/bo...68.htm?rsqid=f733f7860bae4d3bbd1a66364e869429
https://www.trademe.co.nz/motors/bo...68.htm?rsqid=f733f7860bae4d3bbd1a66364e869429
dom
Well-known member
Am seriously tempted to start again:
That pic helps a lot - I had envisaged a more solid central structure and wld def support a major rethink.
Am I right to think that your latest pic was taken at anchor with a second one stowed in its roller? If so, the integrity of that ‘bowsprit’ will be 100% dependent on adequate standing rigging tension to prevent the bowsprit, mast and rig being carried away! :ambivalence:
That alone is an absolute no no, which must be addressed as part of the re-engineering project.
Last edited:
yourmomm
Member
That pic helps a lot - I had envisaged a more solid central structure and wld def support a major rethink.
Am I right to think that your latest pic was taken at anchor with a second one stowed in its roller? If so, the integrity of that ‘bowsprit’ will be 100% dependent on adequate standing rigging tension to prevent the bowsprit, mast and rig being carried away! :ambivalence:
That alone is an absolute no no, which must be addressed as part of the re-engineering project.
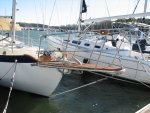
Which latest pic? My latest pic is of the buggered bowsprit in the back of a car! The one before that, with the trysail, is years old, two owners prior to me. I believe she was a swinging mooring when that was taken so anchor would still be stowed. I'm not sure if this is what you mean, but the idea of an anchor roller at the end of a bowsprit never appealed to me...better for the roller to come over the bow, through the sprit
I would have thought?
Any ideas for the re-engineering?
dom
Well-known member
Which latest pic? My latest pic is of the buggered bowsprit in the back of a car! The one before that, with the trysail, is years old, two owners prior to me. I believe she was a swinging mooring when that was taken so anchor would still be stowed. I'm not sure if this is what you mean, but the idea of an anchor roller at the end of a bowsprit never appealed to me...better for the roller to come over the bow, through the sprit
I would have thought?
Any ideas for the re-engineering?
You’re right; it’s the one of the boat at mooring I meant!
Okay, so the anchor over the end of the bowsprit idea goes. Re-engineering the rest of it will depend on the expected forces along the forestay, the angle between the forestay and the bobstay, the expected lateral forces from sweeping waves, the structural nature of your hull/deck joint, the strength of that cracked area, etc.
Taking a step back, I’d personally reconsider the merits of that bowsprit in the first place. It might well be that advances in sail technology obviate the need for a bowsprit for windward work. An additional downwind sail could then be added? Might be a simpler and more secure solution?
Akestor
Active member
Another thought... Is re establishing the forestay on the deck again an option? So that the bowsprit structure only remains as railing use.
Otherwise, a new robust thick wooden bowsprit should be a time consuming project but not that difficult to accomplish. Another thing that might be problematic with this railing/bowsprit structure , is that due to the length of the tubing it should be quite flexible to any direction, which i think you dont want that happening on a bowsprit.
Thats my personal view though and this is open to discussion ofcourse.
eilerts
Member
Hi,
the picture in the first post of the cracked laminate also shows another thing, the crack goes through an old repair. It looks like a mixture of CSM and fine woven cloth has been used.
My guess is that the bowsprit has been damaged in the past, resulting in cracks and delaminations around the bolt holes. Then this has been attempted repaired without grinding away all damaged GRP. The too thin and weak patch of glass and polyester or epoxy has now cracked.
Before you start cutting, check this possibility. You have limited area to bond to down to the rub rail and aft to the toe rail bend, you must be careful not to lose it. If this assumption is correct, you still have to grind away damaged GRP, but hopefully not as much as it looks like.
Whether you go for epoxy or polyester, the West System manual is excellent, and it is possible to do a good repair with both binders.
After grinding away the damaged GRP, make an adhesion test. Make a small (5x5cm) 2-3 ply patch, leave it to cure, and take a chisel and pry it off. How well does it stick?
I have attached a picture of delaminated GRP. The whitish area between the arrows is delaminated. If you see something like that, then you have to grind it away.
Good luck!

yourmomm
Member
Ok am starting to feel a bit overwhelmed now by (what I had initially imagined) may be a relatively simple job. 'Twas ever the case, with boats, I suppose, but fiberglass is a new material for me...I dont have the funds to buy a new sail wardrobe, and I would prefer to keep it, than to mount the forestay back at the bow, as this helps keep the weatherhelm at bay...
What about this as a (less-than-ideal, but most simple, quick, and keeping-the-costs-down) idea:
1. Grind out all the delaminated layers (I am assuming that this will leave quite a large, gaping hole, right at the bow, which I dont want to leave there for any time, as the boat remains on a swinging mooring!)
2. Repair, with as MANY LAYERS as reasonably possible, of epoxy and biaxial cloth (I usually alternate each layer 90°: is this a stupid, or a good idea?). Ensure that these layers are progressively scarfed to the hole in the bow deck, and down the side of the rounded gunwhale, to the rubbing strip, at a least a ratio of 12:1.
3. Fit a strong stainless backing plate, as big and as thick as possible (something in the order of at least 5mm thick, but possibly more).
4. Also fit a similarly sized and thickness of stainless plate on top of the repaired glass, sandwiching the repair in at least 5mm of steel (possibly more), either side, to minimize flexing at the repaired bow deck from the bowsprit. Bolt top plate through repaired glass to backing plate many times.
5. Refit the same bowsprit, in the same way, acknowledging that it's not the strongest, but a compromise of trying to solve a whole heap of problems, and will probably do until I get around to looking at it, again. Perhaps suggest to engineers to shorten the whole thing a little, (perhaps to 50cm), to lessen any flexing, and increase strength?
6. Sail, and sail hard for a month or three, (or maybe 6), then dissassemble again, (preferably on the hard stand!) and check repair for soundness. Reassemble, and relax, if sound; get annoyed and re-engineer, if not....
Thoughts? As an alternative, I also wondered if the engineers could weld in a solid, chunky steel central support along the length of the bottom of the bowsprit, then this could be 'captured' rather than fixed at the repair area (like a gammon iron type of arrangement), which would presumably allow more flexing and movement, but would once again leave the weakness of the gunwhale bolts exposed. So, choices between trying (and probably failing) to increase strength/rigidity, whilst minimizing flexing, or just allowing the flexing at the bow deck to occur more, and trying then to solve the problem of how to reinforce the gunwhale bowsprit attachment bolts....
As I say, ideally I think I would start again, but I just dont have the money or the time at this point, so whatever I do is going to be a compromise...
yourmomm
Member
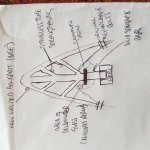
How about this as an alternative solution to the problem? (Attached). I could just fix the delaminated area, and get engineers to weld a new base to the bowsprit like this, including a solid bar longitudinal support down its centre. This bar could then be 'captured' by a gammon iron, (allowing some movement), placed with backing plate in the (repaired) delaminated glass area. Then I could solve the weakness of gunwhale bolts problem by constructing a meaty heel, (with thick stainless top and backing plates), astern of the gammon iron. I could then just rely on forestay and bobstay tensions, (bobstay 2x that of forestay), as well as the gammon iron and heel tenon, to hold the whole thing in place, with the longitudinal bar and the heel (rather than the gunwhale bolts) taking the main sternward forces. This would allow a 'floating' solution, as suggested above, with increased strength than before (combined with newly designed anchor roller, dropping at the bow, rather than end of the 'sprit).
Does this work?
Does this work?
Attachments
Akestor
Active member
Sounds like a plan! I am not sure i am "getting" everything from the sketch but i get the big picture. The solid long bar at the middle makes sense as this will actually "be the bowsprit". But do you plan for this to be a round tube also?
Today i studied how the bowsprit is made in my Westerly Longbow , and it has simple and smart engineering i think. It is all covered with thick wood externally, except the edge were i see the steel coming out from the wood were forestay and bobstay meet. But looking from the inside, i can identify that the deck has a female socket ( deck was molded like that, around 1 foot long and 2-3 inches wide) where the actual steel bowsprit (under the thick wood) is going into. From the shape of the deck socket, i assume that the bowsprit is a square steel tube and not round. That makes sense as a quare tube or a I_I shape tube can be screwd at bottom and sides and make a very rigid structure compared to a round tube. What i am trying to explain is hard with words but very easy in reality. I ll post a pic tomorrow
In your case, if your central tube is made with I_I shape
1) it can be screwd on the top backing plate (flat to flat surface) and through the bottom plate
2) starboard and portside of the tube can be screwd on 90 degree stainless steel angle brackets which also will be screwd on the top and bottom backing plates.
Hope that hepls and not confuses!
Last edited:
eilerts
Member
Hi,
confusion or feeling overwhelmed is often a step on the way to understanding. Your plan is not bad, except I would skip most of elaborate welding plan.
Fiberglassing is easy when you know how to do it. The most common mistake is grinding too shallow and not wide enough. It help a lot if you can go to a place where you have the possibility to use power tools for grinding. If you go by epoxy, then stay with woven cloth, don't mix in chopped strand mat (CSM). Be careful not to get any water on the glass, it loves water and looses interest in epoxy and polyester. Also, wear proper disposable gloves. Buy plenty. Put masking tape on the rub rail and other places you want protect.
The tension from your forestay is transferred to the bobstay. The bowsprit takes compression. This force is transferred to the hull at the bolts in the bow where you found the delamination and at two fixed points at the gunwale. The bolts at the bow take horizontal forces directed aft, very little up and down. If the fiberglass at the bow has become delaminated and weak, it helps with a good backing plate, but I think even 4mm is far enough. Check that the plate is in contact with the laminate at the holes, else it does more harm than good.
I cannot say if the bowsprit itself need any strengthening. I assume it was properly designed from the start. A structural element along the centerline sounds good if it is not already there, but I would not bother to extend it furter aft. I see no reason to build in any allowance for movement. The bowsprit should neither be allowed to move aft nor sideways.
To limit the possibility to move aft you might weld a V shaped stopper that wrap the bow or build a transverse glass epoxy step aft of the bolted steel band, if it is not already there. Straighten or replace bent parts of the bobstay or the bowsprit.
Do you have a picture of the inside of the bow that show the area around the nuts?
Hope this helps.
Jan
yourmomm
Member
Yep thanks, I had started to figure the complicated welding to be overkill. I have decided to ask them simply to weld a solid 4mm (maybe 5mm!) "v" shaped plate in between the port and starboard base tubes of the bowsprit, to fill the gap between them entirely with plate steel, and then stop this plate from any aftward movement (and therefore protect the port and starboard gunwhale bolts) with a strong, notched, and very well supported custom-made heel, for it to sit inside. The heel will sit well aft of the repaired area of glass, so I dont have to worry so much about the strength of my repair, and where access is much better, to fit decent reinforcement and backing plate, etc. I think by this method, I could do away with the bolts, where the delamination is, entirely, and just make good that area of glass. I'll actually ask them to weld the plate on top of the bowsprit base tubes, so there's plenty of gap underneath, between the plate and the hull, to reinforce with additional glass cloth layers, which will be stepped/scarfed all the way around the bow, to the rubbing strip.
Will also ask them to leave a space in the plate for a bow roller, to roll over the stem, rather than at the end of the bowsprit.
Will try to post pictures of inside of delaminated area/ bolt holes when on back on the boat, if I can get one (access very limited there). Should be starting the grinding tomorrow!
grumpy_o_g
Well-known member
Ok am starting to feel a bit overwhelmed now by (what I had initially imagined) may be a relatively simple job. 'Twas ever the case, with boats, I suppose, but fiberglass is a new material for me...I dont have the funds to buy a new sail wardrobe, and I would prefer to keep it, than to mount the forestay back at the bow, as this helps keep the weatherhelm at bay...
What about this as a (less-than-ideal, but most simple, quick, and keeping-the-costs-down) idea:
1. Grind out all the delaminated layers (I am assuming that this will leave quite a large, gaping hole, right at the bow, which I dont want to leave there for any time, as the boat remains on a swinging mooring!)
2. Repair, with as MANY LAYERS as reasonably possible, of epoxy and biaxial cloth (I usually alternate each layer 90°: is this a stupid, or a good idea?). Ensure that these layers are progressively scarfed to the hole in the bow deck, and down the side of the rounded gunwhale, to the rubbing strip, at a least a ratio of 12:1.
3. Fit a strong stainless backing plate, as big and as thick as possible (something in the order of at least 5mm thick, but possibly more).
4. Also fit a similarly sized and thickness of stainless plate on top of the repaired glass, sandwiching the repair in at least 5mm of steel (possibly more), either side, to minimize flexing at the repaired bow deck from the bowsprit. Bolt top plate through repaired glass to backing plate many times.
5. Refit the same bowsprit, in the same way, acknowledging that it's not the strongest, but a compromise of trying to solve a whole heap of problems, and will probably do until I get around to looking at it, again. Perhaps suggest to engineers to shorten the whole thing a little, (perhaps to 50cm), to lessen any flexing, and increase strength?
6. Sail, and sail hard for a month or three, (or maybe 6), then dissassemble again, (preferably on the hard stand!) and check repair for soundness. Reassemble, and relax, if sound; get annoyed and re-engineer, if not....
Thoughts? As an alternative, I also wondered if the engineers could weld in a solid, chunky steel central support along the length of the bottom of the bowsprit, then this could be 'captured' rather than fixed at the repair area (like a gammon iron type of arrangement), which would presumably allow more flexing and movement, but would once again leave the weakness of the gunwhale bolts exposed. So, choices between trying (and probably failing) to increase strength/rigidity, whilst minimizing flexing, or just allowing the flexing at the bow deck to occur more, and trying then to solve the problem of how to reinforce the gunwhale bowsprit attachment bolts....
As I say, ideally I think I would start again, but I just dont have the money or the time at this point, so whatever I do is going to be a compromise...
You've actually got two related problems - the first is the repair to the damage - don't be overwhelmed by fibreglassing, it's not difficult (though getting it neat is a different matter) and it's a skill anyone who wants to maintain their boat should have so give it a go and see how you get on. This isn't a bad repair to start on as it's mostly hidden and you can afford to "over-engineer" rather than try and exactly recreate the original. The only minor complications are a) getting enough sound material to layer/ scarf the new layers over (you've covered that by saying you'll go onto the gunwhales) and b) if the hole is big then you will some kind of support for the new layers (zinc mesh or similar) to stop it sagging before it hardens. Those are both easily doable so I see nothing wrong with your plan there from what I can see but...
Your first problem is "why did break in the first place?" (i.e. what's the root cause?). I like the idea of reinforcing the gunwhale bolts but have they actually been shown to be too weak? Unless the attachment at the stem (the one that caused the damage to the fibreglass) was actually taking any load in shear (i.e. it was stopping the bowsprit sliding backwards towards the rear of the boat) then I can't see the load on the gunwhale bolts at the end of the arms having a different load on them no matter what you do with the repair. IN fact that attachment is actually acting as a pivot and creating a downward (and possibly upward sometimes) load on those gunwhale bolts and the arms and I suspect they are only meant to handle compression.
I still think that the bowsprit simply shouldn't be held down against the foredeck like that. Bowsprits are held down by bobstays and/or specially reinforced attachments that go right through foredeck to the stem/keel of the boat. The foredeck is meant to be walked on and to keep water out of the inside and that's about it. It' certainly not going to be built to take an upwards force trying to pull it away from the hull and, unless you can remove that force, you're likely to still have a problem. The thing is, you've got a bobstay so you shouldn't need the foredeck to hold it down.
I'd do the fibreglass repair on the foredeck but just try sailing without that foredeck attachment and see how you get on - obviously don't try that first in a F6, work up to it. There's something fundamentally wrong with attaching a bowsprit to the foredeck to hold it down though - that isn't going to work. On the positive side, as long as you have bobstay you are not reliant on the foredeck attachment so you're not in line for a dismasting if the repair doesn't work. You could follow your plan but why not try and go without that attachment first and save having to do another repair if it is causing damage?
The only thing that you've said that I'd disagree with is in para 5. "acknowledging that it's not the strongest" - I'm not sure that's true as the bit that has broken shouldn't be contributing to the strength of the arrangement. It's all around the strength of those gunwhale bolts and the bobstay attachment (which I'm assuming is OK) for me. Remember - the bobstay is to hold it down and the gunwhale bolts to stop it sliding backwards (because the bobstay and forestay slope backwards so exert a backwards force). As long as the gunwhale bolts are effectively hinges (e.g. only one bolt each side) then the force exerted on those bolts can only be directly along the line of the arms of the bowsprit (unless you bolt the bowsprit to the foredeck halfway along it).
It's an extreme example but have a look at the photos of the Heard 35 here (thank you YachtsNet) https://www.yachtsnet.co.uk/archives/heard-35/heard-35.htm - there's nothing except the bobstay, the forestay and that hinge at the back handling any force at all.
yourmomm
Member
Thanks grumpy. No that's what I mean in my subsequent posts: I'll try doing away with the bolts at the damaged area entirely. This definitely seems best. The problem is that I DO think they were taking aftward force from the gunwhale bolts, (which may explain some of the damage), so that's why I'm planning to strongly heel the steel plate I'll get welded as the base of the bowsprit, instead. The heel can take the main aftward force, (with gunwhale bolts held in reserve, if balanced correctly); the bobstay and forestay can handle the vertical forces, and the gunwhale bolts (I imagine) are there to manage some (not all!) aftward force, as well as some lateral forces, eg from waves...
No the gunwhale bolts are not hinges: there are two, not one, on each side.
No the gunwhale bolts are not hinges: there are two, not one, on each side.
yourmomm
Member
Here I found this: it looks like this sprit is heeled against the bow stem itself, which isn't possible on mine, as my sprit's set too high (and about to be set even higher, if the base plate is welded on top of the port and starboard base tubes). But, other than that, (and except for his nice teak bowsprit base, where mine will be solid 5 or 6mm steel plate), it's a pretty good model of what I'm trying to do...
Attachments
yourmomm
Member
Grinding today revealed a pleasant surprise....
Weird thing is that the laminate was all torn upwards on top of the steel backing plate, (now visible), but the backing plate itself doesn't seem to have moved at all with whatever force it was under.
You can see how its pitted and corroded by two old bolts (long ago cut), letting water in. But it's a good start to the fibreglassing....
Attachments
Akestor
Active member
Good job! looks solid. Now the question is.... do you keep this and lay laminate on top, or remove entirely the 3 steel stripes and fill the gap with new laminate? From the photos i can't see a reason for not choosing the first option.

