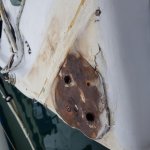
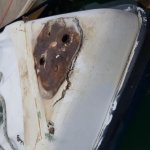
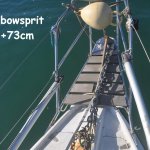
Just removed my bowsprit, to find THIS underneath. Steps for strong repair please?

yourmomm

Member
Joined
6 Jun 2006
Messages
179
Visit site
One of the jobs I had to do on my boat (amongst many) was remove the stainless bowsprit, (really just an extended pulpit, which has somehow managed to stay there 20 years plus), to get it to engineers for repair (it was badly bent, after previous owner left mooring lines over it!). This is what I found underneath (attached, port and starboard views of bow).

The fibreglass is knackered, and under the gunk will only be the same. The thing I'm thinking is that this damage was not caused by the mooring line incident (?although I suppose it might have been?). I'm concerned that the damage seems more indicative of the fibreglass delaminating badly, literally ripped apart, possibly over a long time, by the upward force from the forestay (attached to end of bowsprit), as well as the sternward force from the bowsprit: this damage is by two mounting bolts on the deck, (holes visible) which form part of the bowsprit's mountings to the hull itself (there are four additional bolts: two, both port and starboard on the gunnel, also fixing it to the hull, and there seems to be no similar damage around these areas).

I'm assuming I need to grind all of this delaminated glass out, and re do. But how to make this repair strong enough? I'm assuming just layering the glass cloth in the hole I grind out will have little strength, particularly to resist upward force from the forestay. Can someone advise me step by step what I need to do here? Do I need to grind out much more than the damaged area, to provide additional support for any new glass I layer in? How many layers do I need? (I've got lots of biaxial cloth and epoxy left over from a previous job).

As an aside, does polyester/glass (which is what this is) weaken, over time? There's a few areas ive found on this 50y/o boat, which apparently need strengthening.

Many thanks.
 

Attachments

  • 20181225_123308.jpg
    20181225_123308.jpg
    395.8 KB · Views: 0
  • 20181225_123258.jpg
    20181225_123258.jpg
    343 KB · Views: 0
Last edited:

TQA

New member
Joined
20 Feb 2005
Messages
6,815
Location
Carribbean currently Grenada
sailingonelephantschild.blogspot.com
No big deal and an easy fix.

Grind out the grot leaving a bevelled edge.

If you have access to the underside screw on a bit of ply covered with smooth polythene.

Ues epoxy. Wet the edges. Build up with biaxial cloth. fill and sand.

Now to match the finish you can hunt down the artistic glass guru and pay him to match the gelcoat.

Or take a bit you removed down to Halfords and get the best match rattle can you can find.

Soon done.
 

yourmomm

Member
Joined
6 Jun 2006
Messages
179
Visit site
Thanks. No, no easy access to inside: it's too far forward to reach from the nearest hatch.

And one of those tears is right on the curve of the rounded gunwhale. I'm thinking when I grind it all away, there will be a much bigger hole, with no way to back it for laying mat on top, and which spans both horizontal and vertical parts of rounded gunwhale...how to lay cloth for strength, and following a complex form that is not there, due to lack of backing?
 

Akestor

Active member
Joined
12 May 2018
Messages
400
Location
Athens, Greece
www.youtube.com
After you have grinded the damaged area, find a thin pvc plate(3-4 mm). Shape the pvc bigger than the grinded area, drill it at the middle and tie there a strong thread so you can pull it upwards to form the shape of the deck approximately. Pass the pvc through the "hole" from the outside and have a friend pull the thread up for you while you lay on 1 layer of any glass, with polyester and 2,5% MEK. I say 2,5% because that will make the resin cure fast- 100 grms of polyester should be enough for this. If you make more it will be wasted.
Now you have a nice hard surface that you can build up with more layers using epoxy or polyester. If you can slightly reach the pvc plate from inside you can pull it away it as it doesn't adhere to polyester at all. Make sure that you apply new layers on healthy old laminate. Dont forget to clean with aseton any old surface you are going to do laminating.

Also i think for the bowsprit to be robust without straining the laminate, there must be a stainless steel plate from the inside of the deck were it will be bolted.


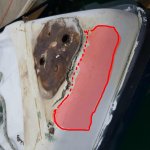
I would cut at the dotted red line and grind for fresh laminate to work on at the pink area.
bowsptir.jpg
 
Last edited:

VicS

Well-known member
Joined
13 Jul 2002
Messages
48,498
Visit site
One of the jobs I had to do on my boat (amongst many) was remove the stainless bowsprit, (really just an extended pulpit, which has somehow managed to stay there 20 years plus), to get it to engineers for repair (it was badly bent, after previous owner left mooring lines over it!). This is what I found underneath (attached, port and starboard views of bow).

The fibreglass is knackered, and under the gunk will only be the same. The thing I'm thinking is that this damage was not caused by the mooring line incident (?although I suppose it might have been?). I'm concerned that the damage seems more indicative of the fibreglass delaminating badly, literally ripped apart, possibly over a long time, by the upward force from the forestay (attached to end of bowsprit), as well as the sternward force from the bowsprit: this damage is by two mounting bolts on the deck, (holes visible) which form part of the bowsprit's mountings to the hull itself (there are four additional bolts: two, both port and starboard on the gunnel, also fixing it to the hull, and there seems to be no similar damage around these areas).

I'm assuming I need to grind all of this delaminated glass out, and re do. But how to make this repair strong enough? I'm assuming just layering the glass cloth in the hole I grind out will have little strength, particularly to resist upward force from the forestay. Can someone advise me step by step what I need to do here? Do I need to grind out much more than the damaged area, to provide additional support for any new glass I layer in? How many layers do I need? (I've got lots of biaxial cloth and epoxy left over from a previous job).

As an aside, does polyester/glass (which is what this is) weaken, over time? There's a few areas ive found on this 50y/o boat, which apparently need strengthening.

Many thanks.

You will find all the info you need to repair this with epoxy resin and bi-axial cloth in the West System boat repair manuals and product user guides and videos Loads to find and read or view. Link below to get you started

Read, digest , read again and when the weather warms up a bit follow their advice and procedures as closely as you can.
A wide overlap on to chamfered edges around the holes together with padding pads where appropriate will be the key to success

There are techniques described for repairing from the outside when there is little or no access internally

https://www.westsystem.com/wp-content/uploads/User-Manual-2015.pdf
 
Last edited:

Tranona

Well-known member
Joined
10 Nov 2007
Messages
42,215
Visit site
Read, digest , read again and when the weather warms up a bit follow their advice and procedures as closely as you can.

The OP is in New Zealand so warmth will be the least of his problems at this time of year, but may not have access to the same brands of materials as we have. However, NZ is at the forefront of modern boat building and repairing so should be able to source both materials and advice locally.
 

yourmomm

Member
Joined
6 Jun 2006
Messages
179
Visit site
If you can’t reach it from the inside, how did you get the bolts out? Or was it just screwed?

Bolts were reached with an extension bar holding a socket wrench. Very fiddly! I was expecting to get the bowsprit off in a day. It actually took nearer three in the end, mainly because of limited access to bolts: limited access, because they were difficult to reach; also because the bowsprit had bent over one of them, when it sustained damage (the reason I was removing it in the first place), and because someone had decided it was a good idea to glass over ALL the nuts on the inside of hull, and, again, because of limited access, I couldn't just grind this glass away...it was a real PITA, frankly...
 
Last edited:

yourmomm

Member
Joined
6 Jun 2006
Messages
179
Visit site
After you have grinded the damaged area, find a thin pvc plate(3-4 mm). Shape the pvc bigger than the grinded area, drill it at the middle and tie there a strong thread so you can pull it upwards to form the shape of the deck approximately. Pass the pvc through the "hole" from the outside and have a friend pull the thread up for you while you lay on 1 layer of any glass, with polyester and 2,5% MEK. I say 2,5% because that will make the resin cure fast- 100 grms of polyester should be enough for this. If you make more it will be wasted.
Now you have a nice hard surface that you can build up with more layers using epoxy or polyester. If you can slightly reach the pvc plate from inside you can pull it away it as it doesn't adhere to polyester at all. Make sure that you apply new layers on healthy old laminate. Dont forget to clean with aseton any old surface you are going to do laminating.

Also i think for the bowsprit to be robust without straining the laminate, there must be a stainless steel plate from the inside of the deck were it will be bolted.


I would cut at the dotted red line and grind for fresh laminate to work on at the pink area.
View attachment 74977

Thanks Akestor! This is exactly the advice I needed, wrt how to lay the first layer of glass. I also thought that there should be at least a backing plate, glassed and bolted under the laminate, but fitting it with very limited access is going to be tricky, which is probably why there wasn't one in the first place.

Thanks for your pink visual advice: just to clarify, you're saying cut at your dotted line (I assume both port and starboard sides of the bow), and remove the (horizontal) deck laminate, in between these cuts, entirely? This is the section which has badly delaminated, so grinding it to good laminate I think is not really possible: removal may be a better option? Then grind down at your pink shaded area, (and, presumbly, rear of the removed deck section, too), to layer the new glass against, using your PVC sheet trick to support the middle?
 
Last edited:

yourmomm

Member
Joined
6 Jun 2006
Messages
179
Visit site
The OP is in New Zealand so warmth will be the least of his problems at this time of year, but may not have access to the same brands of materials as we have. However, NZ is at the forefront of modern boat building and repairing so should be able to source both materials and advice locally.

The boat is on a swing mooring, and I'm trying to do this work without lifting it (I came in to a marina, just to remove the bowsprit, but am heading back to the mooring, now). I dont have the funds to engage our esteemed boat building industry! They cater more to superyachts, than the likes of me...Aquijo was anchored right by me, yesterday, after such a refit!

Warmth is no problem. Rain is a HUGE problem, atm. Summer is not going well, so far....
 

Tam Lin

Well-known member
Joined
1 Sep 2010
Messages
3,662
Location
Essex, near the R. Blackwater
Visit site
Bolts were reached with an extension bar holding a socket wrench. Very fiddly! I was expecting to get the bowsprit off in a day. It actually took nearer three in the end, mainly because of limited access to bolts: limited access, because they were difficult to reach; also because the bowsprit had bent over one of them, when it sustained damage (the reason I was removing it in the first place), and because someone had decided it was a good idea to glass over ALL the nuts on the inside of hull, and, again, because of limited access, I couldn't just grind this glass away...it was a real PITA, frankly...

Been there, done that, you have my sympathy. Now, from an entirely non expert point of view the lack of a backing plate worries me, especially if your fore stay is connected to the bowsprit. It looks like the upward pressure is pulling the fibreglass up because of the lack of one. I would seriously consider putting one in even if it meant you had to cut an access hole somewhere to do it. Best of luck!
 

TQA

New member
Joined
20 Feb 2005
Messages
6,815
Location
Carribbean currently Grenada
sailingonelephantschild.blogspot.com
D'on't just cut. Remember the recommended edge prep is a 12 to 1 bevel. This is generally easiest to achieve with a rough sanding disk around 36 grit.

With some careful measuring and planning it might be possible to craft a backing plate with captive nuts or threaded holes. Best done before you lose the position of the existing holes.

This assumes the repair to be a perfect match.
 

Akestor

Active member
Joined
12 May 2018
Messages
400
Location
Athens, Greece
www.youtube.com
Thanks Akestor! This is exactly the advice I needed, wrt how to lay the first layer of glass. I also thought that there should be at least a backing plate, glassed and bolted under the laminate, but fitting it with very limited access is going to be tricky, which is probably why there wasn't one in the first place.

Thanks for your pink visual advice: just to clarify, you're saying cut at your dotted line (I assume both port and starboard sides of the bow), and remove the (horizontal) deck laminate, in between these cuts, entirely? This is the section which has badly delaminated, so grinding it to good laminate I think is not really possible: removal may be a better option? Then grind down at your pink shaded area, (and, presumbly, rear of the removed deck section, too), to layer the new glass against, using your PVC sheet trick to support the middle?

You are welcome! Yes since the horizontal part is delaminated there is no reason to keep it there. If you remove it and grind the vertical area around the "hole" with a 36 grit you will have enough surface for the new laminate to be layed.
I ve done much of such work with hand tools because i am at a mooring also. You can easily cut the delaminated area with a hacksaw blade and grind the areas with a handsander.

Regarding the internal, since you were able to remove the nuts from the inside with all the ways you found, it will not be that hard to install a stainleess steel backing plate. But thats a job for 2 again! One holding the plate and keeping the nuts from turning, and the other setting the bolts from outside...

Another thing you can do to make the bowsprit much stronger, is to rig it from the edge to the hull bow as in the picture.
bowspti.jpg
 

dom

Well-known member
Joined
17 Dec 2003
Messages
7,145
Visit site
Some good advice re fibreglass here, but could I ask the OP what the boat is?

The reason I ask is that the problem may be function of poor rig set-up, dooming any repair to suffer the same fate, or worse, cause a deeper structural problem running further into the fabric of the hull.

Also, if fitted, what are the standing tensions on the bobstay and checkstays and what kind of force is the forestay designed to take? The reason I ask is that the forestay is often preset steeved somewhat downwards, straigtening and lifting as tension is applied. Raise a little too much and that kind of fibreglass damage is a near certainty.

If there are no checkstays, one must account for similar forces in the horizontal plane.

As forestay tension is applied and bobstays + checkstays power up, imparting a powerful fore-aft force which also needs to be accounted for.

Basically, a bowsprit introduces a whole cocktail of force vectors, some static some dynamic. That must all play in harmony with the fabric of the vessel supporting as necessary.

If not, something will crack!!
 

yourmomm

Member
Joined
6 Jun 2006
Messages
179
Visit site
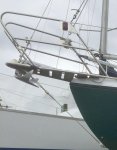
Another thing you can do to make the bowsprit much stronger, is to rig it from the edge to the hull bow as in the picture.
View attachment 74987

I've added some old photos of (pre-damaged) bowsprit. I'm not sure if this what you meant, but it is secured with two bolts where the delamination is (and where original forestay used to be, before addition of bowsprit). It also has an additional two bolts both port and starboard, connecting bowsprit to the rounded gunwhale. I see no damage at the gunwhale bolts, but access to the inside there is bloody difficult as well. The whole structure seems unsatisfactory to me. My previous boat's bowsprit was a 10ft long, 1ft diameter hunk of mighty oak, not some flimsy stainless tubing...but ho-hum.
 

Attachments

  • 3204sm.jpg
    3204sm.jpg
    100.3 KB · Views: 0
  • 3out bow capstansm.jpg
    3out bow capstansm.jpg
    111.1 KB · Views: 0
  • strom jib 1c.jpg
    strom jib 1c.jpg
    102.9 KB · Views: 0

yourmomm

Member
Joined
6 Jun 2006
Messages
179
Visit site
Some good advice re fibreglass here, but could I ask the OP what the boat is?

The reason I ask is that the problem may be function of poor rig set-up, dooming any repair to suffer the same fate, or worse, cause a deeper structural problem running further into the fabric of the hull.

Also, if fitted, what are the standing tensions on the bobstay and checkstays and what kind of force is the forestay designed to take? The reason I ask is that the forestay is often preset steeved somewhat downwards, straigtening and lifting as tension is applied. Raise a little too much and that kind of fibreglass damage is a near certainty.

If there are no checkstays, one must account for similar forces in the horizontal plane.

As forestay tension is applied and bobstays + checkstays power up, imparting a powerful fore-aft force which also needs to be accounted for.

Basically, a bowsprit introduces a whole cocktail of force vectors, some static some dynamic. That must all play in harmony with the fabric of the vessel supporting as necessary.

If not, something will crack!!

Hi Dom, it's a storfidra 25, originally designed without bowsprit, but these were added to a lot of them without problem, to help ease excessive weather helm. This bowsprit (although not confidence-inspiring, from my perspective of its strength) has been on this boat for 30plus years, and survived a number of transatlantic crossings as well as sailing to NZ, from Denmark...so it must have done its job, flimsy though it seems to me. I think it's just that the damage sustained when the previous owner left (swinging) mooring lines over it was greater than I originally realised. Looking more closely at the bobstay plate (8mm steel), I think the small deflection starboard to it (no more than 3mm) is also a result of the same damage. I dont think it's big enough deflection to warrant attention (as the bobstay can still pull straight downwards, when everything's fixed), but it shows the kind of forces which were involved when the damage was sustained. I'm figuring the bobstay failed to do its job, because it was no longer pulling straight downwards, but to the starboard side, as the bowsprit starboard arm collapsed under the weight of the swinging mooring line...this meant the forestay was no longer balanced, and this caused the damage. I guess this bowspirit's strength depends on all that stainless tubing being perfectly in line, and as soon as it's not, all hell breaks loose.

As I say, it doesn't inspire confidence (eg, what about waves in a heavy storm, colliding with it, and exerting more lateral force than it can cope with?)
 

dom

Well-known member
Joined
17 Dec 2003
Messages
7,145
Visit site
Hi Dom, it's a storfidra 25, originally designed without bowsprit, but these were added to a lot of them without problem, to help ease excessive weather helm. This bowsprit (although not confidence-inspiring, from my perspective of its strength) has been on this boat for 30plus years, and survived a number of transatlantic crossings as well as sailing to NZ, from Denmark...so it must have done its job, flimsy though it seems to me. I think it's just that the damage sustained when the previous owner left (swinging) mooring lines over it was greater than I originally realised. Looking more closely at the bobstay plate (8mm steel), I think the small deflection starboard to it (no more than 3mm) is also a result of the same damage. I dont think it's big enough deflection to warrant attention (as the bobstay can still pull straight downwards, when everything's fixed), but it shows the kind of forces which were involved when the damage was sustained. I'm figuring the bobstay failed to do its job, because it was no longer pulling straight downwards, but to the starboard side, as the bowsprit starboard arm collapsed under the weight of the swinging mooring line...this meant the forestay was no longer balanced, and this caused the damage. I guess this bowspirit's strength depends on all that stainless tubing being perfectly in line, and as soon as it's not, all hell breaks loose.

As I say, it doesn't inspire confidence (eg, what about waves in a heavy storm, colliding with it, and exerting more lateral force than it can cope with?)

Oh okay, I think I’m getting it: you have a bowsprit held by a combination of a bobstay plus stainless steel tubular side arms in place of bowsprit shrouds. If all is set up correctly, the heel of the bowsprit should be primarily experiencing an aftward force. Smaller lateral and vertical forces will depend on the distance between the bowsprit’s heel and the gammon joint, which I’m guessing is quite short here.

My my advice would be to first effect a repair, making sure you grind out all of the delaminated fibreglass. This may be quite a lot! Adding biaxial tape may also be tricky with all of those curves, but the aforementioned West link provides the necessary dets.

Next, I’d check the tensions of the bobstay, arms/struts, forestay, etc. when you set the boat up again. An 8mm wire bobstay incidentally sounds quite chunky on such a boat and in light of the impressive journeys she has undertaken, it sounds like there can’t be much wrong ;)
 
Last edited:

DownWest

Well-known member
Joined
25 Dec 2007
Messages
13,752
Location
S.W. France
Visit site
Just chucking in an idea here.. But would it be too difficult to chamfer the sides and relaminate the skin, then bog in some epoxy filler and just use cross bolts to secure the side plates?
 

Birdseye

Well-known member
Joined
9 Mar 2003
Messages
28,322
Location
s e wales
Visit site
It looks to me as if the crack runs round both sides of the fitting, which suggests damage cause by an upward force on the end of the bowsprit. I dont see how this can have been caused by mooring ropes on the end of the sprit since they would pull downwards. Have you checked the other end of the wire running down to the bow? In other words, did that go slack and the force of the forestay pull the end of the sprit upwards breaking the laminate?

You cannot be sure what state the laminate is in so if the boat were mine I would take an angle grinder and cut out the whole area going an inch or more down the sides. Done carefully this will give you a former that can be used to get the right final shape. Pnce you have that degree of access, then you can fit re-inforcement shaped to go part way down the sides. I would use epoxy every time and marine ply for the re-inforcement,

Once the re-inforcement is in position and stuck there, you can start to relaminate the sides and top again using epoxy and woven rovings. You need to chamfer the edges to get a decent bond and to build up a few layers. Filling in with epoxy putty will allow you to get the shape.

Simple maths will give you the size and loading of the bobstay to take the load of the forestay.
 

yourmomm

Member
Joined
6 Jun 2006
Messages
179
Visit site
It looks to me as if the crack runs round both sides of the fitting, which suggests damage cause by an upward force on the end of the bowsprit. I dont see how this can have been caused by mooring ropes on the end of the sprit since they would pull downwards. Have you checked the other end of the wire running down to the bow? In other words, did that go slack and the force of the forestay pull the end of the sprit upwards breaking the laminate?

You cannot be sure what state the laminate is in so if the boat were mine I would take an angle grinder and cut out the whole area going an inch or more down the sides. Done carefully this will give you a former that can be used to get the right final shape. Pnce you have that degree of access, then you can fit re-inforcement shaped to go part way down the sides. I would use epoxy every time and marine ply for the re-inforcement,

Once the re-inforcement is in position and stuck there, you can start to relaminate the sides and top again using epoxy and woven rovings. You need to chamfer the edges to get a decent bond and to build up a few layers. Filling in with epoxy putty will allow you to get the shape.

Simple maths will give you the size and loading of the bobstay to take the load of the forestay.

Well this is what I had originally thought, too, (and am still worried about). There's nothing wrong with the bobstay: both it, and its turnbuckle, are huge, so easily capable of taming the forestay. Although as noted above, the turnbuckle is on maximum compression, so no scope for tightening any further. One idea I had was to make up a new, slightly shorter bobstay, so there was more scope for adjustment in balancing the forestay...but ais say, it seemed adequately taught before (perhaps only because the damage had already lifted the bowsprit, somewhat!). I dont really have a clue how the damage was sustained, whether over time, (from unbalanced tension on the forestay), or whether in the mooring line incident (you're right in thinking that the force here should have been acting downwards, but the bend in the starboard bowsprit stainless toe rail tube actually occurred astern of this damage, and the sprits toe rail tube was very much pointing upwards, where this damage was). Hopefully if I can shorten the bobstay a little to increase tensioning adjustment I will be able to balance the forestay and bobstay adequately when everything's fixed (would this need a tension gauge, or can it be done by feel alone?)
 
Top