Akestor
Well-Known Member
Hello!
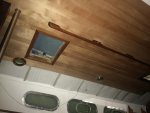
As you can see at the pic ,the top side is naked and i am thinking of ways to make a nice and warm headlining. Previous owner had removed the original messy headlining and painted the fiberglass with white paint (acrylic home paint for external use).
Now i am thinking of sticking velcro (red lines at the pic) and attach 4mm plywood planks alongside the length of the boat (brown lines). The pros is that i will be able to remove the planks for any reason needed easily, but the cons is probably that the velcro will detach at the first warm day of the summer...
Ideas are very welcomed!
Last edited:

") Can you recall how deep you went drilling into the fiberglass roof for screwing the supporting laths? Also..did you make templates for the panels first? or just measured and cut the plywood ?
Can you recall how deep you went drilling into the fiberglass roof for screwing the supporting laths? Also..did you make templates for the panels first? or just measured and cut the plywood ? ")