Tradewinds
Well-Known Member
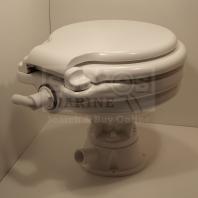
As per heading. For some reason Blakes Taylor only offer a 90 degree inlet spigot for the Popular toilet (see pic below). All my existing pipework is for a Lavac zenith which has a straight inlet spigot.
Has anybody managed to source a replacement straight spigot? I don't want to have to cut away great chunks of GRP to accommodate this right angle spigot.
PS. I've talked to Spares Marine who have a straight spigot for the Zenith - unfortunately this does not fit the Popular model.
Ideas, information gratefully received.
TIA
Edit: I've already bought the Popular so don't want to buy a more expensive Zenith. Anyhow, it's too late to take it back now!
Last edited:


.JPG")