Bukh DV20 Exhaust elbow

James_Calvert

Well-known member
Joined
6 Oct 2001
Messages
2,502
Visit site
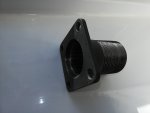
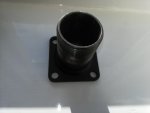
A possible problem with one like the stainless one piece one pictured above is that you may want to rotate it a bit on the square flange to meet your exhaust hose. It isn't necessarily square on.

On getting the old one off the flange, you need a big set of stillsons/pipe wrench. There's a big lock nut to back off first. Then it will hopefully unscrew...
 

joyfull

Member
Joined
10 Feb 2014
Messages
177
Location
Plymouth, UK
Visit site
AFAIk they are the same but Norris will be able to tell you. Separating the flange and elbow isn’t something you can do on the boat I found, it needs a vice etc. There is some talk earlier in the thread that the stainless weld won’t deal well with seawater, I don’t know how true that is though.

The stainless one in the pix includes the flange so I guess that saves some of the grief
 

James_Calvert

Well-known member
Joined
6 Oct 2001
Messages
2,502
Visit site
The stainless one in the pix includes the flange so I guess that saves some of the grief
That's OK if the flange is attached to the elbow at the angle needed for your exhaust installation...

The other thing is that a new water injection hose comes with the standard Bukh elbow kit. You may or may not need a new one of these but getting the existing one undamaged out of the old elbow can be tricky.
 

joyfull

Member
Joined
10 Feb 2014
Messages
177
Location
Plymouth, UK
Visit site
Feeling down now. First attempt to get the elbow off totally useless. Access is in a Centaur with difficult to get to the flange from front or back. No access from over the top. Drenched with wd40 as best I could. Flange studs (13mm I think) not interested at all with reasonable socket spanner. Not a glimmer of movement.

I did not have large enough spanner (around 60mm I think) to have a go at the large nut connecting the elbow to the flange. Will head back ashore and look if I have a spanner large enough.

I think it has all been in place forever and have no idea how I will get either part to move

Not a good morning!

Anyone with ideas gratefully received.
 

Charlie Boy

Well-known member
Joined
14 Jul 2019
Messages
2,927
Location
Alongside Ukraine
Visit site
Did you try to undo the flange nuts first? Have they ‘rounded’? If not then a dab of plus gas, penetrating oil or even diesel is better than WD40. Leave it on overnight though. If that fails then remove the whole exhaust from the head and take the lot home! Then heat can be applied to the stud nuts without setting fire to the boat (ha-ha).
Getting the elbow off the exhaust pipe is a bit of a bastard too, don’t try until the flange/elbow assembly is free, you may also need to apply some lube to that joint beforehand.
DON’T try to undo the joint between the elbow and the flange while you are on the boat. As said before, take it ashore and apply heat generously! Then use a Stilson .
 

James_Calvert

Well-known member
Joined
6 Oct 2001
Messages
2,502
Visit site
You need to get the flange nuts off. They should be brass or bronze or some such, therefore shouldn't have rusted on, although I can quite imagine how they could have got rounded off at the corners.

If that's the case, once you've got something to grip on them they should undo quite easily. I have a set of small and narrow jawed mole grips that can be handy in this situation.

Obviously you haven't inadvertently been trying to tighten them instead... sorry please don't take offence!

When I take mine off it's easier to remove the exhaust hose at my plastic watertrap end and wrestle with the elbow end once it's all off.
 

Poignard

Well-known member
Joined
23 Jul 2005
Messages
51,469
Location
London and Brittany
Visit site
Feeling down now. First attempt to get the elbow off totally useless. Access is in a Centaur with difficult to get to the flange from front or back. No access from over the top. Drenched with wd40 as best I could. Flange studs (13mm I think) not interested at all with reasonable socket spanner. Not a glimmer of movement.

I did not have large enough spanner (around 60mm I think) to have a go at the large nut connecting the elbow to the flange. Will head back ashore and look if I have a spanner large enough.

I think it has all been in place forever and have no idea how I will get either part to move

Not a good morning!

Anyone with ideas gratefully received.
.

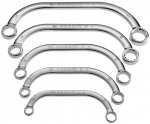
These type of ring spanners can be useful in confined spaces. I use one (13mm) to remove the exhaust flange nuts on my BUKH DV10 in preference to a socket. Make sure you buy a good make, eg Snap-On or Britool. These will fit the nut well. Cheap ones may round off the nuts and then your problems are worsened.


crescent half moon ring spanners.jpg
WD40 is pretty useless as a penetrating oil. I have always used PlusGas as it's readily available and does the job but there are other makes. Give it time to work.

When you re-assemble, use brass nuts instead of the steel ones originally fitted. They are perfectly strong enough and won't corrode into place. You'll be glad you did next time!

Meanwhile, if the existing steel nuts definitely can't be shifted, perhaps because they are rounded off, you may have to resort to removing the cylinder head complete with exhaust flange and elbow. If the engine is in a poor state, it would be a good idea to have it off and overhaul it anyway.
 

James_Calvert

Well-known member
Joined
6 Oct 2001
Messages
2,502
Visit site
Again assuming whatever you have got onto the nuts is a tight fit or well clamped, a knock on the other end with a heavy item like a lump hammer may get the nut started.

The point is that whilst you may not be able to get enough torque on the spanner because it's too awkward, something heavy can have enough momentum in it to make a difference, even though you have hardly any space to wield it.

But mind you don't bang your fingers with it!
 

joyfull

Member
Joined
10 Feb 2014
Messages
177
Location
Plymouth, UK
Visit site
Again assuming whatever you have got onto the nuts is a tight fit or well clamped, a knock on the other end with a heavy item like a lump hammer may get the nut started.

The point is that whilst you may not be able to get enough torque on the spanner because it's too awkward, something heavy can have enough momentum in it to make a difference, even though you have hardly any space to wield it.

But mind you don't bang your fingers with it!

Thank you all for your ideas.

Fortunately I have not rounded the nuts. I tried with a socket set. But did not overload. Just felt that they were very solid and unforgiving. I will spray with penetrating oil and leave overnight. Then try again with the socket set. Not much room to swing a socket spanner.

I presume they are anti clockwise to undo?
 

joyfull

Member
Joined
10 Feb 2014
Messages
177
Location
Plymouth, UK
Visit site
Thank you all for your ideas.

Fortunately I have not rounded the nuts. I tried with a socket set. But did not overload. Just felt that they were very solid and unforgiving. I will spray with penetrating oil and leave overnight. Then try again with the socket set. Not much room to swing a socket spanner.

I presume they are anti clockwise to undo?

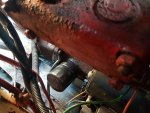
As last resort to take the whole exhaust off the block it looks like four big nuts. Is that all? I presume I will then need a new gasket?20200416_151908.jpg
 

Mistroma

Well-known member
Joined
22 Feb 2009
Messages
4,892
Location
Greece briefly then Scotland for rest of summer
www.mistroma.com
Yes. If you reuse the ‘base‘ plate (off your pic, top left) you’ll need heat to separate the bend from it and exhaust paste to put the new one back.

Brings back memories as I had a DV20 for about 24 years, first elbow failed on a return trip from Holland. I managed to remove the flange using diesel, MUCH better than WD40 which isn't really a penetrating oil. I couldn't get a replacement on East coast of England for several days. Bodged a replacement with cast iron pipe fittings, 2 90 deg. and a T-piece with reducer for the injection. Looked horrible but worked well and go me back to Scotland.:D

I painted the inside of the replacement with some sort of heat resistant paint with fibreglass particles. It worked well and I lasted about 15 years with annual inspection and cleanup. Next replacement was still in use when I sold the boat and engine was 30+ years old at that point. I remember that 5-6 years was thought to be typical for the standard part.

I still have the paper workshop manual and think I might even have a scanned copy somewhere. I can look for the PDF if it is of use to anyone.
 

Poignard

Well-known member
Joined
23 Jul 2005
Messages
51,469
Location
London and Brittany
Visit site
[…]

I painted the inside of the replacement with some sort of heat resistant paint with fibreglass particles. It worked well and I lasted about 15 years with annual inspection and cleanup. Next replacement was still in use when I sold the boat and engine was 30+ years old at that point. I remember that 5-6 years was thought to be typical for the standard part.
.

That's a good recommendation. I must try and find some of that,
 

Mistroma

Well-known member
Joined
22 Feb 2009
Messages
4,892
Location
Greece briefly then Scotland for rest of summer
www.mistroma.com
.

That's a good recommendation. I must try and find some of that,

I wish I could remember the name or manufacturer. I probably first used it in the late 1980s or early 1990s and seem to remember it was a pinkish colour. It said something about interlinking fibreglass when it had cured and also high temperature resistance. I used it twice on the DV20 and once on my new Yanmar. I'd transferred the remnants into a small glass jar and stored it upside down for many years. All gone about 10 years ago and no idea what it was.
 

Poignard

Well-known member
Joined
23 Jul 2005
Messages
51,469
Location
London and Brittany
Visit site
I wish I could remember the name or manufacturer. I probably first used it in the late 1980s or early 1990s and seem to remember it was a pinkish colour. It said something about interlinking fibreglass when it had cured and also high temperature resistance. I used it twice on the DV20 and once on my new Yanmar. I'd transferred the remnants into a small glass jar and stored it upside down for many years. All gone about 10 years ago and no idea what it was.
OK thanks. I'll try and find it on the net or maybe someone else here will know.
 

Mistroma

Well-known member
Joined
22 Feb 2009
Messages
4,892
Location
Greece briefly then Scotland for rest of summer
www.mistroma.com
OK thanks. I'll try and find it on the net or maybe someone else here will know.

Actually, I had a sudden flash of inspiration and am pretty certain it was a Hammerite product we used in industry (hence my unmarked container :D)/

Hammerite mention "Glassguard Protection"
As the HAMMERITE Rust Cap coating dries, millions of heat-hardened glass flakes interlock with special resins, forming a super-tough barrier that seals out moisture to prevent rusting.

HAMMERITE -MANUFACTURERS -Paint Colors

I didn't see a reference to temperature resistance. I might be tempted to buy some before it is banned for some reason (things which work well and contain VOCs do seem to be banned eventually these days :D).
 

joyfull

Member
Joined
10 Feb 2014
Messages
177
Location
Plymouth, UK
Visit site
Unbelievable. Three nuts off. One still very very reluctant.

Should the flange just pull off (with a bit of help)?

When I get the new elbow do I need to add gasket or paste or clean the face etc
 

Poignard

Well-known member
Joined
23 Jul 2005
Messages
51,469
Location
London and Brittany
Visit site
Unbelievable. Three nuts off. One still very very reluctant.

Should the flange just pull off (with a bit of help)?

When I get the new elbow do I need to add gasket or paste or clean the face etc
.

Well done! You're getting there.

It should just pull off but might need a gentle tap with a mallet.

Clean the faces and fit a new gasket. Don't use any gasket cement.
 
Top