Removing old headlining glue and foam, how clean?

steve yates

Well-Known Member
Joined
16 Oct 2014
Messages
4,102
Location
Benfleet, Essex/Keswick, Cumbria
Visit site
I ripped all the vinyl out of the Longbows forecabin last year, and have started scraping the crud off the roof and sides. I’ll replace it with either wood or pvc cladding or ply panels,( no foam backed vinyl is going anywhere near that boat ever again!) Either way will probably involve battens bonded to the roof and sides with insulation of some kind between them.
My question is, just how clean do i need to get back to? Am i wanting to see virgin fibreglass? Also, once scraped to a reasonable point, is it worth a coat of some kind of paint before doing anything else or is that just a waste of time? The 2 pics show opp sides, one scraped back and the other not. Is the scraped one ok to leave now or should i keep working at it?
Thx. FCD387D1-F6C4-446E-A4C9-92E1E32F471D.jpeg0DBE4161-21C4-4631-800E-AF42AEFD6E85.jpeg
 
I had the same situation in the forepeak of my Twister. I scraped the adhesive residue off and painted the hull inside with Dulux Kitchen Emulsion.

Not a very pleasant job (the scraping) but I made myself comfortable on one of these mats, put on a talking book, and got on with it.

1616961974365.png
 
Last edited:
Rather depends on what is being bonded to the roof. I was putting back foam backed vinyl using a similar glue. I got the loose old stuff off with a wire cup brush on an angle grinder. I did not get on with the disc Hawke House recommended.

If you are using a different glue to bond battens you might want to take it back further to bare fibreglass.
 
I'm using wire brushes on a drill, seems the best of the various things I have tried.
What I really want to know is do I gain much by grinding away until I have white fibreglass, instead of dirty or stained looking fibreglass :) It needs to be a requirement to chew away at it and justify all those thousands of extra fibreglass particles floating around , not just to be pretty. Particularly as it will never be seen once the new stuff goes up. But just to make clear, no kind of sticky vinyl, foam backed vinyl or vinyl of any description is going up. It will some kind of system using battens and panels or battens and cladding, so that's a good point David, it needs to take sikaflex or similar for bonding the battens. And some kind of contact spray adhesive probably for sticking up the closedcell insulation between them.
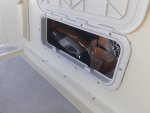
 
When I re lined a boat I used the wire brush, multi tool , wire brush head on a drill to scrape/grind all the loose bits off. Well most of them - doubt you’ll ever get 100% off. The foam backing will cover virtually all of the bumps left.

White hooded suit, goggles, dust mask and good gloves plus a bit of graft and you’ll be ready for glue sniffer heaven sticking on the new stuff....
 
If you're going to epoxy battens to the inside, I'd get the loose off, then use the weapon recommended by Mr Trayfoot to get back to bare GRP where the battens are going. IMO paint is a bad idea - between the battens you won't see it, and the epoxy adhesion will be weakened by the paint layer.
 
Use double sided sticky back foam from Hawkhouse plus plain vinyl..
+1 for this closed cell foam, I used it on my old boat 10 years before I sold and it was still like new when I handed her over.

Unless there is no suitable alternative never put paint near your boat. It will look great initially, but is an annual maintenance task that you and future owners will curse you for. It's possible to do it well with two pack paints, but the liklihood of doing a good enough prep job for it to last is low.
 
I glued some closed cell foam on to one area with silicone sealant spread with a paint scraper an even layer.
I did not remove any of the old foam or glue and it is still stuck after 4 years.
The old headlining was glued to the foam with the same.
Not perfect but looks alright to me.

Note use white or clear not black.
 
I think you could do a lot of work with much mess and achieve nothing. Just remove loose stuff with a wire brush and bond PVC cladding using grab adhesive mostly and hidden small screws for bits you may need to remove due to wire access, light fittings or deck fittings above. I have been down that road a couple of times. When you have cleaned it up I would wipe over with a strong bleach to kill off any mould spores and then get on ewith the fun bit, cladding is so fast, so clean and the insulation level is so amazing that you do not need to use battens at all unless you have lumpy bits you need to "smooth" over.
 
I did the forecabin of my Griffon last year. I replaced all the deck head surfaces with sheets of ply covered with double sided sticky foam plus vinyl. To hold it up I found some studs that are machine screw on one end and wood screw on the other - had to shorten them a bit.
If you are just covering up then just get rid of the loose stuff.
 
I found a heat gun and a long handled scraper made a lot less mess than grinding off old glue and foam that had pretty much turned to dust. Much slower but we live on board and can't strip the cabin out or have so much glass dust floating around for days.
(In truth it wasn't such a long job for me. Took about 15 minutes to show my wife how to do it and slow wander up to the shop to buy a bottle of half decent vino blanco to slake her thirst after.)

After a lot of sweating and swearing we agreed that if old glue was tough to get off then its fine to leave it and glue over it. Nothings fallen off after six years including three years of fierce Mediterranean summers.

We use closed cell PU foam in the form of 5mm or 10mm foil backed gym mats mostly covered with 5mm plywood. I'm not sure that the foil does much for reflecting heat back into the cabin or, more importantly for me now, reflecting heat back through the deck. But I do know that when the deck measures 45°C with my IR thermometer, bare patches of deckhead underneath measure 40° and insulated cabin lining near that measures 30°. So there's a fair bit of insulating going on.
 

Attachments

  • IMG-20210329-WA0009.jpg
    IMG-20210329-WA0009.jpg
    116.1 KB · Views: 12
I just did a job like that. And I have done them before.

A cup brush on a drill and a cup brush on an angle grinder are worlds apart. It's not just the difference in power, there is some difference in how the wires strike the glue at high speed, like a weed wacker. You really need the grinder, unless the glue is very crumbly. The drill didn't make a mark, the grinder took it right off.
 
Steve. According to Hawke House, if the glue residue is still firmly sticking to the glassfibre and it is reasonably smooth, then you are fine to start bonding over it with new glue. That is the advice I followed when I did in my Fulmar forward cabin.
That was my experience when I did my Jouster - which was the same generation as the Longbow. I made sure I got all the foam remains off, but left the glue, except in a few places where it had formed blobs which were easily removed with a chisel.
 
Steve,
Photos below..

New boards done last year - I still have to tackle the anchor locker bulkhead - on this list next year.

This was just after the boards went up for the first time, so I was just using nuts on the studs lightly tightened because the araldite I bedded the wood screw end into the deck head was not that hard yet. Have now used domed nuts and tightened up a lot harder so it looks a lot better. In hindsight I should have used thinner ply as it which would flex more easily.

20200531_141617 (1).jpg
New sheet of double sided sticky backed foam.

20210330_213638.png
Recovered existing board side view - in my office ready to go back up.
20210330_213733.png
Recovered boards waiting to go back up.
The orange tape is a special from Hawkhouse - it is double sided and was used to stick down all the edges. I then used it single sided to seal the edges.
The tape does not react with the vinyl which duct tape and double sided carpet tape does after about 2 years :-(

20210330_213706.png

So no "No glue was used in the covering of these headlining boards..."
 
Top