PSS Shaft Seal .. adjustment advice please

Boatface

New Member
Joined
31 Jul 2018
Messages
19
Visit site
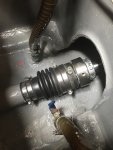
We have a PSS Shaft Seal. I installed it 4 years ago. It's beginning to leak and needs tightening.

Do any forumites have personal experience of doing this, please?
 
They provide an extra set of grub screws for this purpose. The instructions set a fixed distance by which the bellows must be compressed. So measure the overall length and see if the ring has slipped or worn by a significant amount.

One idea I read was to find a length of pipe that will fit over the shaft and slice it lengthwise. You can cut it for the distance between the coupling and the ring, push it on so as to hold the ring in the exact spot whilst you tighten the grub screws.
 
Thank you
pvb : Yes and Yes
MoodySabre: Yes and nice idea to use a split pipe

My concerns are mainly around what may happen to the O rings under the rotor when I try to slide it 1/4 inch down the shaft.
 
Have you checked whether there's any bits of crud on the mating faces? Did you properly compress the bellows when you first fitted it?

I agree about the crud between the faces, in my previous berth (Devon) I had a lot of problems with exactly that. Now that I am on the Clyde, it has not recurred (yet!).

The best answer I found, was to compress the bellows more, so that the water coming in flushed the debris into the bilges.

The bellows do have a life, IIRC seven years.

They are very clear about not reusing the grub screws.
 
An internet search will show there have been several/quite a few failures in service..... Some of them were very costly, as the ocean gets in. I have personal experience. The gear is sold by agents as 'Maintenenace Free' so owners don't do any maintenance - which should include a rigorous inspection regime. Further, the manufacturers' website specifies close torque settings for the 4 grub screws used to secure the rotor in place. Unless you or your meticulous fitter uses the right small torque tool ( not common ) then the achieved settings are likely to be too high or too low. Both can lead to slippage of the rotor along the prop shaft, and in comes the ocean.

A simpler fix than the slit pipe is to affix a pair of s/s Jubilee-style hose clips, screws at 180° for balance, against the rotor so that should the non-reusable grub screws 'wind back' and fail to grip, the rotor cannot move. This reflects the PSS company's actual practice in their larger commercial range of seals. See their website.

The rubber bellows needs to be inspected and replaced regularly, and can develop damage in several ways . Result - failure to keep the ocean out.

One engineer who writes on here will tell you he's never had a problem - perhaps 'cos he's a meticulous engineer. Others will write in here, and in other mags, to tell you of their problems which nearly sunk their boats and caused costly damage to engines, gearboxes and electrical items.

IF the gear is installed exactly as per instructions. IF the gear is inspected and maintained meticulously, as per instructions..... then the gear is good. However - it does NOT fail safe and it CANNOT be inspected to determine how well the grub screws have been fitted. That's two engineering principles breached.

BTW, this was researched some time ago and the tale - including a near-sinking in Falmouth Harbour - written up and offered to PBO. The then editor was initially keen to publish - but someone had a word. It is entirely coincidental that the 'project boat' sports a fine, brand-new and rather expensive PSS Seal.....
 
+1 for flushing the faces. We also turn the faces by hand after a week or so unused to ensure that they have not gummed together as there have been reports of damage to the bellows by twisting due to stuck plates.

I have secured a jubilee clip just 10mm behind the rear seal unit I use this as a visual check that it is not sliding backwards. That clip also served as a lever fulcrum when I was setting the tension, I just used a large screwdriver to compress and hold the bellows while I tightened down the grub screws.
 
Thank you
pvb : Yes and Yes
MoodySabre: Yes and nice idea to use a split pipe

My concerns are mainly around what may happen to the O rings under the rotor when I try to slide it 1/4 inch down the shaft.


I have adjusted mine and not had a problem with the o rings, though I understand your misgivings because, in theory, the indentations left on the shaft (by the grub screws) could jigger them up.

The tricky bit is to pull back the rotor to it's neutral position and then push it forward the required amount (prob 3/4in) whilst being sprinkled with seawater and getting ready to nip up the screws. As long as you are sure there is no detritus under the rotor, it might be best to just push the thing in 1/4in and see what happens.

When you prepare to tackle it remember that there are four grub screws, the second set locking the first in position.

PS

pcatterall makes an excellent point about Jubilees clips, I have always used this method as well
 
Last edited:
Thank you. First hand advice from experienced users .. exactly what I was hoping for
pcatterall: very helpful thank you
doug748: thank you. I was indeed planning to simply shove it 1/4 inch down the shaft as you suggest.
I have already got hold of a new set of grub screws.
 
Thank you. First hand advice from experienced users .. exactly what I was hoping for
pcatterall: very helpful thank you
doug748: thank you. I was indeed planning to simply shove it 1/4 inch down the shaft as you suggest.
I have already got hold of a new set of grub screws.
So.. one or even 2 jubilees tight up to the back of the unit And ease the bellows back the required 1/4" . Leave the clips in situ as a measure of any creep back.
 
fullsizeoutput_567.jpeg
I fitted an anode just in front of the rotor as due to a cutlass bearing issue it had loosened off due to vibration to fully out but IT DID NOT LEAK, after the bearing was replaced and the shaft alignment checked this was how i put it back, you can slide the rotor on the shaft with no issues with the o rings and put the correct tension on.
 

Attachments

  • fullsizeoutput_563.jpeg
    fullsizeoutput_563.jpeg
    155.4 KB · Views: 1
Flushing with fresh water at season end is important, plus of course wetting before use at the start of next season. There is a photo on my website of crevice corrosion on the stainless face of my seal. This occurred over winter when hauled out when I had not flushed it. I know of another similar case. I have never adjusted mine in something like 10 years of use, other than when I turned the stainless collar around. The O-rings are the original ones, no leaks.
 
Top