Oops took this apart and can't remember the right way to reassemble!!

asteven221

Well-Known Member
Joined
6 Jul 2003
Messages
1,414
Visit site
Hi folks.

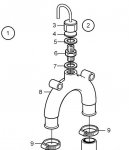
Can anyone advise me on the correct orientation of the nut assembly that has two threads i.e. the bit that joins the the main body to the outlet pipe? If you look closely the threads are different lenghts and slightly different profiles. Unfortunately it fits either way but there is obviously a correct way, that the dumpling (me) who took it apart has forgotten.

It is the anti syphon valve on a Volvo D2-55.

Thanks.
Anti S.jpg
 
It has to be assembled so that the little diaphragm has space to move up and down - the idea is that it moves up to block the outlet when the engine is running, and drops down to allow air in when the engine stops. So I'd imagine that the shorter threaded bit should be upwards. But try assembling it both ways, and see if you can blow through the outlet pipe. There should be some washers involved too.
 
Just to illustrate pvb's post

The diaphragm #4 and the gaskets #5 and #7 are available in a repair kit # 3818424 exchange for a substantial number of beer tokens
 

Attachments

  • VP vacuum valve.jpg
    VP vacuum valve.jpg
    42.4 KB · Views: 48
We had one like that where the tiny neoprene disk stuck closed and seawater syphoned into the engine. Fortunately there was no serious damage but it took a while to get everything back to normal.

While you have it dismantled I would suggest you fit a more robust design, like Vetus for example.
 
Thanks for the info and taking time to reply.

Sorry I should have said that I took it apart to clean it and have the service kit to replace the washers and diaphragm. I have the Volvo manuals as well, but unfortunately the drawing doesn't show the difference in the two threads so regrettably doesn't help. If you look closely at the photo the threads are actually totally different. As well as being different lengths, the shape at the base and at the top of each are different which suggest that there is a correct orientation for fitting. Unfortunately, the part will screw in no bother whatever way it's installed. May that's why Hoolie had a problem with his valve??

Thanks.
 
Just to illustrate pvb's post

The diaphragm #4 and the gaskets #5 and #7 are available in a repair kit # 3818424 exchange for a substantial number of beer tokens

What do you do if, after you've successfully got it all back together, you have some parts left over?
 
What do you do if, after you've successfully got it all back together, you have some parts left over?

If you are replacing any worn parts you will have parts left over.

In saying that I have quite often had bits left over I cannot identify. I just throw then in my spairs bin until I find where they fit of the item works OK.

For the OP I have a engine anti siphon loop without any valve the water just flows out like a pee tube of an outboard.

The trick is to locate it so you can see the pee easy when the engine is running.
 
Turn it round so that machined end is towards the outset and when you assemble it hold hose connection with loop in left hand drop the diaphragm in to the nut and then screw the Y piece in from top but if you are left handed then hold with right hand as I recall
 
Top