lustyd
Well-Known Member
Hi all, the Garmin GPSMap 235 on my dads boat didn't have a user replaceable battery, and the one on the board was flat. Here are some instructions in case they help anyone else out.
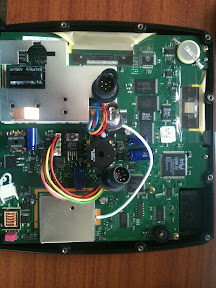
I undid the 12 small screws on the back, and also removed the nuts from the wiring sockets. The back of the unit then comes off easily (watch out for the rubber seal, you'll want that in place later on.
Here is the battery supplied which is "not user serviceable"

SO, being nerdy I got out the soldering iron and removed this battery with it's tabs. The reverse shows the model as BR2032 which is the same as CR2032 (just a panasonic version of it). Here it is removed:

I then bought, for 99p at Maplin, a CR2032 holder and soldered it in. To do this you have to bend the pins flat to reach the solder points but it fits nicely. Make sure you get positive and negative the right way around.

And Voila, a user serviceable battery. Was that so hard Garmin?
I undid the 12 small screws on the back, and also removed the nuts from the wiring sockets. The back of the unit then comes off easily (watch out for the rubber seal, you'll want that in place later on.
Here is the battery supplied which is "not user serviceable"
SO, being nerdy I got out the soldering iron and removed this battery with it's tabs. The reverse shows the model as BR2032 which is the same as CR2032 (just a panasonic version of it). Here it is removed:
I then bought, for 99p at Maplin, a CR2032 holder and soldered it in. To do this you have to bend the pins flat to reach the solder points but it fits nicely. Make sure you get positive and negative the right way around.
And Voila, a user serviceable battery. Was that so hard Garmin?