GRP repair

muzzaman

New member
Joined
22 May 2008
Messages
110
Visit site
photo 1.jpgphoto 2.jpgphoto 3.jpgphoto 4.jpgEvening folks,

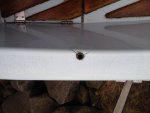
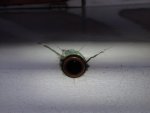
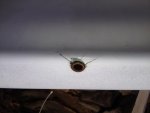
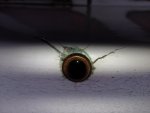
My autohelm fixes into a metal tube which is positioned on the cockpit side. You will see that around it some cracking has developed.

This is not due to the use of the autohelm I hasten to add but because this hole was used to help position a wooden brace attached to the tiller. This was in order to centre the tiller when on her mooring. When the boat (bilge-keeler) took the ground at low tides however, undue pressure I think was put on the brace resulting in cracking around the fittting.

How best to repair this? - grind out the cracks and fill with some gelcoat repair? I did also think about fixing some kind of small stainless steel plate to the area and placing the autohelm "tube" in the centre of this. I am trying to think of the most aesthetically pleasing solution!

Any thoughts or experiences of this kind of repair would be really helpful.

Many thanks in advance.

Murray.
 
Last edited:

V1701

Well-known member
Joined
1 Oct 2009
Messages
4,626
Location
South Coast UK
Visit site
How thick is the fibreglass there? The trouble with where it's positioned is that it's difficult to have something (a block of hardwood, e.g.) underneath for the metal tube to sit in to make the whole thing stronger...
 

muzzaman

New member
Joined
22 May 2008
Messages
110
Visit site
Thanks for replying - I am not sure how thick the GRP is there. I will check but I don't think it would be that thick. Sone kind of block underneath would be difficult to position as you say but would make it stronger.

What about just grinding our the cracks and filling with something? I have no real experience in these kind of repair - would it be repaired with epoxy, gelcoat?

Any other imaginative ideas for strengthening the whole thing would be very welcome!
 

V1701

Well-known member
Joined
1 Oct 2009
Messages
4,626
Location
South Coast UK
Visit site
You're welcome. If it is possible to get a block of hardwood underneath the coaming (by climbing into the cockpit locker) I think I'd remove the the metal tube & use CT1 adhesive to fix the block in place. Once it's in place it will also make the GRP repair easier. Then drill a new hole for the metal tube a bit forward or aft of current position & also in the middle of the coaming. Maybe drill a couple of holes towards either end of the wooden block & screw in a couple of beefy SS screws to better secure it, which you could countersink, fill & fair if you want them invisible...
 

Gwylan

Well-known member
Joined
31 May 2007
Messages
3,651
Location
Moved ashore
Visit site
View attachment 48752View attachment 48753View attachment 48754View attachment 48755Evening folks,

My autohelm fixes into a metal tube which is positioned on the cockpit side. You will see that around it some cracking has developed.

This is not due to the use of the autohelm I hasten to add but because this hole was used to help position a wooden brace attached to the tiller. This was in order to centre the tiller when on her mooring. When the boat (bilge-keeler) took the ground at low tides however, undue pressure I think was put on the brace resulting in cracking around the fittting.

How best to repair this? - grind out the cracks and fill with some gelcoat repair? I did also think about fixing some kind of small stainless steel plate to the area and placing the autohelm "tube" in the centre of this. I am trying to think of the most aesthetically pleasing solution!

Any thoughts or experiences of this kind of repair would be really helpful.

Many thanks in advance.

Murray.

Look at the West System site for ideas and techniques.

Can you get inside the coaming?
If do, then glass a piece or prices of ply on the inside surfaces. Then some epoxy with a filler, sawdust will do, but not ideal.

Then remove the metal tube, clean away the cracked portion. Then glass the metal tube to the bit of wood you put inside the coaming and repair the area that you removed all the cracked material from.

Scrounge around for a colour that will come near to matching the present colour of the boat. Make some gel coat and apply as the last coat. Stretch some cling film over it to give a reasonable surface. When it has all gone off you can gently sand the gel coat back to make a neater finish.

It may not be the greatest looking job, but it should be stronger than it ever was before.
 

muzzaman

New member
Joined
22 May 2008
Messages
110
Visit site
Salar - this was the idea I was toying with. I have a sheet of 316 s/s but not sure how easy it would be to shape it to make it look decent. Any idea as to how easy or otherwise it would be to do? I am slightly concerned that it would be raised up too much above the coaming.

I would still probably fit a hardwood block underneath if possible.

Get a disc made up in 316 stainless with a hole though it and bolt it over the weakened area. This can look quite stylish, and it would strengthen the helm position.
 

rob2

Active member
Joined
23 Aug 2005
Messages
4,093
Location
Hampshire UK
Visit site
I think most people glue a hardwood block (offcut) under the skin before drilling for the fitting. So long as you add a backing pad beneath it to spread the load and prevent localised flexing, it would be fine to grind out the cracks and fill them, but without a backing pad it will crack again as soon as you use the autohelm.

Rob.
 

TQA

New member
Joined
20 Feb 2005
Messages
6,815
Location
Carribbean currently Grenada
sailingonelephantschild.blogspot.com
Don't overthink or overcomplicate things. It is a simple repair.

Grind out the cracks keeping a bit showing the colour if you can. Fill with Marinetex, Araldite or West system epoxy. P 40 would do at a push but polyester resin does not bond as well as epoxy. Sand smooth.

Take that chip you saved visit a shop that sells rattle cans of paint and match the colour.

Mist on a few coats and the job is done.

Do all of this on a warm dry day.
 
Last edited:

salar

Active member
Joined
5 May 2009
Messages
985
Location
Hampshire, UK
harley25refit.blogspot.co.uk
Salar - this was the idea I was toying with. I have a sheet of 316 s/s but not sure how easy it would be to shape it to make it look decent. Any idea as to how easy or otherwise it would be to do? I am slightly concerned that it would be raised up too much above the coaming.

I would still probably fit a hardwood block underneath if possible.

If it broke once it may break again and a cosmetic repair won't prevent that. There needs to be more support for that tube to spread the load. A fabricator will make up a plate for you that curves round the coaming. If it is shaped nicely it would look really good, and be strong as well as stylish. It would need to be thick enough, drilled and countersunk for the screws then polished, so it would need to be done by a pro but it shouldn't break the bank. The guys that make up rails around boats make that sort of thing for the bases.
 

westhinder

Well-known member
Joined
15 Feb 2003
Messages
2,523
Location
Belgium
Visit site
On my previous boat the tube was incorporated into a rectangular SS plate some 8x6 cm with rounded corners to spread the load evenly. The plate was fixed with SS screws on the four corners. Neat and strong
 

William_H

Well-known member
Joined
28 Jul 2003
Messages
13,962
Location
West Australia
Visit site
I agree that a metal plate over the damage and providing more strength is the best option. It is very difficult to make an invisible repair to the gel coat.
As said these tubes for the auto helm take sideways load so really need depth of support to avert the the fitting being bent sidewayswith load.
If you can't get under neath the fitting then use thicker metal for the cover plate. good luck olewill
 

nimbusgb

Active member
Joined
22 Oct 2005
Messages
10,058
Location
A long way from my boat! :(
www.umfundi.com
grind out and patch with epoxy.

Add a stainless plate rolled to match the curvature and mirror polished mounted with countersunk domed headed stainless screws ( can you get behind? )

bending the plate will not be easy though even a 1mm sheet is pretty resilient! You might need to find someone with a decent roller
 

PuffTheMagicDragon

Active member
Joined
16 May 2001
Messages
14,406
Visit site
You'll probably find (as I did) that the metal ferrule is embedded into solid fibreglass. In that case remove the ferrule, fill hole with resin and chopped strands and make good the gelcoat. Then drill a new hole leaving more material from the edge of the coaming, say 2 or 3mm.

HOWEVER, the problem was not weak fibreglass. Consider yourself lucky because if the fibreglass had not fractured you could have easily been looking at repairing a damaged rudder! If I were you I would seriously consider using a thin line to restrain your tiller and never a wooden brace.
 

muzzaman

New member
Joined
22 May 2008
Messages
110
Visit site
Many thanks for all the responses. I had a look in the coaming space and can probably just about reach in to position a wooden backing piece although glassing it in will be too difficult as I can't really reach. The only option I think is to cover the wooden backing piece in adhesive / epoxy, somehow push up to the underside of the coaming and place a wooden brace underneath it whilst it cures.

I will then try and get a stainless steel plate cut and shaped. I have a piece of 316 s/s sheet (2mm) thick. Any tips on how to best achieve the required curve - I suspect this will be difficult!
 

V1701

Well-known member
Joined
1 Oct 2009
Messages
4,626
Location
South Coast UK
Visit site
Many thanks for all the responses. I had a look in the coaming space and can probably just about reach in to position a wooden backing piece although glassing it in will be too difficult as I can't really reach. The only option I think is to cover the wooden backing piece in adhesive / epoxy, somehow push up to the underside of the coaming and place a wooden brace underneath it whilst it cures.

I will then try and get a stainless steel plate cut and shaped. I have a piece of 316 s/s sheet (2mm) thick. Any tips on how to best achieve the required curve - I suspect this will be difficult!

Personally don't think an SS plate necessary if you have a block underneath, however making a template of the required profile maybe. How about using a big SS penny washer instead, expand the hole with a cobalt drill bit...
 

muzzaman

New member
Joined
22 May 2008
Messages
110
Visit site
Thanks, my thoughts re the s/s plate really are about covering over any shoddy repairs to the grp not having done this before.
 
Top