Frozen Whitlock Cobra parts

fulmarnyc

New member
Joined
10 May 2020
Messages
13
Visit site
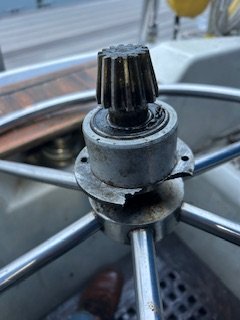
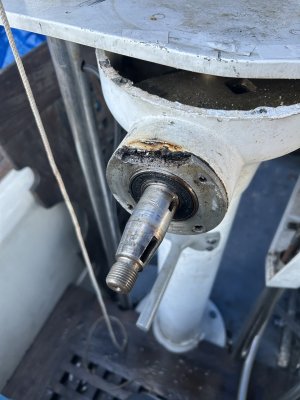
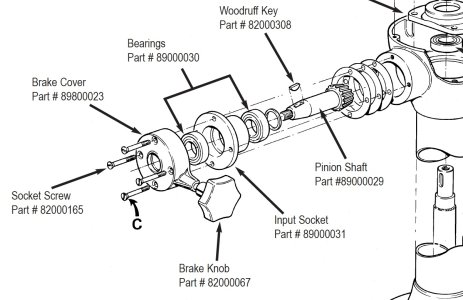
I’m trying to disassemble my Whitlock Cobra (4 I believe) pedestal and I’m currently stuck at trying to remove the input socket from the top bowl. I tried putting the wheel back on the spindle and whacking it with a rubber mallet, it wouldn’t budge. I then tried heating the bejesus out of the socket with a MAP torch, still nothing. I’m not sure if the installer used adhesive instead of grease or it’s just totally locked in from corrosion but I have no idea what to do next. Any suggestions?
whitlock spindle.jpgwhitlock schematic.jpg
 

RunAgroundHard

Well-known member
Joined
20 Aug 2022
Messages
2,339
Visit site
Suggestion
Look under the white boss that is part of the pedestal, that the "input socket" fits into. Check if there is a grub screw that locks the "input socket" in place. I don't if there is one, but on my pedestal, not a Whitlock, there was an additional grub screw that was not obvious on the equivalent of the "brake cover".

As it is destroyed, use a 36" Stilso (pipe wrench) and try and brake the bond, or grind a couple of flats, then with a large spanner try and break the bond. Good luck.
 

greeny

Well-known member
Joined
15 Jun 2004
Messages
2,409
Location
Portugal
Visit site
Drill and tap 3 holes at equal angular positions in the socket face then use three set screw or bolts to jack the socket out bit by bit. A bit of heat on the pedestal hub may help. You'll need to drill into the pedestal face slightly to allow the series of taps ending with plug tap to cut a thread right though the socket to allow the jacking screws to bear onto the pedestal face.
 
Last edited:

fulmarnyc

New member
Joined
10 May 2020
Messages
13
Visit site
Suggestion
Look under the white boss that is part of the pedestal, that the "input socket" fits into. Check if there is a grub screw that locks the "input socket" in place. I don't if there is one, but on my pedestal, not a Whitlock, there was an additional grub screw that was not obvious on the equivalent of the "brake cover".

As it is destroyed, use a 36" Stilso (pipe wrench) and try and brake the bond, or grind a couple of flats, then with a large spanner try and break the bond. Good luck.
I’ll get out this week and have a look. Going by memory though I don’t think there is a “set screw”.
It looks bad but I don’t think it’s destroyed. That corner snapped off when I was trying to pry it off but I’ve reassembled since and the “feel” is no different, though it is on the hard.
 

fulmarnyc

New member
Joined
10 May 2020
Messages
13
Visit site
Are the bearings in the output socket meltable, ie can I continue to use heat on it? Bearings seem to be moving fine after 2 rounds of MAP torch
 

KevinV

Well-known member
Joined
12 Oct 2021
Messages
3,110
Visit site
Have you tried a cheese wire? 0.6mm stainless mig wire works a treat with a couple of pieces of dowel for handles. Lubricate generously.
 

fulmarnyc

New member
Joined
10 May 2020
Messages
13
Visit site
Have you tried a cheese wire? 0.6mm stainless mig wire works a treat with a couple of pieces of dowel for handles. Lubricate generously.
Interesting idea. Are you a welder and have mig lying around or is it particularly well suited for this job? I’d have to scrounge for a bit of mig wire
 

pete

Well-known member
Joined
16 May 2001
Messages
1,171
Location
Here
Visit site
Make a pin spanner using a thick steel disk with a large hole in the middle and with 3 short tight fitting dowels to fit your remaining 3 undamaged holes, weld on a handle and try to turn the bush while heating the outer casting,. It's a bit of work but may be your best option to prevent causing anymore damage.
 

Beneteau381

Well-known member
Joined
19 Nov 2019
Messages
2,117
Visit site
I’m trying to disassemble my Whitlock Cobra (4 I believe) pedestal and I’m currently stuck at trying to remove the input socket from the top bowl. I tried putting the wheel back on the spindle and whacking it with a rubber mallet, it wouldn’t budge. I then tried heating the bejesus out of the socket with a MAP torch, still nothing. I’m not sure if the installer used adhesive instead of grease or it’s just totally locked in from corrosion but I have no idea what to do next. Any suggestions?
View attachment 186734View attachment 186735
You need lots of heat on that casting behind the input socket. It will be corrosion between them that is holding it together. By the way Jack screws will break the socket as well if you put to much effort in to them, heat, freeing oil, heat, tsp, wriggle, tap, heat etc and it will cone free eventually
 

fulmarnyc

New member
Joined
10 May 2020
Messages
13
Visit site
You need lots of heat on that casting behind the input socket. It will be corrosion between them that is holding it together. By the way Jack screws will break the socket as well if you put to much effort in to them, heat, freeing oil, heat, tsp, wriggle, tap, heat etc and it will cone free eventually
Time, patience, lots of heat, PB blaster, a rubber mallet and a very thin hack saw eventually did the trick. I used the hacksaw around the socket/casting seam to facilitate PB blaster penetration. Then over 4 sessions it was heat-PB-mallet-heat-PB-mallet, over and over with no sign of progress, then on the 4th day I saw the tiniest gap. Kept at it and it’s finally free. Like many things on old boats, persevering past frustration and common sense is the answer
 

Attachments

  • IMG_9296.jpeg
    IMG_9296.jpeg
    40.1 KB · Views: 13

Beneteau381

Well-known member
Joined
19 Nov 2019
Messages
2,117
Visit site
Time, patience, lots of heat, PB blaster, a rubber mallet and a very thin hack saw eventually did the trick. I used the hacksaw around the socket/casting seam to facilitate PB blaster penetration. Then over 4 sessions it was heat-PB-mallet-heat-PB-mallet, over and over with no sign of progress, then on the 4th day I saw the tiniest gap. Kept at it and it’s finally free. Like many things on old boats, persevering past frustration and common sense is the answer
Lots of people ask similar questions, as you found out, no definitive answer except heat, tap, freeing oil etc and patience
 

Beneteau381

Well-known member
Joined
19 Nov 2019
Messages
2,117
Visit site
Time, patience, lots of heat, PB blaster, a rubber mallet and a very thin hack saw eventually did the trick. I used the hacksaw around the socket/casting seam to facilitate PB blaster penetration. Then over 4 sessions it was heat-PB-mallet-heat-PB-mallet, over and over with no sign of progress, then on the 4th day I saw the tiniest gap. Kept at it and it’s finally free. Like many things on old boats, persevering past frustration and common sense is the answer
If they are ball bearings and lip seal, Simply Bearings will have them. Just carefully measure the sizes and find them on their website
 

Alex_Blackwood

Well-known member
Joined
19 May 2003
Messages
1,893
Location
Fareham
Visit site
Time, patience, lots of heat, PB blaster, a rubber mallet and a very thin hack saw eventually did the trick. I used the hacksaw around the socket/casting seam to facilitate PB blaster penetration. Then over 4 sessions it was heat-PB-mallet-heat-PB-mallet, over and over with no sign of progress, then on the 4th day I saw the tiniest gap. Kept at it and it’s finally free. Like many things on old boats, persevering past frustration and common sense is the answer
Now for new bearings and one of these ;) I don't know about spares in the US :unsure:
Cobra Spares | Lewmar
Glad you got it apart in the end.
 
Last edited:
Top