Do I need to put curve on replacement windows?

Samoddie

New member
Joined
5 Oct 2021
Messages
19
Visit site
Am replacing the port lights in my Anderson 22 (yes, made of unobtainium, etc;) ). Did one in the summer, which was pretty hard, and took almost all day. I had refixed the frame, but stupidly hadn’t sealed the actual pane into the frame. So, frame was well fixed to the boat, and took an age to get off. All told, it took a day to do the one pane (my objective had really been to see how thick the acrylic was, but I wasn’t able to resist rebedding the pane and frame. Am expecting that one remaining frame will be as hard to get off, and the port side much easier cos they wont be at all well sealed once I have the fixings undone. The old acrylic was 4.5mm thick, and based on what I have read I have come to the view that 6mm will likely be fine (unsupported vertical span is perhaps 180mm). One reason I am not going for thicker is that the lights curve a little fore/ aft. My main question is - do I need to apply heat to allow this tiny bit of curve in the acrylic? Or, if the acrylic easily adapts to the shape, will it fine to put the acrylic into the frame, and re bed this frame into the cabin side? Subsidiary questions - I used Sikaflex to both bed acrylic into frame and to seal the frame to the cabin side. On the other hand, it does seem as if people use either specialist butyl products, or even just plain butyl tape? Comments welcome on all these issues! The complicating factor is that I will be doing the work in Feb, on the W coast of Scottish Highlands so while it wont be freezing, it wont be warm. At least when I do the next 3 portlights, the boat wont be afloat!
 

chris-s

Well-known member
Joined
24 Apr 2019
Messages
684
Visit site
We replaced the 12mm acrylic windows on our Beneteau last winter, they were slightly curved but by applying some pressure whilst they set they didn’t need to be pre-curved. Ultimately I guess it depends how much of a curve you have.

IMG_2024-11-24-212754.jpeg
 

Neeves

Well-known member
Joined
20 Nov 2011
Messages
13,103
Location
Sydney, Australia.
Visit site
You should not need to apply heat.

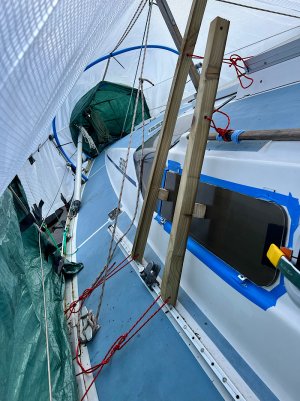
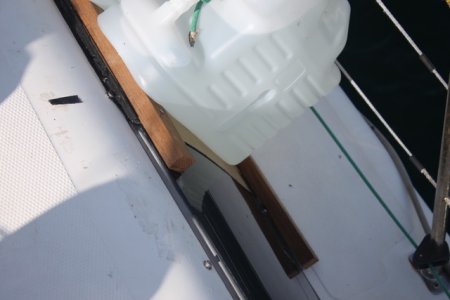
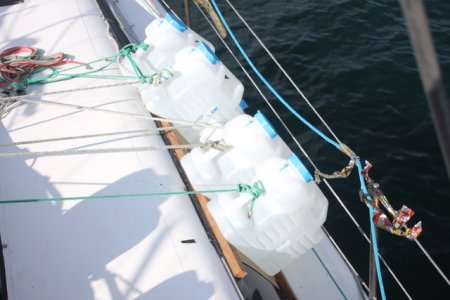
If you secure one side of the acrylic with a strong batten, screw the batten into the fibre glass where you will use (whatever) to secure the port lights. Use another batten at the other side and apply the pressure to bend by screwing the batten down. The 2 secured battens will offer the pressure needed to bend the acrylic (but we added pressure by slinging two water bottles, 25l each, on top of the battens (hang from boom, or rig something up). There are a number of sealants/adhesives from the usual suppliers, Sika, 3M your supplier of CT1 - specifically for acrylic.

I've never used Butyl tape and don't know if it is strong enough to hold a curve.

We did one window at a time, it does take a long time to remove the old window (filleting knife is useful), clean up (a chisel made from acrylic will not damage the gel cost, the gel coat is harder). It also helps to have 2 people - as the acrylic can be quite heavy and you want to drop it into place, precisely.

When the adhesive/sealant has set off, it takes time and will take longer if cold, you can then remove the battens and fill the screw holes with the same sealant. The sealant needs to be quite thick as it has to stretch when set off (heat of the sun on the acrylic).

Jonathan
 

Samoddie

New member
Joined
5 Oct 2021
Messages
19
Visit site
You should not need to apply heat.

If you secure one side of the acrylic with a strong batten, screw the batten into the fibre glass where you will use (whatever) to secure the port lights. Use another batten at the other side and apply the pressure to bend by screwing the batten down. The 2 secured battens will offer the pressure needed to bend the acrylic (but we added pressure by slinging two water bottles, 25l each, on top of the battens (hang from boom, or rig something up). There are a number of sealants/adhesives from the usual suppliers, Sika, 3M your supplier of CT1 - specifically for acrylic.

I've never used Butyl tape and don't know if it is strong enough to hold a curve.

We did one window at a time, it does take a long time to remove the old window (filleting knife is useful), clean up (a chisel made from acrylic will not damage the gel cost, the gel coat is harder). It also helps to have 2 people - as the acrylic can be quite heavy and you want to drop it into place, precisely.

When the adhesive/sealant has set off, it takes time and will take longer if cold, you can then remove the battens and fill the screw holes with the same sealant. The sealant needs to be quite thick as it has to stretch when set off (heat of the sun on the acrylic).

Jonathan
Thanks. Frames are held in place by multiple screws, so not worried about the fixing. Totally agree that butyl has no adhesive power (at least not the stuff I have used)
 

Neeves

Well-known member
Joined
20 Nov 2011
Messages
13,103
Location
Sydney, Australia.
Visit site
You should not need to apply heat.

If you secure one side of the acrylic with a strong batten, screw the batten into the fibre glass where you will use (whatever) to secure the port lights. Use another batten at the other side and apply the pressure to bend by screwing the batten down. The 2 secured battens will offer the pressure needed to bend the acrylic (but we added pressure by slinging two water bottles, 25l each, on top of the battens (hang from boom, or rig something up). There are a number of sealants/adhesives from the usual suppliers, Sika, 3M your supplier of CT1 - specifically for acrylic.

I've never used Butyl tape and don't know if it is strong enough to hold a curve.

We did one window at a time, it does take a long time to remove the old window (filleting knife is useful), clean up (a chisel made from acrylic will not damage the gel cost, the gel coat is harder). It also helps to have 2 people - as the acrylic can be quite heavy and you want to drop it into place, precisely.

When the adhesive/sealant has set off, it takes time and will take longer if cold, you can then remove the battens and fill the screw holes with the same sealant. The sealant needs to be quite thick as it has to stretch when set off (heat of the sun on the acrylic).

Jonathan
IMG_3088.jpegIMG_3089.jpeg

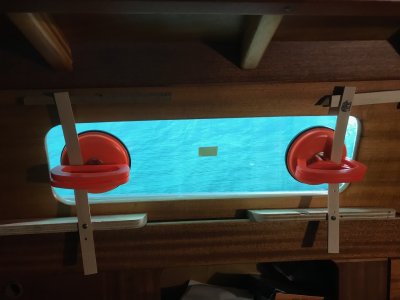
Our curve was not great - but we were using 10mm acrylic. You can see the slight curve and the battens with screws into the fibre glass of the coachroof.

We did try the glass suction devices (for carrying glass) but did not find a satisfactory way of utilising them.

We did have windows with much greater curvature - they needed a former and heat, and we did not have the former nor the ability to apply heat evenly (but the boat builder did have both)

Jonathan
 

Samoddie

New member
Joined
5 Oct 2021
Messages
19
Visit site
Thanks for responses so far. Seems like people think that the putting a tiny bit of curve into acrylic wont cause intrinsic stresses in the material that will ultimately cause failure.
 

Samoddie

New member
Joined
5 Oct 2021
Messages
19
Visit site
Also. Is there really such a thing as ‘marine grade acrylic’ or is this just guff from representatives of the marine inudstry?
 

DownWest

Well-known member
Joined
25 Dec 2007
Messages
13,833
Location
S.W. France
Visit site
Also. Is there really such a thing as ‘marine grade acrylic’ or is this just guff from representatives of the marine inudstry?
I have some acrylic 5mm from the local 'B&Q' bends very easily, no need for heat. But it does have one side treated for UV. Made two smallish oval ports held with ply frames on the curved cabin side
Some time ago I took on a project that required spiral curved panels in 10mm, only supported at the ends. Each panel was around 1 mt /1.20 mt. x .60mt. It softens at 120°, so I built an metal oven and a mould of wood with formica facing. Rested the panel with light clamping on the top of the mould, then popped each one into the oven and waited until it reached temp and draped over the mould.. Worked well, but must be spotlessly clean. Edges polished with wet and dry sandpaper after the jigsaw marks were flattened with a fine flap disc. A belt sander with fine grain is also good for this.
 
Last edited:

PetiteFleur

Well-known member
Joined
29 Feb 2008
Messages
5,104
Location
Suffolk
Visit site
I used Butyl tape to secure the window frame to the coach roof. Also used thin plastic spacers between each pair of screws so the butyl tape didn't get squeezed out. Start the screws at the centre and work your way evenly to the end. The windows were long with 6mm perspex.
 

DownWest

Well-known member
Joined
25 Dec 2007
Messages
13,833
Location
S.W. France
Visit site
And, make the screw holes larger than the screws, pref with a bit of thin plastic tubing as a bush, so the screw doesn't bear on the side of the hole. Less likely to start a crack.
 

bluerm166

Well-known member
Joined
29 Sep 2009
Messages
1,044
Visit site
Our very long narrow windows had been increased from the original 8mm thickness ,no doubt because the sign shop had thicker of the tint reqd.in stock - so one to 10mm and the other to 12mm.
As a result because the original fixing screws were reused the windows leaked even after two attempts under the previous owner to rebed them ,not having sufficient thread in the interior backing to pull them in.
Slightly longer screws did the trick.This might be a consideration in your case,perhaps with finer tolerances as you have a frame involved.

These long ( 1500 ) acrylic panels were decidedly floppy in handling so your 6mm should be fine.
 
Top