Cut out size for a Taylor 030 stove/oven help pleas

HG02

New Member
Joined
24 Apr 2014
Messages
10
Visit site
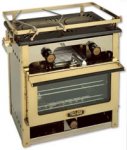
I recently bought a Taylor Paraffin stove 030 model in great condition and wondered if any one had some photos they could post of there cut opening size and some photos to inspire me , and give me direction I have made allowances of 600 mm ( 24 inches roughly) in height and 540 mm in width and was thinking approximate depth would be around 600mm(24 inches roughly with a extended bench top to cover the back . Has any one any suggestions please Many thanks in advance The stove is in transit at thee moment :)
 

Attachments

  • 030.jpg
    030.jpg
    22.2 KB · Views: 0
Hi Tranona
I know that but would have like to see how some of you have fitted the Taylors in the Yachts there not as popular in OZ and there does not appear to be many images fitted that all on Google
Cheers
 
You have to make allowance for the mounting gimbals. Also allow for it to actually gimbal if that's what you want. My 029 fits in a space that's 2ft wide, fitted on the standard gimbals. Not presently aboard so no photos.
All dimensions are here http://www.taylorsheatersandcookers.co.uk/sp030.html
I would order a spare flexible fuel pipe, I have had a few fail usually after removing the cooker from its gimbals. I think they go a bit brittle with time, although the last one I fitted seemed to be of better quality than previous ones.
If you are new to them then the best way to light them is as follows...
Remove the centre cap, pour 15ml of meths down the hole, put the cap back...pull to check it's secure!..,light and put a kettle on during the preheat time. This will be 4 minutes if no fibre insert in the preheat tray or 6 mins if there is a fibre insert. Light as soon as the flame goes out, just as if it were a gas cooker. In this way you will avoid flare ups and the preheat time is not wasted since it will heat the kettle, though the underside will blacken.
Also I use odourless paraffin from Caldo, not sure if available to you.
Another tip is to always turn off the tap between the pressure tank and the cooker after use. Accidentally turning on a hot plate will have paraffin everywhere! But there will still be residual pressure in the fuel line.
Just to add that if your model has the newer type burners then you will need the fibre inserts and the preheat time will be 6 minutes. The newer burners need longer preheat than the older type. Old type are 4 leg, newer are 2 leg.
 
Last edited:
Hi Foeu
Thank you very much for that valuable info, One of the thing that was worrying me a little was finding a good start system and your just gave me that . And I will definitely buy an extra flex flue hose . I am hoping also that I can fit it in a space with Gimbals of 21 inches as this would also give me room for a reasonable sized sink as well.
Thoughts as far as gimbals blocks are securing a block of wood either side and resting and bolting the taylor 030 mounting blocks on those.
taylor stove  cut out.jpg This is the only photo I can find but in this one the wooden blocks appear to mount the Taylor gimbals on the side . I am hoping I can mount on top of the wooden blocks

Many thank for the information Foeu
 
Yes I'm pretty sure mine are mounted on top of wooden blocks. Will be on the boat in a few days, if I can take useful photos I'll post them here.
This site may be of use http://www.sparesmarine.co.uk/webshop/cookers/?brandFilter=Taylors
If you light the burners the way I suggested then you will avoid flare ups and it will be just like using gas. The guy at the factory who made my cooker 12 years ago showed me how to light it. If it doesn't light or flares up when trying to light, then you have not preheated long enough or have waited too long after preheat to light.....wait til cool before a second attempt on that burner.
If you have any problems/questions just PM me, now or in the future.
They are derided as difficult to use by many people who have never used one or don't know how to use one. They are in fact easy and safe to use.
 
That one is only done that way because the cutout is wider than it need be. My O30 has the gimbal blocks mounted on top of wood chocked, but of course you have to get the height right if you want the fiddles below the counter top. No reason if you have not built the bulkheads yet why you would not bolt the blocks direct to them. This does however mean there is little space either side to get the locking screws out when you want to lift the cooker. Once you get your cooker you will find it straight forward to work out the best way.
 
stove top removal 012.jpgstove top removal 2 003.jpg work so far long way to go , I may also make a full width draw at the bottom of the cabinet if I can obtain enough depth
Removed the old stove top amd will mod the cabinet for the gimbal
 
Last edited:
Top