The Restoration of Mai Star II (Gadfly II)

jstarmarine

Active member
Joined
21 May 2021
Messages
434
Visit site
As many of you know from following my other Thread on this forum, I have another restoration project underway at the same time. When I am unable to get up to Chance this yacht is where I spent my spare time when not repairing and restoring my clients boats and yachts

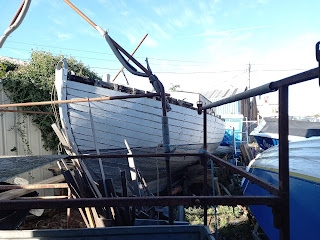
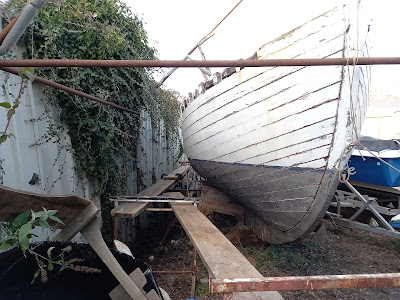
I am taking the time to work closer to home base and get on with my other restoration project Mai Star II. It has been standing in my Yard for the past few years with little being done to it apart from removing much of the rotten deck and broken deck beams.


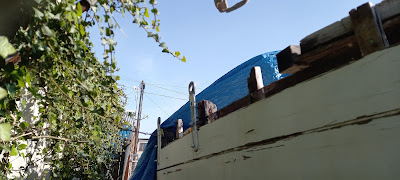
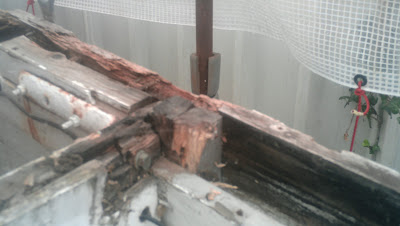
The main job at the being of the project was to get rid of the worse of the rotten and broken parts, such as Broken foredeck deck beams. The two which had broken were the two just ahead of the cabin. These two beams were the original deck beams that were either side of the mast hole through the original deck.
Sometime in the past the lower part of the mast was removed and a steel support post was fitted under the deck to support a tabernacle. The base of which spanned the two deck beams. However, these deck beams broke with old age and now I have to make two more deck beams as well as a number of other deck beams and carlins around the boat.


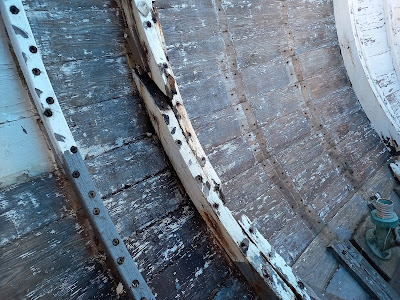
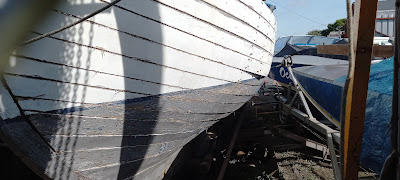
Much of the inside of the hull is in reasonable condition apart from a few places where the fixings have become streched and the planks have move out of position and look like a clicker built boat on the inside as well as the outside especially on the turn of the bilge. This as possibly been to being grounded over the years and not using the boats beaching legs which original holes and backing pads can still be seen in place on the inside of the hull amidships.


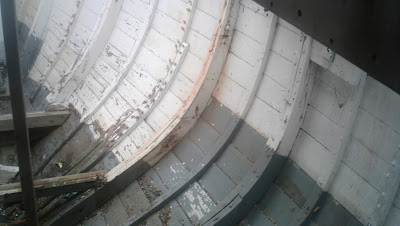
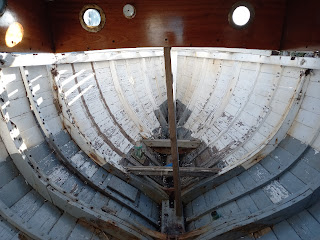
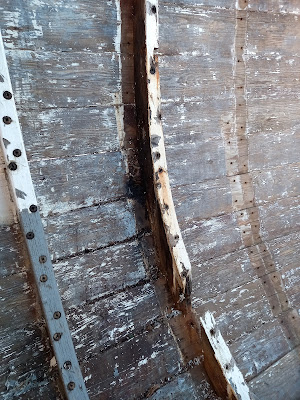
The forward end of the hull on the port side is the worse affected with the most broken rids and damaged frames.


In this photo it can be seen that I will have to replace all the ribs and frames in this area to get the strength back in the hull, before tackling the ribs and frames further along the port side.


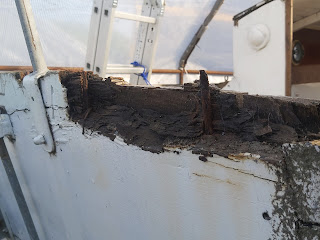
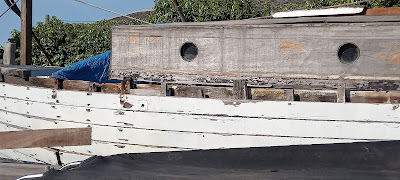
Deck leaks and lack of good ventilation made this area a breeding ground for the top of the frames to go rotten while the rest of the frame is in good order, therefore, it is going to be matter of renewing the top of the frames and making good the whole area around the top of the frames.

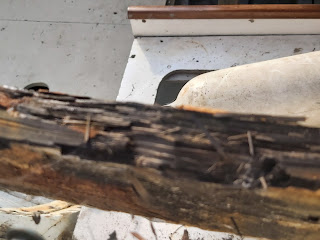
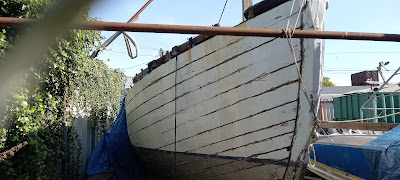
One job that was done early was to remove the whole of the top plank around the hull. It was find that just the top plank was affected and the rot had not go=ne further down the hull.


jstarmarine

Active member
Joined
21 May 2021
Messages
434
Visit site
Now it is time to get on and Make a start on Mai Star II restoration and get her back to a sailing yacht once again.


A far amount of the repairs needed to the hull are in the forward part of the yacht on the port side from the stem back to the midships area of the hull, this is where most of the damaged and rotten wood is situated.


A friend helping remove the rotten deck and top plank


The rotten top plank on the port side showing how badly split it was and rotten in places it was


Same side looking aft showing the rotten tops of the grown frames which will need replacing with new green oak


After 70+ years the top plank as given up the ghost


The same is true of the top of the transom. I will have to look and think hard about whether it is going to be better to just replace the top section or to take the whole transom out and replace the whole of the transom.


jstarmarine

Active member
Joined
21 May 2021
Messages
434
Visit site
Now that some of my day jobs are well underway, it gives me time to get the oak out of the timber pile and get it into a position where I can cut the lengths for steaming the new ribs into the boat once they are cut and planed and thickened to the correct shape and size.


However, before I can do that I will have to get the stems in the planks cleaned out so the gaps in the gaps can close up a bit when the new ribs are steamed in. However I have to clear up the yard round the boat to get to the area I have to work.
 

jstarmarine

Active member
Joined
21 May 2021
Messages
434
Visit site
The long job of raking out the plank seams as started. When all the seams are cleared of the old caulking cotton and putty the plank will be able to move around and be able to be re-fixed to bring the planks back into the original position,


Before any of the refixing of the planks can take place the hull will have to be cleared of any old paint and dirt that has find its way under the ribs and frames in the boat, which is keeping the planks from going back into position and laying flat against the ribs and frames.

So after all the seams are cleared of the old cotton and putty, then inside of the boat is going to need stripping of all the old paint and all the ribs and frames are going to need marking up to see which need to be cleaned out between the planking and ribs and frames to get the planks to sit against the frames and ribs. This will also highlight the frames and ribs that need refixing with new copper nails and in some cases refixing with bronze screws where it is not possible to nail the frames back into position.

When working on Mai Star II the frames were fixed in place using bronze boat nails dead fixed into the frames, which after a lot of years have worked loose and no longer hold the plank in position where a screw will have a better chance of holding the plank to the frames.

One job that I have to do this coming week is to repair the metal frame for the overall cover and get it put up over the boat before the weather takes a turn for the worse. So it is out with the welder and get the frame repaired and back in position.
 

jstarmarine

Active member
Joined
21 May 2021
Messages
434
Visit site
The seams on the port side above the waterline are now done


The starboard side seams are getting there just a few more feet to go before they are done as well


A big task ahead in the cabin, especially in the forward end and amidships


There are a number of repairs needed in the bilge area especially the ribs and the inner hog which needs sorting out


jstarmarine

Active member
Joined
21 May 2021
Messages
434
Visit site
Now that the Christmas break is drawing to an end. It is now time to plan the next stages of the restoration of Mai Star II.

One of the first jobs when I open the boatyard on the 4th of January is going to be to recover the boat with the temporary framework with a new cover after the framework is repaired. During this last year the framework got damaged and had to be taken down and put to one side and put in storage and a cover put over the boat while I was engaged in working my day job as a boat builder running my own yard, so Mai Star II was put on the back burner for the year while work in the yard had to be done first to pay the overheads for the business, then all the Covid restrictions made it difficult to get work done as suppliers were on short time and delays in get equipment and materials from other parts of the world. This all as made for an interesting past year working in a small boatyard by yourself without the company of other people to bounce your ideas off.

Once the framework is repaired and re-erected and the design for holding it together is re-engineered so that any amount of wind and weather hitting the framework and cover will not break the joints where the framework connects together which was one of the problem which made it break in the first place through this last year. Most of the problem was the lack of welding on the spigots on the uprights which were just tack welded together. This time when I have the parts of the framework in the workshop, is to weld a complete weld around the spigots so that the joints are stronger than before and also fit spilt pins to the joints so they can not and will not move apart when being hit by high winds and rain.

So with this work in mind, it is now time to bring the parts of the framework into the workshop and clean up the parts of the framework so that I can make a start of welding up the damaged parts of the framework, so I can re-erect the framework over the boat and get the cover over the boat to help dry out the boat so that the work can start again.

So during the last few days of the Christmas break it is time to draw up a restoration schedule for Mai Star II like the one I have set up for my other restoration project on my James Silver Motor Sailer Chance.
 

jstarmarine

Active member
Joined
21 May 2021
Messages
434
Visit site
Now that I have made time to get the area under the boat clear of any rubbish that as been laying around it as given me a chance to get on and make a start of removing the remaining nails in the bits of ribs that are still in the boat.


Got the area cleared now and so we can make a start on getting the remain bits of rib out and start to make some new ribs to go back in the hull.


jstarmarine

Active member
Joined
21 May 2021
Messages
434
Visit site
The port side forward where most of the damage as been over the years with broken ribs


Now coming back along the hull to where the chain plates are situated is where the most of the damage and rotten frames are situated.


The original toilet seacocks which are in good condition and will be serviced later on in the restoration


Once the frame was removed from its position it was found that the planking in one place was badly damaged and will need to have a new section of planking put in to replace the damaged plank


The frame is in a very poor condition and will be put back in a better way so that it does not move and the planking will go back in its correct position


The condition of the frames is not good at all


This plank joint will be moved when the new section of planking is replaced


jstarmarine

Active member
Joined
21 May 2021
Messages
434
Visit site
The first major job on the port side of the hull will be to clean out the caulking seams and so the planks can move freely and can go back into position and when I make up the two new frames to go in that part of the hull the shape will come back into the hull. Then I will be able to steam the ribs back in to put the strength back in the hull before moving down the hull to the next area to be sorted.
 

jstarmarine

Active member
Joined
21 May 2021
Messages
434
Visit site
Having been away doing the other restoration project, namely Chance up in Woodplumpton in Lancashire, It is now time to turn our attention to Mai Star II once more and get the ribs and frames sorted out in the port side forward section of the hull and the hull sorted out.

Especially in areas like in this photo where the plank as been rotted away at the joint between two planks that are butted together and fixed on a frame and not a butt block. Also the planks have moved so the planks are not laying against the frame as they should do and the hull looks more like a clinker build boat than a smooth carvel hull.

1.jpg


One of the major problems with as old as Mai Star II is that many of the copper nails and other fixings of the hull have stretched over the years and have aloud the hull planking to move and rather than sort the fixings out along the way over the years, she was caulked more and more as the planks moved until this would not work anymore and we end up with the hull in the condition that Mai Star II is currently in. So as part of her restoration there will be a major refastening of the hull planking with fresh copper nails and roves and renewed fixings in the frames .


1.jpg
 

jstarmarine

Active member
Joined
21 May 2021
Messages
434
Visit site
Making a start on removing the last of the starboard sheer stake plank
Yesterday I started to remove the last part of the starboard sheer stake plank to gain access to the back of the beam shelf/ gunwale to be able to pass the new steamed oak ribs into place after the old doubled and sistered ribs are removed.
1.jpg

As you can see from this photo I have uncovered a can of worms in the way of other work that is going to have to be done before any other work can be done on the sheer stake or any other part of the boat in this area.
There is an area of expending foam in a void space behind the forward apron of the stem, there is a lot of checking in the breasthook and a former colony of woodworm long since gone away.
1.jpg

So I am will have to make a new laminated breasthook and also do a repair to the upper section of stem to remove any rot that as travelled down thew stem that can not be seen from just looking at the exposed part.
1.jpg

The copper nail on the upper part of the photo is a nail that was made up from a length of copper rod with the end pinned over to make a head for the nail and the inboard end having a copper washer to act as a rove. This was a normal practice when you had a length that was not a standard length and you had to make your own nails This was true when you were nailing lodging knees in position and the distance was more than most nails came in at the time when Mai Star II was build.

1.jpg

The port side of the hull is now clear of any of the old ribs and now needs to be primed with yacht primer before the new ribs are steamed into position and the fixed in place with copper nails and roves and the shape of the hull brought back into its correct shape once more.
At the same time I will be making a template of the frame to make a new frame the correct shape to fit in the hull and that will also help bring back the shape in that side of the hull, As this is the area of the hull that as distraughted the most over the years.

The port side is where the tops of the frames are in the worst condition as many of the upper section are rotten and split. So there is going to be a lot of upper section of the frames to remake and fit and the side where the most of the ribs will need to be renewed.
The deck beams will have to be remade as they are rotten at the ends and the cabin sides will have to be remade with new corner posts. Also there are going to be new carlins and short deck beams as well.
1.jpg
 

jstarmarine

Active member
Joined
21 May 2021
Messages
434
Visit site
The condition of the deck beams and breasthook on the starboard side.

1.jpg

1.jpg
1.jpg
1.jpg
1.jpg

Over the years of Mai Star II / Gadfly II life there have been many changes to the way she was decked and how the deck was fixed to the deck beams and the top plank.

In the third phot you can see there is what remains of a iron nail which the old deck was nailed to the top plank with, although the heads of the nails have rusted away, the nails were a good quality as seeing as the boat is now 83 years old they have not done too bad in all that time.
However, the deck beams are not so good as the ends rotted away over time and the only thing holding the deck in in place was the in the top plank and the nails in the good part of the deck beams.
So along with the ribs and frames that have to be renewed there are going to be at least three new deck beams ahead of the cabin, Starting with the deck beam attached to front of the cabin.
The first job will be to remove the old deck beam and make a camber pattern to put the correct camber back in the deck and also the two beams that are missing ahead of the cabin front. Once they are made and fitted. The rest of the side deck short beams can be made anew and also the carlins can be made and fitted to front of the cabin deck beam and the one at the aft end of the cabin.
The aft deck beam will have to be fitted to the new aft of cabin bulkhead once that is made and fitted. In the meantime the cabin sides and front will be dismantled and put in storage until all the deck beams and carlins are made and fitted. then the cabin sides and front will be rebuild.
 
Last edited:

jstarmarine

Active member
Joined
21 May 2021
Messages
434
Visit site
The size of the task ahead of Simon and the family in restoring Mai Star II

Starting to make a start on removing the last bits of the sheer strake on the starboard side, once this is removed then can tackle the beam shelf and the lodging and hanging knees


The top of the stem is in need of a bit of rebuilding as a bit of rot was found after the sheer strake was removed


The small bits of sheer strake that were left behind when the rest was removed is now getting removed to expose the tops of the frames and ribs


The port side is in need of the ribs refitting before much more of the shape is lost


The planks have moved more as the boat as been sitting out of the water, however, the planks will be moved back into position with props to realign the planks after the seams are cleared of old caulking and putty.


The port side is clear of all the sheer strake plank


The cabin is back up near to its correct position so that the new beams will have to be set with this caber when refitting the sheer strake and the carlins and side deck beams


Major work needed on the transom, possibly a new transom coming this time round


jstarmarine

Active member
Joined
21 May 2021
Messages
434
Visit site
Now we are back from Woodplumpton and working on Chance it is time to turn our attention to Mai Star II
Now that we are back in Essex after spending a week in Woodplumpton working on Chance, It is time to make a start on Mai Star II and get on with working on Mai Star II.
One of the first jobs is to make room round the boat so it can be worked on easily and safely. At the moment it is not easy to work on her as there is a boat sitting close to her port side where I need to replace the five ribs and the first of the frames in the bow section of the boat.
1.jpg

This area is where the most damage and misshaping as taken place on the boat and the area which needs the most attention to bring the hull back into the correct shape and make the plank seams become a lot smaller than they are presently. Most of the problem as come about over the years as the nails in the plank have stretched and moved, so making the planks move and then the plank seams then being re-caulked to keep them watertight. So the more they stretched the worse the problem became .
Also the ribs broke and were doubled or in some cases sistered, the only problem was that when the extra ribs were put in the planks had already moved to their new position. So rather than replace the original ribs and can the hull shape they misshapen the hull.
So the job now will be to push the hull back into the original shape after the seams are cleared of any old caulking cotton and old hard putty and with the aid of supports put the hull back into the correct shape one more.
 

jstarmarine

Active member
Joined
21 May 2021
Messages
434
Visit site
In order to make the cabin sides safe to work on there has been a board fitted under the cabin sides while it is made safe to remove the cabin sides in one piece


A few of the loose parts from the boat which my son Michael has removed to help doing the work on the deck beams easier for both of us to do once we have removed the cabin sides


My son Michael removed the to aft cabin bulkheads which were the last bits holding the cabin sides in place and once we have the beside Mai Star II we can lower the cabin sides off the boat and get them in the workshop to be worked on


Some of the roof was rotten so it was removed to help make the cabin sides and roof a little lighter when it comes to lifting it off.

 
Top