The major restoration of Chance (Token) James Silver Western Isles Motor sailer

jstarmarine

Active member
Joined
21 May 2021
Messages
434
Visit site
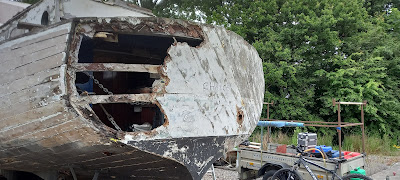
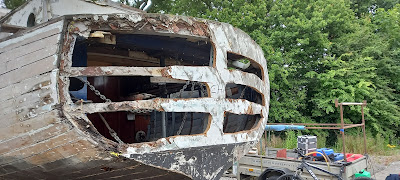
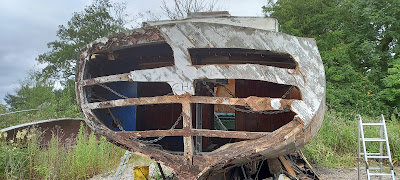
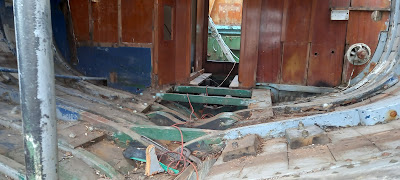
A day off from Chances restoration with a trip to the Lake District

A hearty breakfast at the local Costa Coffee and then off to Windermere


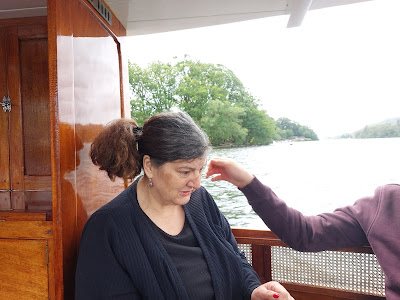
Tricia the Chance Project manager deep in thought about the work on chance


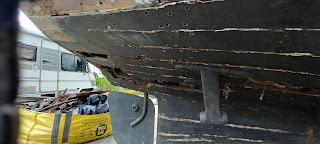
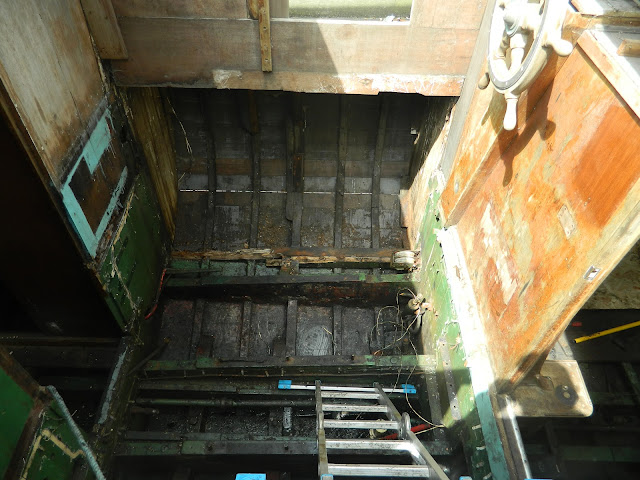
Michael the apprentice boat builder having an away day from the bilges of Chance and seeing day light for a change and not the dirt in the bilges of Chance


The two of them, hell we are out on a boat that floats and dreaming of trhe good days ahead when Chance once more see the ocean waves once more


The boatshed at the Windemere Jetty museum, where looked round and gave us ideas and renewed energy to get on with our restoration of Chance


We then when to Coniston Water to see where Donald Campbell did his water speed record runs and where he was killed during one of his attempts to break his own records.


john_morris_uk

Well-known member
Joined
3 Jul 2002
Messages
27,254
Location
At sea somewhere.
yachtserendipity.wordpress.com
That's it I suspect: I've helped out mending a few wooden boats from the early to mid-1960s and anything from fasteners for deck planking to interior cabinetry were steel, which inevitably refused to come out cleanly. Cost and availability, but mostly cost.
I agree. I rebuilt a south coast one design that had been built by Camper & Nicholson in 1959. It was riddled with mild steel screws which were a complete pain in the behind and had corroded and left stains and impossible stumps of screws to remove.
 

jstarmarine

Active member
Joined
21 May 2021
Messages
434
Visit site
I agree. I rebuilt a south coast one design that had been built by Camper & Nicholson in 1959. It was riddled with mild steel screws which were a complete pain in the behind and had corroded and left stains and impossible stumps of screws to remove.
Hi John,
The hull of my James Silver is fixed with bronze screws and copper nails and roves, however, the interior furniture is held together with mild steel screrws which are a real pest to remove without breaking bits of the furniture.
 

jstarmarine

Active member
Joined
21 May 2021
Messages
434
Visit site
Planning for the next trip to Woodplumpton to start on the hull repairs

This is going to be our first place we are going to tackle, the aft cabin on the starboard side with the worse area of rib repairs that is needed to be renewed in the boat. The area where there are so many short or doubled or sistered ribs and the place where the shape of the hull is not the shape it should be. It is also the area where there are a number of planks need replacing in the underside of the hull.
1.jpg


As can be seen in this photo in the top left hand corner, there a number of planks that need renewing.. This will need the starboard "A" bracket and the starboard propeller stern tube log removing to get rid of the rotten planks and get back to good planking. Once the planking is renewed then the "A" Bracket and Stern tube log will be refitted and a new oak Stern Tube Log made to replace the old Stern Tube log.
1.jpg

Once this area of the hull is sorted and re-ribbed , then we can move along the hull to the next area of the hull that need ribs and planking replacing . So this is what we will be doing over the next few months as we get the hull strong enough to be moved to Essex.
 

jstarmarine

Active member
Joined
21 May 2021
Messages
434
Visit site
This is an update to let you all know what we have been up to over the past few weeks and month. We have finally got the engine room cleared of all the water and fuel tanks and have got to the see the condition of the hull and the ribs in the engine bay. As we had feared the broken ribs were behind the water and fuel tanks. We had thought that may well be the case and were not really surprised to find that they were in that condition.
One thing that did happen when we removed the water and fuel tanks was that the side deck collapsed and had to be shored up until we can make repairs to the deck beams and beam shelf to get the deck back up to their correct height again.
The fuel tanks were rusted through on the tops of the tanks and were badly rusted at the bottom so it was decided that the best course of action was to remove the tanks and in the future have new stainless steel water and fuel tanks made to the same pattern as the original tanks. That way keep the same weight in fuel and water to maintain the correct trim.
One of the jobs this coming time is to get all the ballast together and get it weighted and then get lead to replace the iron and in that way it will take up less room in the bilge when it is refitted at the end of the restoration .
So when we are back up at Chance it will be all hands to the bilges and cleaning will be the order of the day until the bilges are clear and then we can get on to the next stage of re-ribbing her and fitting new planks.
 

jstarmarine

Active member
Joined
21 May 2021
Messages
434
Visit site
Busy week ahead on Chance
It has been a fortnight since we have been up at Woodplumpton and it is now time to go up to Woodplumpton again for a weeks work on Chance.
Now that all but the masts and booms are now back at my workshop it is time to make a start on the repairs and restoration of the hull planking and ribs in the boat.
We have investigated the boat from stem to stern and have found that Chance is in need of a lot of ribs to be removed and replaced along her length. Surprising the ribs forward on the main cabin appear to be in good order apart from a few where bulkheads have crossed over them and made them rotten through fresh water rotting the bullhead and in turn rotting the rib.
The most damage to the ribs is amidships down both port and starboard side. The starboard side being the worse affected with the breaks in the ribs going all the way to the transom. On the starboard side they were doubled and in some cases sistered rather than replace the whole rib and not make the planking look like a pin cushion. The port side faired a little better and the broken ribs end in the aft master cabin heads.
The planking is another pr4oblem, as over the years, the planking as been replaced with short lengths to just remove the rotten wood at the time with no regard to the strength of the hull, which is now in a poor condition and long lengths are going to have to be replaced in order to return the strength back into the construction of the hull and get the hull back into the correct shape which has been lost over the years through repairs.
So it has been decided to make a start at the worse affect part of the hull the starboard quarter and work our way a long the hull until we go round the hull to the port quarter. While one of the working party tackles the transom and the framework that it is made from. From research done the transom was made up off the boat in a jig and the fitted to the aft end of the deadwood. once it was in place the planks were fixed to the transom after the bevels were cut and shaped on the oak frame work around the edge of the transom.
Unlike some modern boatbuilders with their modern ideas of how to re-plank a hull I am going to do the re-planking using the old time served method of removing every other plank, that way keeping the shape of the hull and not letting it distraught out of shape. I do not know where this idea that you can deskin a boat and think it is not going to go out of shape. The only way it would not happen is that as the old planks were coming off and a boatbuilder was cutting and shaping the planks as fast as they were coming off and refixing them with the correct fixings . In the case of Chance Copper nails and roves on the ribs and bronze woodscrews on the frames. I would love to see this method done by a single boat builder doing a restoration project such has Chance. I do believe only the major boatyard would de-skin a hull and refit a new hull if they had a double gang of boat builders doing one side each. Screwing new planks on to old ribs and frames is not only a bad practice, but a practice that is in my mind a bodge and a practice that should be stopped before it becoming the standard by which boats are repaired.
So over the next few months you will see how a hull should be restored using traditional methods.
 

tillergirl

Well-known member
Joined
5 Nov 2002
Messages
8,360
Location
West Mersea
Visit site
I did see the Tally Ho did de-skin completely BUT he had the original plans and he had already identified that the boat (pre-de-skinned) was out of shape. Before he completely de-skinned her he cut and fitted the futtocks to recover the right shape. I rather think the worst side of your methodology is that it is going to be quite a long time before you can bring Chance home. I do favour your trad methods in that situation.
 

jstarmarine

Active member
Joined
21 May 2021
Messages
434
Visit site
Removing the covering boards to uncover a can of worms and poor repairs from the past.
The port side of the side deck and aft deck is original as the position of the deck fittings are still in place
DSCN0660.JPG

The positions of the side davits and the aft davits and the aft cleats are clearly seen in the deck
DSCN0667.JPG

DSCN0661.JPG

There is a large hole in the deck as a repair was started and never finished
DSCN0663.JPG

The starboard side deck was repaired but never mirror to look like the port side deck which will be done this time
DSCN0664.JPG

The aft end of the
side deck and on to the aft deck is a lodging deck which is in place but not fixed to the beam shelf
DSCN0677.JPG

In the past the beam shelf was replaced but never fixed in place correctly and someone had done a poor repair to the deck and did not take the time to make sure to mirror the teak deck planking to be the same as the port side.
DSCN0683.JPG

The beam shelf is rotten in a number of places and will have to be replaced along it full length and so is the top plank. Also the short deck beams will have to be replaced as these have been hacked about with in the previous repair
DSCN0685.JPG

So it is going to be fun renewing the poor workmanship of a previous repair
DSCN0687.JPG
 

tillergirl

Well-known member
Joined
5 Nov 2002
Messages
8,360
Location
West Mersea
Visit site
I regret I am not surprised by this news. When I had to lift Tiller Girl's deck I found quite enough of what you now report. I was fortunate though that I had caught her at that time - and that there were no 'repair' issues. Will that cause more problems that need to be resolved before you can stablise her for transport?
 

jstarmarine

Active member
Joined
21 May 2021
Messages
434
Visit site
These are all the ribs from the aft cabin area,some are just short ribs, others are dry laminated ribs, that is to say they were steamed into position and not glued together before they were nailed in position.


They were different widths and thickness as well. I will take measurements off the original size and steam new ribs into position using the original specification.


The starboard side of the aft cabin with the ribs removed, now the cleaning up of the hull planking and hole filling of the holes that will not be reused


The hull planking looks like a pin cushion with all the nails removed


A lot of the planking in this part of the hull is going to have to be replaced as it is rotten and made up of short lengths


jstarmarine

Active member
Joined
21 May 2021
Messages
434
Visit site
Now that tanks are out it is possible to remove all the old tank support bracket and clean the years of dirt that had collected in the engine bay


The first time oin over 70 years the bottom of the bilge in the engine bay as seen the light of day and it is good order after all the neglect it as had over the 20 plus years until we came to Chance rescue


All that is needed now is the old bilge ump and water pipes to be removed and then the cleaning can start


jstarmarine

Active member
Joined
21 May 2021
Messages
434
Visit site
The port side of the side deck and aft deck is original as the position of the deck fittings are still in place


The positions of the side davits and the aft davits and the aft cleats are clearly seen in the deck


There is a large hole in the deck as a repair was started and never finished


The starboard side deck was repaired but never mirror to look like the port side deck which will be done this time


The aft end of the
side deck and on to the aft deck is a lodging deck which is in place but not fixed to the beam shelf


In the past the beam shelf was replaced but never fixed in place correctly and someone had done a poor repair to the deck and did not take the time to make sure to mirror the teak deck planking to be the same as the port side.


The beam shelf is rotten in a number of places and will have to be replaced along it full length and so is the top plank. Also the short deck beams will have to be replaced as these have been hacked about with in the previous repair


So it is going to be fun renewing the poor workmanship of a previous repair


jstarmarine

Active member
Joined
21 May 2021
Messages
434
Visit site
Starting on the transom and finding out the major repairs needed to be done before any work can be done to the planking
The way I first saw Chance a year ago and a job I was not looking forward to doing


First job was to cut out the sections of the transom between the beams running athwartships and then remove the bit fixed to the beams


The first of the many odd repairs done to the transom. The transom covered up the end grain of the planks with a thin layer of plywood


The frames are well rotten and need replacing first before any work can start on any part of the boat


The upper part of the transom was made up of diagonal plywood, however, the bottom part was made up of athwartships layers of plywood


One bit if you can see it, is that the starboard side as dropped and the the sheer line shows that it as happened, so the starboard side is going to have to be propped up back into position until the sheer line back in the correct position


With the ribs out of the starboard side in the aft cabin and with careful propping the shape should come back in the starboard side and the transom will be the correct shape once more


jstarmarine

Active member
Joined
21 May 2021
Messages
434
Visit site
Good grief.

I'm watching with great interest.
Hi Ben,
I was expecting a fair amount of problems in this end of the boat as it has had the most repairs over the years done to it and has lost some of the original shape. You can see from previous posts that the starboard side and aft deck s have been messed about and was not re-build correctly, in that the beam shelf and knees were not bolted back together once the repairs were made. So the next time I come up to Chance I am coming up with a lot of props and wedges put the shape back into the boat especially the transom. So watch this space for updates.
 
Top