Plank repair - opinions welcomed

Sniper

Member
Joined
9 Jul 2001
Messages
857
Location
East Coast
Visit site
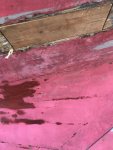
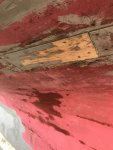
I have to replace a short bit of planking which has been ruined by the fasteners attaching the anode to the hull - a common occurrence. The plank only needs to be about 18” long, is almost flat and shouldn’t require any edge set. I am unsure whether to work an 8-1 scarph into each end or to use butt blocks. There isn’t a butt block anywhere in the rest of the boat so I assume when she was built they had some 28’ stock to work with.

my inclination is toward scarphed joints with liberal amounts of thickened epoxy to fix, but I’d welcome other views.
 

tillergirl

Well-known member
Joined
5 Nov 2002
Messages
8,363
Location
West Mersea
Visit site
A very interesting question. How thick and wide is the planking? I would automatically favour scarphing but wouldn't be keen abouit two scarphs in the distance of 18". But just a wild idea: how extensive is the timber electrolysis? Hole cut out the damaged wood, epoxy one or two butt blocks behind the holes and fit graving pieces. I suspect that might not be favoured as traditional but it could be very strong. All a matter of the extent of the damage.
 

Hacker

Well-known member
Joined
4 Nov 2015
Messages
1,066
Location
Falmouth
Visit site
Is it carvel or clinker? If clinker then you will need to scarf. If you have any other scarfed planks this will mean you might need to adjust the plank length to give you sufficient distance both laterally and vertically. For the neatest finish you want the inside of the scarf to land under a rib. If carvel then you could do either; butt block is the easier to do.

As Tillergirl says, graving pieces could be an easier option. If they are small then no support behind would be needed.
 

penfold

Well-known member
Joined
25 Aug 2003
Messages
7,733
Location
On the Clyde
Visit site
Unless the damage is huge(more than a third of the plank width perhaps) I'd agree, graving pieces are an easier and less invasive solution. With a good fit and epoxy arguably you don't even need a butt block.
 

Sniper

Member
Joined
9 Jul 2001
Messages
857
Location
East Coast
Visit site
Thanks all. Sorry - I should have made clear that she is carvel. Originally I was hoping to get away with graving pieces but the damage is considerable - full depth of the plank and given the proximity of the holes has spread right along between them. It is a very tired piece of wood! The plank is 5” wide and seems to be 7/8” thick, larch.
 

tillergirl

Well-known member
Joined
5 Nov 2002
Messages
8,363
Location
West Mersea
Visit site
Umm, yes. Not a graving piece. I assume this is aft? How far from the damage to transom. I had some damage and I had the same situtation that a graving piece(s) was not easily sensible. But I decided to scarph just foward of the damage and replace the length of the plank to the transom. I recall that was about 4ft. The scarph obviously was either side of a rib and so the scarph had the additional strength of the rib fastenings. I thought the cost of the extra length of the timber (iroko) was not very significant and as there was some 'shape' I thought it easier just to have one scarph and the other end could be pulled down to the transom (I cut over length to assist that end shape).
 

Sniper

Member
Joined
9 Jul 2001
Messages
857
Location
East Coast
Visit site
Umm, yes. Not a graving piece. I assume this is aft? How far from the damage to transom. I had some damage and I had the same situtation that a graving piece(s) was not easily sensible. But I decided to scarph just foward of the damage and replace the length of the plank to the transom. I recall that was about 4ft. The scarph obviously was either side of a rib and so the scarph had the additional strength of the rib fastenings. I thought the cost of the extra length of the timber (iroko) was not very significant and as there was some 'shape' I thought it easier just to have one scarph and the other end could be pulled down to the transom (I cut over length to assist that end shape).
Thats a very good idea and one which I have considered as the weak piece is just under the tuck. My main reservation is the difficulty in accessing some of the nails and roves further aft within the Lazarette. I’ll have a good look tomorrow because I do like the idea of good wood for the whole length together with only one join. Also easier to work some twist into a longer piece.
 

Tranona

Well-known member
Joined
10 Nov 2007
Messages
40,851
Visit site
Anodes and wood are not good bedfellows. Once you get the repair done think carefully about whether you actually need anodes. Most wooden boats don't need them except for protecting the propeller, and even then many older propellers are made of superior alloys that do not suffer from dezincification. If an anode is needed there are alternatives to hull anodes. This link may help
turbolink.co.uk/seasurveys21/timber%20grp%20surveys.html#electrolyticdamage

There is no need to bond skin fittings or seacocks and particularly not stern tubes.

If you do have a prop that can't be protected by either a shaft or a nut anode then line your holes in the plank with epoxy and make sure the bolts are well bedded in sealant to keep any of the metal away from the wood.

I have direct experience of this problem as I fitted a hull anode when I re-engined and changed the shaft from bronze to stainless on the advice of the "experts". The stern tube was also bonded to the anode. Wear on the anode was negligible, but just as you described rot started around the holes and deposits around the stern tube. Initially I changed the studs and epoxied the holes so the rot stopped but the anode still did not erode as the prop had its own anode. On the advice of John Lilley of Seasurveys I removed the anode and filled the holes. He also found rot where the galvanised rudder tube came through the horn timber - same process. Fortunately there was enough "meat" in the timber to dig out the rot to solid wood and fill with epoxy filler and sheath to blend in with the original sheathing.
 

john_morris_uk

Well-known member
Joined
3 Jul 2002
Messages
27,281
Location
At sea somewhere.
yachtserendipity.wordpress.com
Anodes and wood are not good bedfellows. Once you get the repair done think carefully about whether you actually need anodes. Most wooden boats don't need them except for protecting the propeller, and even then many older propellers are made of superior alloys that do not suffer from dezincification. If an anode is needed there are alternatives to hull anodes. This link may help
turbolink.co.uk/seasurveys21/timber%20grp%20surveys.html#electrolyticdamage

There is no need to bond skin fittings or seacocks and particularly not stern tubes.

If you do have a prop that can't be protected by either a shaft or a nut anode then line your holes in the plank with epoxy and make sure the bolts are well bedded in sealant to keep any of the metal away from the wood.

I have direct experience of this problem as I fitted a hull anode when I re-engined and changed the shaft from bronze to stainless on the advice of the "experts". The stern tube was also bonded to the anode. Wear on the anode was negligible, but just as you described rot started around the holes and deposits around the stern tube. Initially I changed the studs and epoxied the holes so the rot stopped but the anode still did not erode as the prop had its own anode. On the advice of John Lilley of Seasurveys I removed the anode and filled the holes. He also found rot where the galvanised rudder tube came through the horn timber - same process. Fortunately there was enough "meat" in the timber to dig out the rot to solid wood and fill with epoxy filler and sheath to blend in with the original sheathing.
Exactly the same problem and advice I received. I’ve still got the bit of mahogany plank with rot around the anode holes which I cut out of our Camper and Nicholson built SCOD. The anode had been added by some well intentioned person but to the detriment of the boat. A surveyor suggested that anodes on a wooden boat frequently do more harm than good. Good quality bronze fittings should look after themselves and if they do eventually look as though they might be suffering, they’re much easier to replace or repair than the structure of the boat.
 

tillergirl

Well-known member
Joined
5 Nov 2002
Messages
8,363
Location
West Mersea
Visit site
Thats a very good idea and one which I have considered as the weak piece is just under the tuck. My main reservation is the difficulty in accessing some of the nails and roves further aft within the Lazarette. I’ll have a good look tomorrow because I do like the idea of good wood for the whole length together with only one join. Also easier to work some twist into a longer piece.

Yes, access will be a pain. I had the advantage of having reasonable access. I rather think I scarphed and butt blocked. The point made on 'Tally Ho' is well made. One of the drawbacks is the direction of the scarphs. The leading edge of the scarf should be at the back of the planking - so the feather edge is not exposed at the front on the outside. I rather think I did both was because I wasn't too proud of the scarph!
 

Hacker

Well-known member
Joined
4 Nov 2015
Messages
1,066
Location
Falmouth
Visit site
Unless you have ribs chunky enough to accept bronze screws you are going to have to access the existing roves. Hope it doesn’t turn into one of those jobs that requires major disassembly to do a smallish repair!
 

Sniper

Member
Joined
9 Jul 2001
Messages
857
Location
East Coast
Visit site
Thanks to all for views. In the end I’ve decided to go minimalist and with butt blocks. Although the plank is completely degraded around the bolt holes it doesn’t go too far along the grain, nor spread to adjacent planks and the timbers are as good as new.

Next question - what to replace it with? I was thinking seasoned larch as that would match the rest of the plank and would move at the same rate.

I98139767-26D2-4146-81C8-062B6533476E.jpeg18E51D7D-F120-4980-87D6-BD257A08891A.jpeg

8B7B5FE2-620D-4181-9979-AB2D1E0D10F5.jpeg

In the meantime here are some photos of the ‘ole and the lump I’ve chopped out
 

Hacker

Well-known member
Joined
4 Nov 2015
Messages
1,066
Location
Falmouth
Visit site
If you can I would go one more set of ribs. Are there any other butt blocks nearby? You need to keep 3 ribs away either side and more than 3 planks above or below. I would go with the larch as you suggest. Make sure your butt blocks extend about an inch onto the planks above and below.
 

Sniper

Member
Joined
9 Jul 2001
Messages
857
Location
East Coast
Visit site
If you can I would go one more set of ribs. Are there any other butt blocks nearby? You need to keep 3 ribs away either side and more than 3 planks above or below. I would go with the larch as you suggest. Make sure your butt blocks extend about an inch onto the planks above and below.
Interesting point. Can I ask why you suggest an extra set of ribs? Is it give a firmer base for a short length of planking? There aren’t any other butt blocks in the boat as far as I can see; certainly non in the proximity of the repair.
 

Sniper

Member
Joined
9 Jul 2001
Messages
857
Location
East Coast
Visit site
I’ve hesitated to update this thread until the boat is back in the water. She’s afloat and pretty tight after 24 hours with no problem around the repair, which in the end was fitted against butt blocks.
Couple of photos of the plank during fitting for anyone who’s interested.
 

Attachments

  • 306FCE2F-5DF8-4497-ABCF-5BDF3D0991C2.jpeg
    306FCE2F-5DF8-4497-ABCF-5BDF3D0991C2.jpeg
    749.9 KB · Views: 32
  • 398BB57F-2CB2-4249-8C81-2A097F15D76F.jpeg
    398BB57F-2CB2-4249-8C81-2A097F15D76F.jpeg
    617.5 KB · Views: 30

Hacker

Well-known member
Joined
4 Nov 2015
Messages
1,066
Location
Falmouth
Visit site
My only comment is that it looks to be quite a short repair. May be fine as is but if you need to repair any other planks (3 above or below or within 3 ribs) I would be tempted to make it longer. Otherwise how easy did you find it?
 

Sniper

Member
Joined
9 Jul 2001
Messages
857
Location
East Coast
Visit site
It’s a fair comment. I could have made it longer but I would have been faced with resiting a skin fitting on one side and taking half the cockpit apart to gain access to rivet heads on the other. As it was, it was a fairly quick and easy repair to make and the short length didn’t require any twisting or edge setting of the plank. If I need to make any further repairs around it which necessitate more disruption I can always redo it to allow for shifts of butts etc. As it’s the first underwater repair I’ve done I was pleased just to get it in and watertight.
 
Top