Fletcher sportscruiser 19 owners

Allanmcc

New member
Joined
30 Dec 2019
Messages
6
Location
Glasgow
Visit site
Qbhoy, Hoping to get started around February when the weather gets a bit better. Will get pictures under the floor, going for a rewire at the same time as sorting the fuel tank. Just completed a trailer rebuild and sorting the heavy steering. If you get the PDF can you let me know.

cheers Allan
 

QBhoy

Well-known member
Joined
11 Mar 2016
Messages
2,612
Visit site
Qbhoy, Hoping to get started around February when the weather gets a bit better. Will get pictures under the floor, going for a rewire at the same time as sorting the fuel tank. Just completed a trailer rebuild and sorting the heavy steering. If you get the PDF can you let me know.

cheers Allan
Excellent. Are you fitting hydraulic steering ? I really need to do that. It’s horrendous at low planing speed, for torque steer.
 

QBhoy

Well-known member
Joined
11 Mar 2016
Messages
2,612
Visit site
No. I have a Gto with the teleflex, when stripping it down found packed with old grease and crud. Nice easy cheap fix.
Good find. I also have a GTO. Really needs hydraulic steering with the engine on it. Not cheap though.
 

Hot Property

Well-known member
Joined
11 Aug 2015
Messages
1,490
Visit site
I fitted a Seastar system to my gto sportscruiser. Much better than the old teleflex system and no torque steer either ( if that's what you call no unwanted forces when throwing the boat around).

Not cheap at around £600 but if you have a big engine then worth doing...
 

QBhoy

Well-known member
Joined
11 Mar 2016
Messages
2,612
Visit site
I fitted a Seastar system to my gto sportscruiser. Much better than the old teleflex system and no torque steer either ( if that's what you call no unwanted forces when throwing the boat around).

Not cheap at around £600 but if you have a big engine then worth doing...
Think that’s the answer hot property. No doubt. Easy enough to fit ?
 

Hot Property

Well-known member
Joined
11 Aug 2015
Messages
1,490
Visit site
It was ok to fit, hardest part was removing something on the outboard itself. Had to open up the clamshell but just a few more screws.

My engine was a Merc/Yamaha 75 4 stroke so same weight as the 115 version. New owner (Karl) on the Fletcher FB forum, has now fitted a new 150 Merc using the original system I installed. Dead easy to turn at all speeds.
 

QBhoy

Well-known member
Joined
11 Mar 2016
Messages
2,612
Visit site
It was ok to fit, hardest part was removing something on the outboard itself. Had to open up the clamshell but just a few more screws.

My engine was a Merc/Yamaha 75 4 stroke so same weight as the 115 version. New owner (Karl) on the Fletcher FB forum, has now fitted a new 150 Merc using the original system I installed. Dead easy to turn at all speeds.
Mine has a new mercury mariner 115 command thrust...torque steer worsened by this fact. This model takes the larger merc props with its larger gearbox. I have a whopping enertia on it. This means that there is no trim anode fitted to it, with there not being the clearance for it. The TS is horrendous at fast displacement speeds and slow planning speeds without a fair bit of trim. So much so that if you let the steering wheel go for a second...it’s hard lock to starboard in a second or less.
I believe there is a cut down trim anode that would fit...but ultimately the answer is hydraulic steering. Thanks again HP
 

QBhoy

Well-known member
Joined
11 Mar 2016
Messages
2,612
Visit site
Mine has a new mercury mariner 115 command thrust...torque steer worsened by this fact. This model takes the larger merc props with its larger gearbox. I have a whopping enertia on it. This means that there is no trim anode fitted to it, with there not being the clearance for it. The TS is horrendous at fast displacement speeds and slow planning speeds without a fair bit of trim. So much so that if you let the steering wheel go for a second...it’s hard lock to starboard in a second or less.
I believe there is a cut down trim anode that would fit...but ultimately the answer is hydraulic steering. Thanks again HP
Up side is the fletcher performs extremely well with this engine and prop options. 44.1 mph gps is incredible for the set up. Apparently well known to put out much more power than claimed, these new mercury 4 strokes. Actually lighter than the old mercury 125 optimax 2 stroke as well. Amazing.
 

Allanmcc

New member
Joined
30 Dec 2019
Messages
6
Location
Glasgow
Visit site
Just completed a rewire of my Gto and changed most of the components. Was quite rough and long over due a refurb. Only issue I am having is getting the floor up. It must have been up before and someone has been very liberal with the sealant when putting back down. Anybody got any clue how to lift it without snapping the deck?
 

QBhoy

Well-known member
Joined
11 Mar 2016
Messages
2,612
Visit site
Just completed a rewire of my Gto and changed most of the components. Was quite rough and long over due a refurb. Only issue I am having is getting the floor up. It must have been up before and someone has been very liberal with the sealant when putting back down. Anybody got any clue how to lift it without snapping the deck?
Excellent work. I’m needing to add an extra fuse box in for accessories to mine.
with the floor. I’m not sure to be honest, especially if the whole thing has been stubbornly sealed down. I’d love to know what shape and how large the fuel tank is.
 

Allanmcc

New member
Joined
30 Dec 2019
Messages
6
Location
Glasgow
Visit site
Fletcher 19 Sports Cruiser
Wet Cabin issues:
Here is what I did to mine to get a dry cabin.
1. The Hull Deck join - I noticed water coming in downstairs when going through heavy seas on the hull deck join.
The deck (top half of your boat) is joined to the bottom of your hull by screws located under the rub rail. I removed the rubber out of the rub rail you can then see a load of screws all the way round the boat. I remove a couple of meters at a time I then filled the gap between the two joints with silicon / stikaflex and screwed them back together. I did this all the way round the boat don’t remove all the screws at the same time or you will never get the top and bottom half back together again, just a couple of metres at a time.
Near the bow of the boat the curve is quite extreme which meant on mine the gap between the hull deck join was large in places. I then removed the trim half way up the inside of the cabin and where the carpet meets the vinyl and found the wood on the join to be rotten, I replaced as well as I could and then fibre glassed the hull deck join on the inside of the cabin over the new wood strip.

2. The Anchor locker – Water is wetting the wood the mirror is screwed to on the inside of the cabin.
On mine the drain hole for the anchor locker was too high. I drilled a hole on the other side of the bow in the anchor locker so that all the water can escape rather than sit there at a certain level.

3. The Deck hatch – The seal comes off on the hatch that’s fitted simply by opening and closing the hatch – bad design
You can’t get that Lemar hatch anymore but they make a slightly larger one. I brought this and had it fitted the new current design does not have the same design flaw as the original with the seal coming off when opening and closing. Mine was a 2001 boat.

4. The Windscreen seals – Water coming in under the windscreen between the cabin roof and lining.
The seals round the Taylor Made windshield glass / plastic shrink. You can either replace the seals by removing the glass / plastic windows or fill the shrinked bit with black silicone I experienced shrinkages with gaps over an inch! If you can remove the seal to check for holes. Under the seal I had two drill holes that had no screws in. Guess this was from factory. I put silicon in the holes and new screws. I also used marine filler on the inside of the hole.

5. Where the middle part of the windscreen opens the seal goes where it beads down on the top of the dashboard. I replaced the seal but water still came in under heavy rain which then runs down to the cabin door and if enough rain collects in the channels leaks down on top of your porta pottie. I used a strip of self-adhesive foam stuck to the deck underneath the bottom of the opening Windscreen this stop the water back flowing.
End result a dry cabin. The problem is the water would soak into the headlining then exit in the cabin in a completely different place to where it entered and only after the headlining foam had absorbed most of the water so the leak may not be apparent till a few days later.
My Boat would do 38mph with a Yamaha F100a and a Stainless Propeller, the 4.3 Mercury Inboards did 52mph.
Fuel wise I think is was approximately 1L of petrol per mile. I think the tank was 80L a normal mixed use 2 hour play would use about 25L of fuel.
Hope the above is helpful, here is a link to all the PDF files I have on the Fletchers and the brochure.
https://we.tl/t-cjhUYtmH83
 

Allanmcc

New member
Joined
30 Dec 2019
Messages
6
Location
Glasgow
Visit site
Hi,
Can you give me a bit of info on how you removed the rubber bump rail. Did you heat it and and remove it at the bow or did you have to remove it all? I have a bit of rot in the anchor locker which is causing a leaking into the cabin.

cheers
 

Ryc737

New member
Joined
22 Oct 2022
Messages
10
Visit site
Fletcher 19 Sports Cruiser
Wet Cabin issues:
Here is what I did to mine to get a dry cabin.
1. The Hull Deck join - I noticed water coming in downstairs when going through heavy seas on the hull deck join.
The deck (top half of your boat) is joined to the bottom of your hull by screws located under the rub rail. I removed the rubber out of the rub rail you can then see a load of screws all the way round the boat. I remove a couple of meters at a time I then filled the gap between the two joints with silicon / stikaflex and screwed them back together. I did this all the way round the boat don’t remove all the screws at the same time or you will never get the top and bottom half back together again, just a couple of metres at a time.
Near the bow of the boat the curve is quite extreme which meant on mine the gap between the hull deck join was large in places. I then removed the trim half way up the inside of the cabin and where the carpet meets the vinyl and found the wood on the join to be rotten, I replaced as well as I could and then fibre glassed the hull deck join on the inside of the cabin over the new wood strip.

2. The Anchor locker – Water is wetting the wood the mirror is screwed to on the inside of the cabin.
On mine the drain hole for the anchor locker was too high. I drilled a hole on the other side of the bow in the anchor locker so that all the water can escape rather than sit there at a certain level.

3. The Deck hatch – The seal comes off on the hatch that’s fitted simply by opening and closing the hatch – bad design
You can’t get that Lemar hatch anymore but they make a slightly larger one. I brought this and had it fitted the new current design does not have the same design flaw as the original with the seal coming off when opening and closing. Mine was a 2001 boat.

4. The Windscreen seals – Water coming in under the windscreen between the cabin roof and lining.
The seals round the Taylor Made windshield glass / plastic shrink. You can either replace the seals by removing the glass / plastic windows or fill the shrinked bit with black silicone I experienced shrinkages with gaps over an inch! If you can remove the seal to check for holes. Under the seal I had two drill holes that had no screws in. Guess this was from factory. I put silicon in the holes and new screws. I also used marine filler on the inside of the hole.

5. Where the middle part of the windscreen opens the seal goes where it beads down on the top of the dashboard. I replaced the seal but water still came in under heavy rain which then runs down to the cabin door and if enough rain collects in the channels leaks down on top of your porta pottie. I used a strip of self-adhesive foam stuck to the deck underneath the bottom of the opening Windscreen this stop the water back flowing.
End result a dry cabin. The problem is the water would soak into the headlining then exit in the cabin in a completely different place to where it entered and only after the headlining foam had absorbed most of the water so the leak may not be apparent till a few days later.
My Boat would do 38mph with a Yamaha F100a and a Stainless Propeller, the 4.3 Mercury Inboards did 52mph.
Fuel wise I think is was approximately 1L of petrol per mile. I think the tank was 80L a normal mixed use 2 hour play would use about 25L of fuel.
Hope the above is helpful, here is a link to all the PDF files I have on the Fletchers and the brochure.
https://we.tl/t-cjhUYtmH83

hi I seem to have the leak issue, am I able to private message you to discuss? And are those pdfs still available? Thanks
 

Ryc737

New member
Joined
22 Oct 2022
Messages
10
Visit site
I’ve had mine for 3 years now. Where is the leak ? Is she an inboard or outboard
Do you have a leak too? My hatch was leaking but the seal was just sitting incorrectly, seems to be fixed if no one opens it again ? my main leak seems to be the rub rail, have water gathering in the boxes under the seats, when I shine a light up in its dripping down from rub rail area in heavy rain.
 

Ryc737

New member
Joined
22 Oct 2022
Messages
10
Visit site
I’ve had mine for 3 years now. Where is the leak ? Is she an inboard or outboard
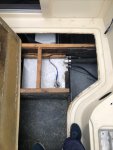
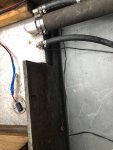
Sorry mine is an outboard. I see you want pics of the tank and floor, I have some as previous owner had lifted floor
 

Attachments

  • C0664BD4-C340-4624-8101-52FF13683069.jpeg
    C0664BD4-C340-4624-8101-52FF13683069.jpeg
    359.4 KB · Views: 15
  • 06365EED-22B4-48A9-B542-CBE952DED7E1.jpeg
    06365EED-22B4-48A9-B542-CBE952DED7E1.jpeg
    365.8 KB · Views: 15
Top