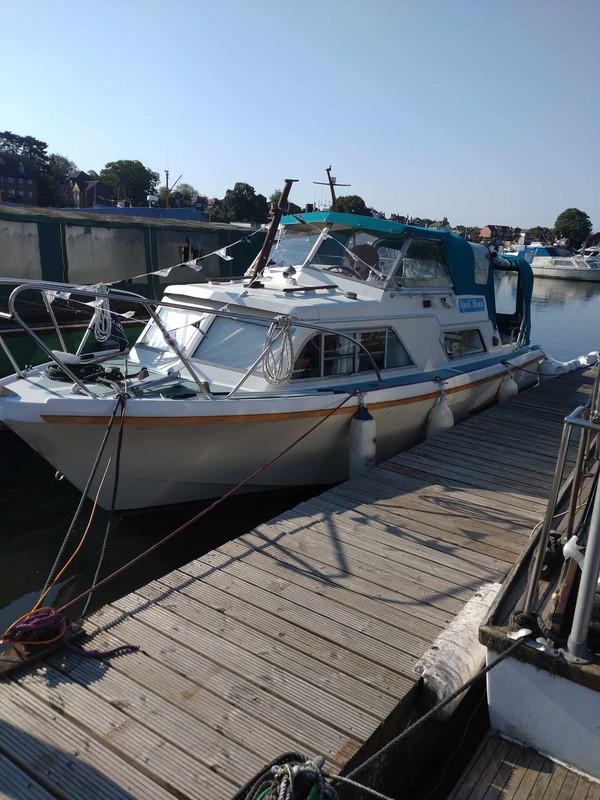
Fairline Fury MK1 restoration/refurb

waynes world

Well-known member
Joined
7 May 2011
Messages
1,568
Location
Manchester
Visit site
Dont know wat all the fuss was about. Ah there wasnt any lol.

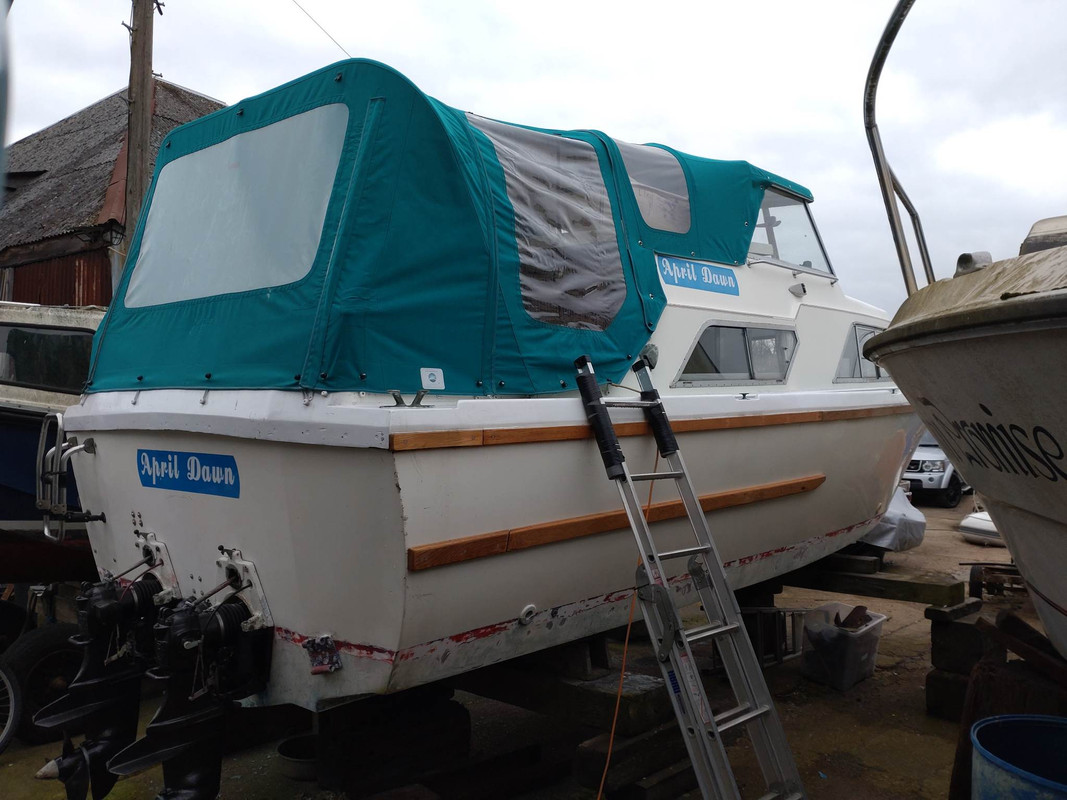
As last seen bulkhead was removed. Now i have fitted a new one :) I was happy to start with on Friday i picked up the Marine ply, 18mm two full sets at £157, bargain. That wood yard is best in Bolton. If not Manchester.

I havnt been faffing with boats for a couple years now due this and that but i never throw away, which is good as all the other materials i had int shed. Poly/Epoxy resin, woven, CSM and resins, and all inbetween so saved a fortune here. One thing i am near out of you will guess later.

OK this H is doing me head in and sick of editing the post so please burrr with as i keep dropping H`s.


I know it was a good price and need a 2.5m x 2m area covered i made as much of this ply as possible.

20230526_150855.jpg


Had to order some Puraflex 40, my choice of adhesive as its excellent and same ingredients as Sika 291i. Just Toolstation had to get it delivered as out of stock, which it didnt turn up so i bought more from a TS further away and went to collect it. hey ho an hour wasted already haha.

Now this is my trick of the trade for templating anything needed to be ...well templated

Basting tape. real good double sided tape used in sewing mainly. And no so new acetone. down to my last 200ml i reckon. if tat.

20230526_142346.jpg


just stick the tape all around the edge to be templated

20230526_152631.jpg


Where in some you will have your murder scene. Dont worry i am still alive, T still loves me.....tab god :)


20230526_154835.jpg


And then i marked out the cutting edge wit perm marker.

20230526_155647.jpg


trim the polythene but leave a few inch/75mm

then you can place it over sheet and get it were you want before trimming back, just so you know your sheet is big enough.

20230526_160616.jpg


trim back to line, mark around wit marker and cut ply. CUT tough inside the marker line on ply as tat is the cut line needed.

20230526_162206.jpg


it needed a wee fettle to get fitted and like a idiot i am i cut to much off one edge, but easy sorted. You dont need to see that bit lol.

20230526_165244.jpg


20230526_165252.jpg


ok the bit i cut to much out to fit snug


20230526_165259.jpg
 

waynes world

Well-known member
Joined
7 May 2011
Messages
1,568
Location
Manchester
Visit site
The gap the the Portside is were the sheet maxes out on width. no problem as will make a new bit to fill tat.

Rest is the same,

20230527_113518.jpg


I was wanting to add Spead Toe Carbon Fibre but i couldnt find any wide enough and no patience.
So now i used poly resin with added styrene for three coats, first being 5% last being 2%. then lay up of one lam of 350grm CSM.

20230527-173638.jpg


you can see in that pic i chamfered the edges in a few places to give a good area for connecting the boards together.

I fixed the new bulkead in with Puraflex40 along the top and side down to the gunnel with 20mmx8mm SS screws. .

Here you see the camfer i did where needed. to be filled wit CSM and woven. then a topping off wit filler.

20230528-153158.jpg


20230528-153217.jpg


So set to work tabbing in the bottom and sides upto gunnel.

20230528-163807.jpg


Not that you can see , i did five layers of a mix of CSN and woven. good and strong.
One thing though i messed up wit rushing was that i wanted the joints to be epoxy and filler but as i used poly resin/CSM the flowcoat will not stick. so i used Poly resin a through. still do the job though.


20230528-174933.jpg


20230529-084813.jpg


20230529-084818.jpg

20230529-085856.jpg


I cant remember now which filler this is but i usually use it wit epoxy but as said i am only using Poly resin i tried it and works fine to fair in the joint. Not tat it needs it as it will not be seen ans its below deck. But still ;)

20230529-103025.jpg


it will do, its not my best as used t be OCD, now i just want it done.

20230529-124302.jpg


Last bit for the last two days is Flowcoating it. I found about 2l int she and as its old i thought i should test it first. And to my joy it is fine :) Just gave it a good mix


20230529-122934.jpg


I gave it a single thick coat then when is was greening off i used the rest.

I will polish it back next week wen fully set in.
It looks out of place now wit te boat. now ill need to polis te boat back up to match :(

20230529-140135.jpg


I have two more windows to refurb whic i will as and wen as no rush so mainly ill be getting te fuel tank back in and rear deck. which i hope leads the deciding on the starter battery calorifier homes.

Captain Faffer singing out as shattered now and need a cider :)
 
Last edited:

vas

Well-known member
Joined
21 Jun 2011
Messages
7,897
Location
Volos-Athens
Visit site
good progress captain.
Probably missed it, but how is the new ply/flowcoat "mate" with the old original grp/gelcoat? OK, i don't mean structurally, I see the bonding and I do get the point that hopefully when polishing the lot, the colours will match, but is there a alloy/inox trim that goes around the old grp, or what to cover up all these holes around??

V.
 

waynes world

Well-known member
Joined
7 May 2011
Messages
1,568
Location
Manchester
Visit site
good progress captain.
Probably missed it, but how is the new ply/flowcoat "mate" with the old original grp/gelcoat? OK, i don't mean structurally, I see the bonding and I do get the point that hopefully when polishing the lot, the colours will match, but is there a alloy/inox trim that goes around the old grp, or what to cover up all these holes around??

V.
Morning V

I have a place that sells all the trim in aluminum and i have my shopping list ready. they sell Hockey stick profile to join the edges to cover the screws, and Z section for the door frame and channel for the door.

wat i like about this place is fair price, good delievery and easy website to get around.

UK's First Online Metal Supplier - Aluminium Warehouse
 

waynes world

Well-known member
Joined
7 May 2011
Messages
1,568
Location
Manchester
Visit site
lots and nothing been done.

Engines OMG what a pain in the arse these are being, well one of them,

lets see then, a few week back i decided to see what i can do with the fuel tank. decided to clean it back, while doing so i found the coating on it was a wax. easy then to remove with a gas torch to slightly warm it and wipe it off.

these supports were in fair condition but for one that had a split in it so hey ho, get rid of them all.

20230607_164942.jpg

20230607_184343.jpg


and T doing a bit again :)

You can see in tis picture two repair patches. had these done at work as there was bad corrosion under the plywood supports. didnt expect that as the pads were on real well.

20230610_135637.jpg


anyway to shorten this story once cleaned back more this shown up besides a good few more. 3mm plate and in as far as i could with a vernier they are .3mm pitting so a lot more to the depths

20230610_153828.jpg


In the end i am not taking any risk with a petrol tank and getting a new one made, work will do it for free. gutted aswell as they have aluminium in but its only 2mm and not the right grade. still a couple hundred quid will get me enough to have it sorted.

what did i say a while back..................one jib at a time. well in the boat`y world of rebuilds this does not happen unless you have plenty of money and time.

So then i thought

Helm dash

I hate this so its coming out and a new one will be made

20230611_130654.jpg


MMmm what the hell haha

20230611_130815.jpg


All sorts going on but once removed its clear wat is what as i removed clock by clock and reconnected the wires. well but for one which i was disturbed by a mate, haha i do have one :) and forgot where four wires go. ill sort it though

20230611_133005.jpg


the gauges seem in fair condition so ill strip them and check them over. Wish i didnt sell my ultrasonic cleaner now. like i do :(

Not decided on the new dash properly but maybe a Carbon fibre one.

ill be getting a new one of these detectors anyway. this is a bit old now and the sensor is a gonner.

20230611_130116.jpg
20230610_170329.jpg


20230610_170346.jpg
 

waynes world

Well-known member
Joined
7 May 2011
Messages
1,568
Location
Manchester
Visit site
Next

I need to get the transom and engine bay sorted for when the engines and drives are done, in a few weeks from now i hope.

Two holes need filling, one being the drain valve. still dont get what its there as its a few inches off the bottom

20230617_151916.jpg


and a cable end of sorts, no clue what it was for so its removed. or did i find out.....forgot now haha, but its gone anyway

20230617_152159.jpg


dash end
20230611_130046.jpg


20230611_130057.jpg
 

waynes world

Well-known member
Joined
7 May 2011
Messages
1,568
Location
Manchester
Visit site
So a basic hole filling job done, epoxy resin and West systems filler 404, used a couple of hardwood plugs aswell.

20230617_171452.jpg


20230617_172316.jpg


chamfered back the edges both sides where i could.


20230617_180834.jpg


valve that was removed

20230617_190825.jpg


20230617_182932.jpg


prime the holes and plugs first with the epoxy and while that is greening off mix the filler

20230618_113446.jpg


20230618_112934.jpg


oh and prep the woven, always good to be ready ;)

20230618_114450.jpg


20230618_122925.jpg


20230618_123303.jpg


add the filler to the catalysed resin untill its a thick enough to hold igts weight, liek peanut butter for this job.

20230618_123308.jpg


then a matter of applying to the plugs and filling the holes but not to the top as to be sure i added the woven matt.

left for an hour so it was then the excess was able to be scraped off to get a better adhesion for the matt

20230618_124123.jpg


20230618_134925.jpg


20230618_135212.jpg


once happy then let set, sand back to be level with the outer edge then fill with more epoxy resin/filler

20230619_183619.jpg


sweeeetttt :)

20230625_150757.jpg


thats that done. i will be getting some primer soon and spraying it before the outdrives go on.

20230625_150813.jpg


oooppppsss

looking at that pic i notice i need to add a build up for the trim tabs to sit on, above the bottom chine, you can see where they are partly removed. ill use the epoxy and filler again to make them


I have just noticed i have done a fair bit on this boat but nothing much to see, i guess its that time of the project you dont.

ill update on the engine situation later.
 

waynes world

Well-known member
Joined
7 May 2011
Messages
1,568
Location
Manchester
Visit site
Engines what a nightmare these have been. if i didnt want to keep the performance i would of stuck in a single diesel by now. been through a few engines and all had bad problems in one way or another.

To get over the stress of this second engine though i thought i would see if the first engine i did last year is ok. Its been sat untouched for a good 12 months. I dont know why i was so surprised but it fired up first time on the button. so happy days to know its going to be good left for a time and no problems, i say that as folk have said there bad when not used much. And it has just been sat under a tarp in the garden not in a nice dry workshop.

One thing i did wrong, or read wrong was that the aluminum parts needed etching primer. you cna see here the from cam cover is loosing its paint. so it either remove all the rest of the pint and leave in aluminium or remove the pump etc and repaint it. i am liking the aluminum idea at the minute. its no going to be seen when the engine is fitted anyway.

20230325_110759.jpg


I also fixed the expansion plug and leaks it had when i first part rebuilt it. I havnt had it up to full temp as its not possible int his situation but its not leaking.
I left it running for around 15mins. coolent barley got warm.

20230325_133005.jpg


20230527_200919.jpg


I cleaned it up and refitted the plug with a bit of JB High heat epoxy weld.

One last thing on that engine. when cold it has a slight misfire, think it is a coke problem, maybe float, although i have rebuilt the carburettors. no big problem as said it starts fine and runs fine after a few minutes.


Now this second engine, its not completely rebuilt yet as in the end i sent one of the four heads head of to have new valve seats and skimming and clean up. this is where i am at the minute.

I got the best block i have and sent it off for a rebore and skim. took a choice of a lot of places as i didnt want some business who do a half hearted job so i went for word of mouth and longevity of business and work on classic engines. all good as one not to far away.
Now if you just check and take your time looking at what had been done instead of just wanting to be off camping that day, we picked this block up as we were passing on way.

Got it to the campsite and once unpacked i looked it over. why wouldnt i haha


This is when i got it home BTW, not the campsite lol.

20230626_100821.jpg


MMmmm

Have maybe 2tho clearance from the head, not a bad thing aslong as no interference.

Bores look great tough

20230626_100827.jpg


closer again if you havnt seen the problem yet

20230626_100831.jpg


20230626_100836.jpg


by this time i was wondering wat the hell ad been done. can barley see and machine marks from the skim, but then new tooling and fast/slow would maybe do that.

Well it was weekend so i couldnt call them to ask why i wasnt spoken to about this. So over that weekend i was a bit stressed with it as i have had such a mess with this second engine.

In the end all it was is that it was the max they could machine off before the block was scrapped. Now if tey had told me this when they called me to collect it that would of saved me a worry. Chap just said `i dont know who did it, it will be fine though to use`

So i just cleaned it and again used the JB weld to fill the pitting. Only after asking a few folk and also the engine machine shop i ave sent the head off to. So all good now on the block..........welllll

something missing here hey

could it be something lying on the table there ?????

20230704_200115.jpg


cranks nicely though lol

20230704_200128.jpg


what happened was when i was fitting the pistons i snapped a second ring aarrrrr

Not just an AArrrrrr but a bloody BIG AAAARRRRRRRRRRRRR.

Volvo Penta only made 15/30/40 tho oversize piston ring sets. And these are 20 thou .

I searched all over the internet as in worldwide and emailed all specialists and to no available did not find one place who supply 20 tho sets.

Although on ebay i found a place that sells piston sets in 20 thou oversize. They will not sell just rings but a piston and rings so instead of around £25 this cost a mistake of £89. I was glad though to not to have to rebore again and get a new set of pistons.

So all good and wanting ti get the rebuild done i went and did this. I knew i shouldnt of but with me jsut wanting it done i used the wrong assembly lube on the pistons.

20230705_205437.jpg


20230705_210528.jpg


20230705-212044.jpg


You should not use bearing etc lube on pistons a sit can clog up oil ways wit coking up etc.
So it was strip down again and soak in petrol to remove all lube and rebuild with basic engine oil.

This is what i used

Permatex 81950 Ultra Slick Engine Build Assembly Lube Bearing Cam 4fl oz 1188ml 686226819505 | eBay

all cleaned up now and great.

20230708-151141.jpg
 

waynes world

Well-known member
Joined
7 May 2011
Messages
1,568
Location
Manchester
Visit site
Now the head. i got the best i have from a rebuilt and running engine, apparently. I cleaned it back and as i did it shown up this crack.

20230627_164923.jpg


20230627_164903.jpg


20230627_164630.jpg


Not that bad for were it is but then i looked at the valves, there good, well within specs.

I started to lap them in as the crack did not worry me to much but then took a closer look at the seats.

well there you go, a game changer here

20230703_203019.jpg


20230703_214003.jpg


valves are wellll i dont know haha

they are all roughly the same.

20230703_215713.jpg


20230703_215115.jpg


Tis made me just stop faffing and send it off to be machine up with new seats etc. Hope to get it back this week so i can crack on with the rebuild.

In the mean time i ave been prepping the other parts


oil pump just serviced.

20230704_200152.jpg


20230704_200228.jpg


20230704_200836.jpg


Having five of these i had a choice again to sort the best out. all roughly the same but for the wear in the cover plate. left hand one was best condition. just not cleaned it back in the pic.

20230704_202956.jpg


Also one on the raw water pumps. i have two the same so the one on the other engine will be replaced with one of these type JP 3/8 pumps.

20220816_201857.jpg


again easy refurb

20220816_201825.jpg


20230616_183117.jpg

Hardest part was getting the seals out. taken some poking and prodding.

20230616_183125.jpg


Pins are good so just got a basic rebuild kit. Impeller and gaskets

20230704_213559.jpg


mite go buy another Ultrasonic cleaner as this is ard work lol

I have noticed also i have lost two face plate screws and a cam retaining screw. what a bloody surprise haha
atleast tis one is done

20230711-193539.jpg


20230711-193544.jpg


I ave done more like rebuild the bulkhead window, still deciding if to keep it in the white gel coat or carbon fibre tow weave.


so again getting there, i also cleaned out the engine bay yesterday ready for engines and drives. ah need to paint the transom yet

one job at a time....a boat will never be done working that way.
 

waynes world

Well-known member
Joined
7 May 2011
Messages
1,568
Location
Manchester
Visit site
Well i wasnt expecting this. You maybe as i am a faffer by name faffer by nature.

I got an offer i couldnt refuse.

I have bought this ( well when i get back from away in September ) and will be selling the one i have.

Its all good ready to go and i have applied for another mooring down Port Dinorwic.

Engines are good and running, bilge needs a clean out for me wanting to see a clean one haha. I am still undecided to fit the rebuilt engines i have as these are AQ115 and mine being AQ130. Or i just fit the twin carb setup off my engines for extra 10knots haha.

I will see when i get it here about that.

So Faffer Fury is up for sale as a shell. keeping the drives and everything to match with the engines i have.

I decided on this as i have so much on work wise and only a couple weekends a month to chill. And price was not much more than the canopy for the project boat alone.

I need to look for some half decent not mad priced navigation gear now for next season when i hoe i can get a mooring back at Port Dinorwic.

Going to miss faffing but then cant wait to chill again.


359901947-992392102073901-3466610253576204775-n.jpg

333636578-165672799567016-957991522241185157-n.jpg


368401031-1508020296689224-9052111448106341202-n.jpg
346096376-229058803357928-3083073129729824619-n.jpg
 
Top