Avon Dinghy valve leak

Quandary

Well-known member
Joined
20 Mar 2008
Messages
8,200
Location
Argyll
Visit site
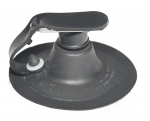
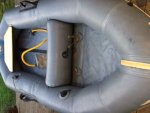
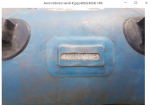
Our Avon Redcrest is now 45 years old and has had a fairly tough life having survived two kids and a dog. It is kept inflated across the transom of the boat in season and stored outside in winter. In recent years one of the original A4 Leafield valves has started to leak and is dependent on the rubber stopper to keep the air in. In the past I have been able to cure this by flushing with soapy water but not this year, I suspect the metal valve seat may be corroded and rough and it now loses pressure quite rapidly, unless the pressure is kept very high which is then not good on hot days when I think it is over hard . I could get a repair kit but that would mean two different vales to maintain. Taking account of its age I thought that perhaps I could get another couple of seasons out of it by drying out the valve and applying something like a heavy silicone grease to the seat to seal the valve.
Anyone tried anything like this?
 

dancrane

Well-known member
Joined
29 Dec 2010
Messages
10,105
Visit site
I have exactly the same problem with an elderly Redstart.

Until reading this, it never occurred to me that the valve could be revived...I was just going to rely on the stopper.

What exactly does one do with the Polymarine sealant?
 

neil_s

Well-known member
Joined
28 Oct 2002
Messages
1,534
Location
Chichester
Visit site
It's a bit fiddly, but you can replace the rubber 'mushroom' in the valve. Polymarine have them. You need to thread a piece of thin string through the central hole in the valve so that the new mushroom can be pulled into place from outside the dinghy! You can also clean the metal valve seat with a bent cotton wool bud. You need to push a piece of stiff wire down the middle of the bud to make it keep the bent shape. I used IPA on the bud - Pollymarine do a specialist cleaner, though.
 

dancrane

Well-known member
Joined
29 Dec 2010
Messages
10,105
Visit site
Thanks Neil, sounds difficult but worth doing. (y)

Possibly we're not talking about the same valve. Youtube shows disassembly of a plastic Leafield valve, here:


But my Avon valves don't look like that - they're small black rubbery things, visible below...are those changeable too?

49968092518_8846c7a574_c.jpg
 
Last edited:

Quandary

Well-known member
Joined
20 Mar 2008
Messages
8,200
Location
Argyll
Visit site
Try Polymarine sealant - seemed to cure my leaking valve.

Can you give me a bit more detail on that? I understood the sealant was stuff you put into the chambers to cure porous walls, is there another kind of stuff that will seal a valve without permanently closing it? Polymarine seem to suggest I replace the valve with a B7 or similar, I am hoping to avoid doing that, two of the three original A4s have lasted 45 years without leaks.
I could cut out a bit of fabric insert a doubler with a new valve in it, I am hoping to avoid doing that. I did consider doing what Neil suggests in post 4 but thought there was a fair chance of spoiing the valve.
Part of my problem is that Polymarine think I am in the Highlands and want to charge me close to £20 a time for even very small packages. I try to avoid doing business with companies that will not use Royal Mail for stuff small enough to go in an envelope.
Last week an Ebay seller tried adding £41 to the price of a 125 cc. tin of hypalon adhesive.
 

LeaAvonRedseal

New member
Joined
3 May 2021
Messages
9
Visit site
If so I would welcome some advice... I have a 45 year old dingy which came with a new Valve to be fitted but I'm hesitant to attempt it in case I mess it up
 

White socks

Member
Joined
18 Apr 2021
Messages
38
Visit site
Anything on a rib, or dinghy tube can be replaced.
If you don’t want to put modern easily serviced valves in and use the old antique types they can be done.
You will need a white China graph pencil , 80 grit Emery cloth, heat gun , glue, 1” paintbrush , a small paint scrapper with the corners rounded off and a small roller, metal best but plastic ok too a couple of clear sandwich bags and thinners or cleaner to suit the glue your going to use.
id Recommend bostik glue and bostik 501 cleaner.
I’ll try and explain as best I can......
Deflate the boat to do the job
1. Draw around the outer grey hypalon collar inside and outside edge.
2. Put a mark anywhere around the grey collar , this will be a relocation mark for when you restick it.
3. Gently heat the grey collar till it’s nice and warm. ( don’t put the heat gun close or leave it to blister the hypalon)
4. Peel the grey collar off the tube and valve. Try not to stretch the hypalon material
5. Now gently heat the valve, just enough to soften the glue and start peeling the tube material off the black valve. I use a small paint scrapper with the corners rounded off smooth to make it easy.
6. Take note of the measurement on the old valve of how much glue is on, prob 15-20mm.
Now use China graph to mark this on new valve.
7. Abrade this marked area with Emery cloth so it’s nice and rough.
8. Using the Emery cloth you now need to abrade inside of the tube, where it’s going to stick to the new valve.
No need to be precise always best to over do it than to under abrade.
9. Apply one coat of glue to the abraded area of valve and inside of tube.
I cut the bristles down to about 30 mm to control glue easily.
Keep glue coats thin, it won’t stick better because you put more glue on.
Let these coats go touch dry.
10. Apply second coat of glue,
11. Once it’s slightly tacky you can place some clear plastic strips on to glue prior to placing it in tube. This prevents it sticking where you don’t want it to!( small sandwhich bags ideal)
Now you need to place the valve in the tube, make sure it’s right way round.
Peel back the plastic in sections and bond the tube to the valve.
If you get things stuck wrong just heat gently and seperate of use a bit of cleaner on a rag to reactivate the glue.
Highly recommend using a small roller to apply pressure to the glued areas
12. Once you have bonded the tube to the valve leave it to dry a while.
Now you need to place the grey collar back on and draw around the inside to mark the next area to abrade.
13. Now abrade the area on tube and valve and the backside of the grey collar.
14. Apply first coat of glue to tube, valve and collar and leave to go touch dry.
15. Apply second coat and wait for it to go tacky, once ready start at the location mark you made in step 2. And stick the collar to tube and valve.
Again applying pressure with a roller will help get a really good bond.
16. Leave to dry for 20-30 mins, clean up any excess glue from the edges of the collar, either with cleaner or by gently rubbing with a paint scrapper with corners rounded smooth.
Now inflate the tube almost full, then after a while fully inflate and you should be good to go ?
If you get stuck give me a shout prob easier to talk you through it.
 

LeaAvonRedseal

New member
Joined
3 May 2021
Messages
9
Visit site
Anything on a rib, or dinghy tube can be replaced.
If you don’t want to put modern easily serviced valves in and use the old antique types they can be done.
You will need a white China graph pencil , 80 grit Emery cloth, heat gun , glue, 1” paintbrush , a small paint scrapper with the corners rounded off and a small roller, metal best but plastic ok too a couple of clear sandwich bags and thinners or cleaner to suit the glue your going to use.
id Recommend bostik glue and bostik 501 cleaner.
I’ll try and explain as best I can......
Deflate the boat to do the job
1. Draw around the outer grey hypalon collar inside and outside edge.
2. Put a mark anywhere around the grey collar , this will be a relocation mark for when you restick it.
3. Gently heat the grey collar till it’s nice and warm. ( don’t put the heat gun close or leave it to blister the hypalon)
4. Peel the grey collar off the tube and valve. Try not to stretch the hypalon material
5. Now gently heat the valve, just enough to soften the glue and start peeling the tube material off the black valve. I use a small paint scrapper with the corners rounded off smooth to make it easy.
6. Take note of the measurement on the old valve of how much glue is on, prob 15-20mm.
Now use China graph to mark this on new valve.
7. Abrade this marked area with Emery cloth so it’s nice and rough.
8. Using the Emery cloth you now need to abrade inside of the tube, where it’s going to stick to the new valve.
No need to be precise always best to over do it than to under abrade.
9. Apply one coat of glue to the abraded area of valve and inside of tube.
I cut the bristles down to about 30 mm to control glue easily.
Keep glue coats thin, it won’t stick better because you put more glue on.
Let these coats go touch dry.
10. Apply second coat of glue,
11. Once it’s slightly tacky you can place some clear plastic strips on to glue prior to placing it in tube. This prevents it sticking where you don’t want it to!( small sandwhich bags ideal)
Now you need to place the valve in the tube, make sure it’s right way round.
Peel back the plastic in sections and bond the tube to the valve.
If you get things stuck wrong just heat gently and seperate of use a bit of cleaner on a rag to reactivate the glue.
Highly recommend using a small roller to apply pressure to the glued areas
12. Once you have bonded the tube to the valve leave it to dry a while.
Now you need to place the grey collar back on and draw around the inside to mark the next area to abrade.
13. Now abrade the area on tube and valve and the backside of the grey collar.
14. Apply first coat of glue to tube, valve and collar and leave to go touch dry.
15. Apply second coat and wait for it to go tacky, once ready start at the location mark you made in step 2. And stick the collar to tube and valve.
Again applying pressure with a roller will help get a really good bond.
16. Leave to dry for 20-30 mins, clean up any excess glue from the edges of the collar, either with cleaner or by gently rubbing with a paint scrapper with corners rounded smooth.
Now inflate the tube almost full, then after a while fully inflate and you should be good to go ?
If you get stuck give me a shout prob easier to talk you through it.

That's a fantastic answer
I couldn't have asked for a better description,The valve I have got from the previous owner is a new one but has had a hypalon ring added already so some of the steps you are describing may have been done in a different order , I will attach pictures of exactly what iIhave. Thank you very much for your help .
??

valve.jpgvalve back.jpg
 

LeaAvonRedseal

New member
Joined
3 May 2021
Messages
9
Visit site
Is your choice of glue through your own experience or based on cost ?.. most of the YouTube video's I have looked at are talking about a two part hypalon adhesive such as ToobBond 2-Part Hypalon Adhesive Glue RIB Inflatable Boat Repair ... i have looked at a few glues but I am happy to take advice from someone who knows what works at a good price Have I got the right thing you recomended in the Evostick glue and cleaner.png ?
 

Attachments

  • ribstore 2 part adhesive.png
    ribstore 2 part adhesive.png
    235.8 KB · Views: 6
  • Evostick glue and cleaner.png
    Evostick glue and cleaner.png
    104.4 KB · Views: 11
  • 2990 Hypalon Adhesive, 2 Part, 250ml Tin.png
    2990 Hypalon Adhesive, 2 Part, 250ml Tin.png
    211.3 KB · Views: 7

LeaAvonRedseal

New member
Joined
3 May 2021
Messages
9
Visit site
As you can see in these pictures is an old Dingy now 1975 I believe from the serial #. So im not intending anything to challenging or any sea use ? just a potter up the lea and stort navigation on a warm day :giggle:? Max ten yards from the bank
 

Attachments

  • s-l500.jpg
    s-l500.jpg
    25.1 KB · Views: 14
  • serial #.png
    serial #.png
    371.1 KB · Views: 13

LeaAvonRedseal

New member
Joined
3 May 2021
Messages
9
Visit site
Has Anyone used " ALPHA S2000 A / B TWO PART POLY-CHLOROPRENE" from " 4Bearings " before ? . the attached .pdf file is an impressive read a lot of military tests done and passed with flying colors
and at a very good price and free delivery on Ebay ....and no I dont work for them ..LOL ?
 

Attachments

  • ALPHA S2000 A  B TWO PART POLY-CHLOROPRENE BASED ADHESIVE LATEX GLUE .png
    ALPHA S2000 A B TWO PART POLY-CHLOROPRENE BASED ADHESIVE LATEX GLUE .png
    292.4 KB · Views: 12
  • 109-9054_TDS.pdf
    33.1 KB · Views: 3

White socks

Member
Joined
18 Apr 2021
Messages
38
Visit site
Yes 2402 is the one I recommend.
I worked for RNLI for 7 years doing the tube refits on every inshore boat, made the self righting bags, stuck all the tube fittings etc day in / out.
If there was better adhesive they would use it, even the new rib tubes are bonded with it so use with confidence.( but if you feel others are good of course use them )
That additional piece on the valve is an internal patch, you will need to abrade it well before gluing.
use the plastic bags to cover it prior to inserting into the tube and peel a section away then apply pressure, rollers really make the difference when using contact adhesive.
Once it’s stuck add the external collar as described previously.
 

LeaAvonRedseal

New member
Joined
3 May 2021
Messages
9
Visit site
Yes 2402 is the one I recommend.
I worked for RNLI for 7 years doing the tube refits on every inshore boat, made the self righting bags, stuck all the tube fittings etc day in / out.
If there was better adhesive they would use it, even the new rib tubes are bonded with it so use with confidence.( but if you feel others are good of course use them )
That additional piece on the valve is an internal patch, you will need to abrade it well before gluing.
use the plastic bags to cover it prior to inserting into the tube and peel a section away then apply pressure, rollers really make the difference when using contact adhesive.
Once it’s stuck add the external collar as described previously.
That's Great
Thanks for the help and advice (y)
 

FairweatherDave

Well-known member
Joined
28 Sep 2009
Messages
1,970
Location
Solent
Visit site
As you can see in these pictures is an old Dingy now 1975 I believe from the serial #. So im not intending anything to challenging or any sea use ? just a potter up the lea and stort navigation on a warm day :giggle:? Max ten yards from the bank
Our Redstart looks much like yours. I'm happy using it for a bit more than that although I'm still inside Chichester harbour when I get to our mooring. But I am curious how you are working out the age from the serial number? Do you have a link?
PS Whitesocks, your guide to repair looks really useful ....thanks for posting
 

LeaAvonRedseal

New member
Joined
3 May 2021
Messages
9
Visit site
Our Redstart looks much like yours. I'm happy using it for a bit more than that although I'm still inside Chichester harbour when I get to our mooring. But I am curious how you are working out the age from the serial number? Do you have a link?
PS Whitesocks, your guide to repair looks really useful ....thanks for posting
Yeah that's what I have been lead to believe... and it seems to be about right as I also have a Redseal withe the later type vales and its last two digits in the serial # end in 85
 
Top